
User Guide


Radio
Communication
Test Set
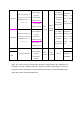
SSG Output:
-119dBm (Level 3)
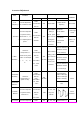
19. SQ Open
Enter in turn the item “C”
(Level 9 on), “D” (Level 3
on); adjust CH to “0.”, “1.”,
“2.”, “3.”, “4.”
SSG Output:
-112dBm (Level 9)
No need to
adjust software
setting at SQ
Level 3/9;
press [P2]
twice to save.
Continuously
press[P2] key
twice for CPU
reading and
writing; SQ level
Radio
Communication
Test Set
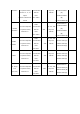
SSG Output:
-123dBm (Level 3)
20. SQ Close
Enter in turn the item “C”
(Level 9 off), “D” (Level 3
off); adjust CH to “0.”, “1.”,
“2.”, “3.”, “4.”
SSG Output:
-115dBm (Level 9)
ANT
SP Jack
Adjust
software
setting
No need to
adjust software
setting at SQ
Level 3/9;
press [P2]
twice to save.
Continuously
press[P2] key
twice for CPU
reading and
writing; SQ
level
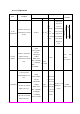
21. Distortion DIS≤5%
22. S/N
1. Channel: RX Center
Radio
Communication
Test Set
SSG Output:
-60dBm
ANT
SP Jack
Filter:
0.3-3.0KHz
Check
S/N≥47 (W)
S/N≥42 (N)
Note: The radio must be covered with aluminum chassis during the adjustment of
sensitivity, Tx power, signalling waveform, frequency deviation, Rx Squelch. Connect an
RF power meter to the antenna connector during transmission. Connect the SINAD meter
with 16ohm load to the external [SP] Jack.