
User's Manual


23
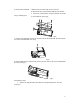
Fig.7
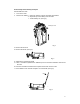
2. Assemble the small PCB:
a. Insert the flexible PCB into the socket on the small PCB and lock it up.
b. Insert the bottom of the small PCB into the underside of the two tabs under the
case.
c. Tighten the screws. (See fig.8)
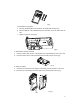
Fig.8
3. Assemble the chassis and PCB
a. Insert the switch shaft in front of the PCB into the corresponding holes on the case.
b. Press the bottom of the chassis downwards until a click is heard. (See fig.9)
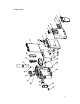
Fig.9
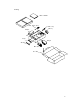
4. Attach the battery:
a. Insert the two extensions at the bottom of the battery into the two slots on the case.
b. Press the top of the battery toward the radio until a click is heard. (See fig.10)
Fig.10
Slot