
User's Manual


16
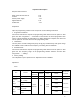
Adjustment Description
Required Test Instrument
Radio communication test set 1 set
Scanner 1 set
3A/10V power supply 1 set
Digital voltmeter 1 set
3A Ammeter 1 set
Preparation
Open the programming software in PC and operate as the following instructions.
1. Programme Download:
Connect the radio with the computer via programming cable. And then turn the power on. LED
glows red. Click “Programme”
→
“Download” on the interface to choose programme. Click
“Open” to begin download and LED flashes red. When download is complete, click “End” and
turn the power off. And then disconnect the programming cable.
2. Initialization:
Turn the power on while holding down [PTT] and [A] key simultaneously. LED glows orange
and a BEEP sounds. Radio channel frequency and setting data are initialized.
3. Destination Set:
Connect the radio with the computer via programming cable. And then turn the power on. LED
glows red. Set “frequency range” on the programming software interface. And then click
“Programme” → “ Writing”.
4. Factory Setting
The compander is open. Squelch level 2. Adjustment mode is disabled.
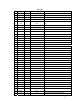
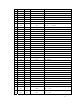
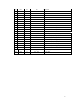
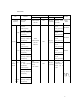
Adjustment
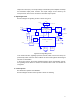
VCO
Measurement Adjustment
Item Condition
Test
Instrument
Terminal Part Method
Specification/
Remarks
1. Setting Power supply 7.5V
1.Turn to CH1. Press
PTT. TX High
Check
3.3V±0.2V
2.Transmit
VCO loc
k
voltage
2. Press PTT again.
TX Low
Check
1.0V±0.4V
1. Turn to CH2. Press
PTT. TX High
Check
3.1V±0.2V 3. Receiving
VCO loc
k
voltage
2. Press PTT again.
TX Low
Digital
Voltmeter
CV
TC350
TC351
Check
1.0V±0.4V