THANK YOU! We are grateful for your purchase of HYT product. We believe this easy–to-use radio will provide you with dependable and reliable communications. This HYT portable two-way radio is a precision device. Treat it with care, and you will enjoy years of reliable operation.
Contents User Safety, Training, and General Information Compliance with RF Energy Exposure Standards Important Note: FCC Information FCC Compliance Precautions Product Inspection Battery Information Accessory Installation Battery Antenna Belt Clip Earplug Cover External Earphone/Microphone (optional) Getting Started Features and Operation Turn on/off the radio Adjust the Volume Select Channel Transmit Receive Monitor Repeater/Talk Around Repeater/ Reverse Frequency Selectable Power Scan Music Call Emergenc
User Safety, Training, and General Information READ THIS IMPORTANT INFORMATION ON SAFE AND EFFICIENT OPERATION BEFORE USING YOUR HYT PORTABLE TWO-WAY RADIO. Compliance with RF Energy Exposure Standards Your HYT two-way radio is designed and tested to comply with a number of national and international standards and guidelines (listed below) regarding human exposure to radio frequency electromagnetic energy.
Body-worn operation z Always place the radio in an HYT approved clip, holder, holster, case, or body harness for this product. Use of non-HYT-approved accessories may exceed FCC RF exposure guidelines. Antennas & Batteries Use only HYT approved, supplied antenna or HYT approved replacement antenna. Unauthorized antennas, modifications, or attachments could damage the radio and may violate FCC regulations. z Use only HYT approved, supplied batteries or HYT approved replacement batteries.
Important note: FCC Information FCC Compliance This equipment has been tested and found to comply with the limits for a Class B digital device, pursuant to part 15 of the FCC Rules. These limits are designed to provide reasonable protection against harmful interference in a residential installation. This equipment generates, uses and can radiate radio frequency energy and, if not installed and used in accordance with the instructions, may cause harmful interference to radio communications.
Reorient or relocate the receiving antenna. Increase the separation between the equipment and receiver. Connect the equipment into an outlet on a circuit different from that to which the receiver is connected. Consult the dealer or an experienced radio/TV technician for help. FCC Requirements Your radio must be properly licensed Federal Communications Commission prior to use. Your HYT Wireless dealer can assist you in meeting these requirements.
Product Inspection Thank you for your use of HYT portable two-way radio TC3000. Before use, you are recommended to inspect the product as follows. First check the shipping carton for any signs of damage. If any damage has occurred, please contact your dealer immediately. Confirm the supplied product against the packing slip to assure accuracy. Available Accessories Item Qty.
Battery Information Initial use of the battery The battery is not fully charged at the factory. Please charge the new battery before initial use. In general, the battery should be charged for 12 hours before initial use, which is suitable for Ni-Cd, Ni-MH or Li-ion battery charged with slow or rapid charger. It is recommended to take this step during the first three times of use. When the battery power is low, it needs to be charged. Applicable Battery Packs Charge only the HYT approved battery packs.
be stored after full charge to avoid the damage to the battery because of over-discharge. 2. Take out the battery stored for about 6 months to charge it, to avoid the influence of electrolyte over-discharge on battery capacity. 3. Notice the ambient humidity and temperature for the battery storage. Please store it in cool dry area with room temperature, to decrease self-discharge.
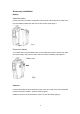
Accessory Installation Battery Attach the battery Insert the two tabs on bottom of the battery into the slots at the bottom of the radio. Push top of the battery towards the radio until a click is heard. (See figure 1) Fig.1 Remove the battery Turn off the radio. Push the battery latch on the middle of the radio to remove the upper side of the battery away from the radio. And then remove the battery. (See figure2) Battery Latch Fig.
Install Remove Belt Clip Attach Belt Clip Align the slot of the belt clip with the T-slot at the battery cover and press the belt clip downwards until it is locked. (See figure 3) Fig.3 Remove the belt clip Press the disassembly release upwards with a key until it releases and then push the belt clip upwards with your thumb to remove it. (See figure 4) Fig.
Earplug Cover Rotate the screw at the bottom of the cover counter clockwise by a screwdriver until it is out of the nut to remove the Earphone/Microphone jack cover. (See figure 5) Fig.5 External Earphone/Microphone (Optional) Insert the tab at the bottom of the earphone/microphone into the slot on top of the radio. (See figure 6). Align the nuts at top of the earphone/microphone with the holes on the radio and then turn them clockwise to fasten. Fig.
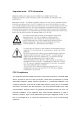
Getting Started (1) Antenna Used to transmit/receive signals. (2) LED Following table indicates LED indication and corresponding radio status. LED Status No display Standby Green Receive Red Transmit Flashing green Scan Flashing red Low battery voltage Flashing orange Call waiting (3) Channel Selector Used to select wanted channel.
(8) Microphone Used to input sounds. (9) External Jack Used to connect with external earphone or programming cable. (10) Belt Clip Used to clip the radio on your belt. (11) Battery Pack (12) PTT key Press and hold PTT, radio operates in transmit mode. Release PTT, radio returns to receive mode. (13) Programmable Key [B] (14) Programmable Key [C] The following table shows the key function when 1. Short press; 2. Long press; 3. Hold down and monitor.
Features and Operation Note: TC3000 provides a series of audible alert tones.
3. Press PTT and speak into the microphone with your mouth 2.5-5 centimeters away from the radio. LED glows red during transmission. 4. Release PTT key to finish speaking. Receive 1. Turn on the radio. 2. Rotate “Channel Selector” knob to select wanted channel. 3. Adjust the volume. 4. Then you can receive a valid call. LED glows green during receiving. Monitor 1. Press MONI key to monitor the current channel. 2. Release MONI key to exit.
Scan Scan feature allows you to monitor all channels. When scan feature is enabled, the radio will detect all channels. If an active channel is detected, the radio will remain on that channel and you will be able to hear the conversation. Disable/Enable Scan Feature 1. Press scan key, scanning begins. 2. Press scan key again, scanning ends. LED flashes green in scan mode. Callback Pressing PTT during scanning can callback on the callback channel.
1. VOX feature enables you to transmit automatically by speaking into the microphone. 2. Transmission stops automatically when you stop speaking. 3. Press PTT to disable VOX feature. 4. Turn the radio on again, VOX feature will be activated. Built-in Modem MSK modulator with speed of 1200/2400bit/s inside the radio supports data transmission. Please contact your dealer for details. Low Battery Alert When the battery voltage becomes low, the red LED will flash and beeps sound.
Group Call: A call generated by an individual radio to a radio group. Broadcast: A unidirectional call generated by an individual radio to a whole system. You need to do some settings via programming software to use HDC1200. ¾ Select HCD1200 in “Optional Signalling" box in channel edit window. And select corresponding call list for CALL1 and CALL2. Set the selected system and call list. Set the programmable keys for CALL1 and CALL2. Set the squelch mode (logic relationship).
Troubleshooting Guide Trouble z No power z Power doesn’t last long even if fully charged. Can’t talk to or hear other users in your group. z z z Voice of other users (non-group user) appears on the channel. z Solution Battery may be used up. Please replace or recharge the battery. Battery may not be attached properly. Remove the battery and attach again. Battery life cycle is over. Please replace it with a new one. Make sure you are using the same frequency and CTCSS tone as other users in your group.
Optional Accessories Dual Pocket Rapid Charger CH20L01 Multi-unit Charger MCL01 (for Li-Ion batteries) Remote (for Li-Ion batteries) Speaker Receive-only Earpiece with Transparent Microphone SM08N1 Acoustic Tube (use with Remote Speaker Microphone SM08) ESS04 Receive-only Earpiece (for use with Remote Switch Power (exclusive to dual Speaker Microphone SM08) ESS01 pocket rapid charger) PS2001 Earbud with Transparent Earbud with in-line VOX ESN01 Acoustic Tube EAN01 Earset with Boom Mic
Throat-vibrating Earpiece with Headset ECN02 Transparent Acoustic Tube ELN01 Leather Carry Case (applicable 系列) to(适用于 TC3000TC3000 series) LCBN09 Transparent Waterproof Bag LCBY03 Chest Pack LCBN03 22
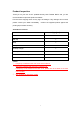
Frequency Chart Model: Serial Number: Channel Transmit Frequency Transmit CTCSS Receive Frequency Receive CTCSS 1 2 3 4 5 6 7 8 9 10 11 12 13 14 15 16 Key Function Table Key Briefly Press Press and Hold Key A Key B Key C HYT endeavor to achieve the accuracy and completeness of this manual, but cannot guarantee its accuracy at all times. All the above specifications and design are subject to change by HYT without notice.