
User's Manual


TC-700 Disassembly and Assembly for Repair
30
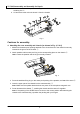
5. Remove the solder of the positive and negative terminal on the battery’s connector with a
soldering iron ⒀.
6. Lift and remove the main unit board ⒁ from the chassis.
Fig. 3
Cautions for assembly:
4. Attaching the case assembly and chassis (as shown in Fig. 4, 5 & 6)
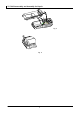
1. Make sure the water-proof packing attached to the circumference of the chassis is securely
inserted in the groove of the chassis ①.
2. Attach speaker and its water-proof ring to the corresponding place on the chassis ②.
Note: ensure the speaker and the ring is securely inserted.
Fig. 4
3. Press the stainless fixing ring on the water-proof packing of the speaker, and attach the screw ③.
4. Insert the upper part of the chassis into the case assembly ④.
Note: Make sure the speaker lead wire does not press on the microphone magnetic core.
5. Press downward the chassis ⑤, enabling the chassis and the case to fit together.
Note: If the packing of the SP/MIC does not come to the correct position after attaching the
chassis to the case assembly, reposition the packing with your fingers.