THANK YOU! We are grateful for your purchase of HYT product. We believe this easy–to-use radio will provide you with clear and reliable communications in high efficiency. This HYT portable two-way radio is a precision device. Treat it with care, and you will enjoy years of reliable operation.
Contents User Safety, Training, and General Information Compliance with RF Energy Exposure Standards FCC Compliance Precautions Product Inspection Battery Information Accessory Installation Attaching/Removing the Battery Attaching/Removing the Antenna Attaching/Removing the Belt Clip Attaching Remote Earphone/Microphone Getting Acquainted Programmable Auxiliary Functions Basic Operation Advanced Operations Auto Dial Emergency Lone Worker Man Down (optional) Monitor/Squelch Off Scan SQL Check & Adjust Voice
Communication Range Alarm Background Operations Time-out Timer (TOT) Busy Channel Lockout (BCL) and Busy Tone Lockout (BTL) Battery Save Low Battery Alert CTCSS/DCS DTMF 2-Tone/5-Tone Signaling Control PTT ID Troubleshooting Guide Care and Cleaning Optional Accessories Frequency Chart 3
User Safety, Training, and General Information READ THIS IMPORTANT INFORMATION ON SAFE AND EFFICIENT OPERATION BEFORE USING YOUR HYT PORTABLE TWO-WAY RADIO. Compliance with RF Energy Exposure Standards Your HYT two-way radio is designed and tested to comply with a number of national and international standards and guidelines (listed below) regarding human exposure to radio frequency electromagnetic energy.
Transmit and Receive To transmit (talk), push the Push-To-Talk (PTT) button; to receive, release the PTT button. Hand-held radio operation Hold the radio in a vertical position with the microphone one to two inches (2.5 to 5 cm) away from the lips. Body-worn operation z Always place the radio in an HYT approved clip, holder, holster, case, or body harness for this product. Use of non-HYT-approved accessories may exceed FCC RF exposure guidelines.
receiver is connected. Consult the dealer or an experienced radio/TV technician for help. FCC Licensing Requirements Your radio must be properly licensed Federal Communications Commission prior to use. Your HYT Wireless dealer can assist you in meeting these requirements. Your dealer will program each radio with your authorized frequencies, signaling codes, etc., and will be there to meet your communications needs as your system expands.
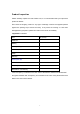
Product Inspection Please carefully unpack the radio. Before use, it is recommended that you inspect the product as follows. First check the shipping carton for any signs of damage. Confirm the supplied product against the packing slip to assure accuracy. If any items are missing or have been damaged during shipment, please file a claim to the carrier immediately. Supplied Accessories Item Qty.
Battery Information Battery Charging Information The battery is not charged at the factory. Batteries must be fully charged before initial use or if they have not been used for some period of time. The battery capacity will be optimum only after being charged/discharged for two or three times. When the battery power is low, it either needs to be charged or replaced with a new one. Applicable Battery Packs Charge only the battery packs listed below.
Charging the Battery When radio LED flashes red and three Beeps sound within 30 seconds after the battery is installed, that means battery power is low. Please charge the battery. You are recommended to use HYT-approved, supplied charger; Charger LED will indicate the charging status. LED Status Red LED glows Charging Green LED glows Done 1. Plug the power cord into the adapter. (See Fig. 1) Fig. 1 2. Plug the DC socket of adapter into the DC jack on back of the charger. (See Fig. 2) Fig. 2 3.
Fig. 4 5. Make sure the battery is well connected with the charger connectors; when charging starts, the red LED glows. 5. The green LED glows when the battery is fully charged in about 3 hours, please remove the battery or the radio with battery from the charger. *Notes: *Charger LED may flash if you connect the charger to power source before inserting the battery. *After removing the battery from charger, do not insert the battery or another one into charger until charger LED glows green.
Accessory Installation Attaching the Battery 1. Push the battery along the guide on back of the radio until the battery latch at the bottom of the radio locks. Removing the Battery 1. Turn off the radio. 2. Pull back the battery latch. 3. Slide the battery away from the radio. Attaching the Antenna 1. Screw the antenna into the connector on the top of radio by holding the antenna at its base. 2. Turn the antenna clockwise to fasten it. Removing the Antenna 1.
Getting Acquainted (1) PTT Key ●To transmit, hold down the PTT key and speak into the microphone; Release it to receive. (2) SK1 (Side Key 1) ●Programmable key (3) SK2 (Side Key 2) ●Programmable key (4) Antenna (5) Microphone (6) Speaker (7) TK (Top Key) ●Programmable key (8) Channel Selector Knob ●Rotate the knob to select channel 1-16. (9) Power/Volume Control Knob ●Rotate the knob clockwise until a “click” sounds to turn on the radio; Rotate it counter clockwise to turn off the radio.
the volume. (10) LED Indicator Radio status is indicated by LED state/color or alert tone.
Programmable Key 4W three Beeps Enter one Beep Exit two Beeps (11) Speaker/Microphone Jack (12) Belt Clip (13) Battery (14) Screws (belt clip) (15) Battery Latch 14
Programmable Auxiliary Functions Your dealer can program each of the TK, SK1, SK2 keys with one of the following auxiliary functions. Please refer to their descriptions in “Advanced Operation”.
Basic Operation 1. Turn On the Radio: Rotate the Power/Volume Control knob clockwise until green LED flashes one time. ● A BEEP sounds if alert tone is set your dealer. 2. Monitor: press the preprogrammed MONI key or SQ OFF key to hear background noise, then turn the Power/Volume Control knob to adjust the volume. 3. Select Channel: Rotate Channel Selector Knob to select your desired channel; the radio will report the current channel number when one is selected. 4.
Advanced Operations The following functions are programmable by your dealer, as described above. Auto Dial Press the preprogrammed Call1/Call2 key to transmit the stored DTMF code, 2-tone /5-tone code. Emergency Program the programmable key (TK) with emergency feature. When activated, the emergency feature enables the radio to emit emergency alarm or send ENI (Emergency Number Identity) / background tone to companions or system (as selected by user via programming software).
Monitor/Squelch Off ● Monitor Toggle Press the preprogrammed Monitor Toggle key to enable the signaling squelch feature; press it again to exit. ● Monitor Momentary Press and hold the Monitor Momentary key to enable the signaling squelch feature; release it to exit. ● Squelch Off Press the preprogrammed Squelch Off key to activate the noise squelch feature; press it again to exit. ● Squelch Off Momentary Press and hold the Squelch Off Momentary key to activate the noise squelch feature; release it to exit.
radio exits from Scan mode or restarts. ■ You cannot delete the priority channel, if one has been set. ■ You cannot delete a channel if there will be less than 2 channels available for scanning. SQL Check & Adjust Program one of the programmable keys with this feature; Press and hold the preprogrammed key to hear the squelch level of the current channel. Briefly press the key to adjust the SQL. Squelch will be increased by one level and setting is saved each time when you press the key.
Press and hold the preprogrammed key, Beep tone corresponds to power level, a Beep indicates Low power; two Beeps indicate Middle power and three Beeps indicate High power. Briefly press the key to adjust the power level; Power will be increased by one level and setting is saved each time when you press the key. Whisper Press the preprogrammed Whisper key, you would be clearly heard even if you speak with low voice. Press it again to exit.
Background Operations Time-Out-Timer (TOT) Time-Out-Timer is used to prevent someone from using the same channel for a long time. If the transmission exceeds the time preset by your dealer (default is 1 minute), transmission will stop and an alert tone will sound. To stop the alert tone, release the PTT key. Press the PTT key again to resume transmitting. Your dealer can program a warning function to alert you before the TOT elapses.
Low Battery Alert Low Battery Alert alerts you to recharge or replace the battery. When the battery voltage becomes low, radio LED will flash red and three Beeps sound within 30 seconds, indicating to recharge or replace the battery with a new one. CTCSS/DCS When CTCSS/DCS is set, the squelch feature will be opened only when signals containing the matching tone or code are received. Likewise, your signals will be received only by parties using the same CTCSS/DCS signaling.
● LED glows green in decode mode, and flashes orange for a preset period of time after successful decoding. Signaling Control CTCSS/DCS AND 2-Tone/5-Tone: If both signalings are employed, the squelch feature is only opened when both match. CTCSS/DCS OR 2-Tone/5-Tone: If both signalings are employed, the squelch feature is opened when either matches. PTT ID Beginning / End of Transmission Identification signal (PTT ID) is used to connect/disconnect the radio with repeaters and telephone systems.
Troubleshooting Guide Trouble Solution No power *Battery may be used up. Please recharge or replace the battery. *The battery may not be properly installed. Remove the battery and attach it again. Power doesn't last long even if fully *Battery life is over, please replace it with a new one. charged Can't talk to or hear group members *Make sure you are using the same frequency and same CTCSS as your group members. *Your group members may be out of the communication range.
Optional Accessories Earset with boom microphone & in-line PTT EH-M2 Earset with in-line microphone & PTT EH-M3 Earbud with in-line microphone & PTT ES-M1 Remote speaker microphone Antenna (VHF/UHF) Frequency Chart Model: ____________________ Serial Number: ________________ Channel Transmit Frequency Transmit CTCSS/CDCSS Receive Frequency Receive CTCSS/CDCSS 1 2 3 4 5 6 7 8 9 10 11 12 13 14 15 16 HYT endeavors to achieve the accuracy and completeness of this manual, but cannot guarantee its accuracy