THANK YOU! We are grateful for your purchase of HYT product. We believe this easy–to-use radio will provide you with clear and reliable communications at peak efficiency. This HYT portable two-way radio is a precision device. Treat it with care, and you will enjoy years of reliable operation.
Contents User Safety, Training, and General Information Compliance with RF Energy Exposure Standards FCC Compliance Precautions Product Inspection Battery Information Accessory Installation Radio Overview Features and Operation Basic Operations Time-Out-Timer (TOT) Battery Save Low Battery Alert Monitor Programmable Function Key High/Low Power Compatible Channel Bandwidth 2-Tone Encode & Decode DTMF ANI CTCSS/DCS Signalling Signalling AND/OR Logic Channel Scan Busy Channel Lockout Troubleshooting Guide Car
User Safety, Training, and General Information READ THIS IMPORTANT INFORMATION ON SAFE AND EFFICIENT OPERATION BEFORE USING YOUR HYT PORTABLE TWO-WAY RADIO. Compliance with RF Energy Exposure Standards Your HYT two-way radio is designed and tested to comply with a number of national and international standards and guidelines (listed below) regarding human exposure to radio frequency electromagnetic energy.
Antennas & Batteries Use only HYT approved, supplied antenna or HYT approved replacement antenna. Unauthorized antennas, modifications, or attachments could damage the radio and may violate FCC regulations. Use only HYT approved, supplied batteries or HYT approved replacement batteries. Use of non- HYT -approved batteries may exceed FCC RF exposure guidelines.
Precautions • • Only qualified technicians are allowed to maintain this product. Do not use the radio or charge a battery in explosive areas such as coal gas, dust, steam, etc. • • • Switch OFF the radio while refueling or parking at gas station. Do not modify or adjust this radio without permission. Do not expose the radio to direct sunlight over a long time, nor place it close to heating source. • Do not place the radio in excessively dusty, humid areas, nor on unstable surfaces.
Product Inspection Please carefully unpack the radio. Before use, it is recommended that you inspect the product as follows. First check the shipping carton for any signs of damage. Confirm the supplied product against the packing slip to assure accuracy. If any items are missing or have been damaged during shipment, please contact your dealer immediately. Supplied Accessories Item Qty.
Battery Information Battery Charging Information The battery is not charged at the factory. Batteries must be fully charged before initial use or if they have not been used for some period of time. The battery capacity will be optimum only after being charged / discharged for two or three times. When the battery power is low, it either needs to be charged or replaced with a new one. Notices: Do not short the battery terminals or dispose of the battery by fire.
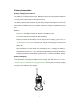
Accessory Installation Attaching the Battery 1. Turn off the radio. 2. Insert the tabs at the bottom of the battery into the slots at the bottom of the radio chassis. 3. Press the top of the battery towards the radio until a “click” is heard. (See Figure 1) ② ① (Fig. 1) Removing the Battery 1. Turn off the radio. 2. Push the battery latch on the back panel towards the top of the radio. 3. Pull the top of the battery away from the radio chassis, and lift the battery from the radio.
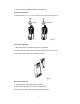
2. Turn the antenna clockwise to tighten. (See Figure 3) Removing the Antenna 1.Turn the antenna counterclockwise until you can remove it. (See Figure 3) Attach 安装 Remove 拆卸 (Fig. 3) Attaching the Belt Clip 1. Align the grooves of the belt clip with those of the battery. 2. Press the belt clip downwards until the belt clip tab locks. (See Figure 4) Note: attach the belt clip before installing the battery. ① (Fig. 4) Removing the Belt Clip 1. Press the belt clip tab upwards until it releases. 2.
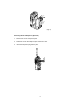
② ③ ① (Fig. 5) Attaching External Earphone (Optional) 1. Remove the cover of earphone jack. 2. Rotate the cover until earphone jack comes into view. 3. Insert the earphone plug into the jack.
Radio Overview (1) Antenna Used to transmit/receive signals. (2) LED Indicator The radio LED glows red during transmission and green during reception; The LED flashes red when battery voltage is low. (3) Channel Selector Knob (4) Power/Volume Control Knob Rotate the knob clockwise until a “click” is heard to turn the radio on, fully counter clockwise until a “click” is heard to turn the radio off. When the radio is on, turn the knob to adjust volume.
(9) External Jack (for external earphone or radio programming) Rotate the jack cover and insert accessory plug or insert programming cable into the jack to program the radio via programming software. (10) Battery (11) Belt Clip Used to clip radio on your belt. (12) Battery Latch Used to fasten and remove the battery. (13) Charging Connector Insert the battery into the charger; connect the charging connectors with those on the charger to begin charging.
Features and Operation Basic Operations 1. Turn on the radio: Turn the Power/Volume Control Knob clockwise until a “click” is heard. 2. Adjust the volume: Turn the Power/Volume Control Knob to adjust the volume. When function key is programmed with monitor feature, turn the knob while holding down the function key to adjust the volume to a comfortable level. 3. Select a Channel: Rotate Channel Selector knob to select your desired channel. 4.
■ TOT Pre-Alert Your dealer can program a TOT Pre-Alert feature to alert you just before the TOT expires. When this feature is activated, the radio will sound an alert tone at the preset TOT Pre-Alert time (1-255s before the TOT expires). Transmission will be inhibited by TOT after this time. Battery Save The Battery Save feature is enabled by your dealer to minimize the power consumption.
High/Low Power This feature is enabled/disabled by your dealer. In receive mode, press the preprogrammed High/Low Power key to toggle between high and low power. Three beeps alternating from high tone to low tone indicate that the transmit power is switched from high to low; and three beeps alternating from low tone to high tone indicate that the transmit power is switched from low to high.
The dealer can preset CTCSS/DCS signalling on all or just certain channels. Note: Although using CTCSS/DCS enables you to avoid hearing unwanted calls, it does not mean your calls will be private. Signalling AND/OR Logic Signalling "AND"/"OR" sets the audio unmute condition for any channel programmed with 2-Tone or CTCSS/DCS. 2-Tone AND CTCSS/DCS: The squelch opens only when both 2-Tone and CTCSS/DCS are received and matches the preset one on selected channel.
Troubleshooting Guide Trouble Solution No power ●Battery is low. Recharge or replace the battery. ●The battery may not be properly installed. Remove the battery and attach it again. Power doesn't last long even if ●Battery has lost its capacity, replace it with a new one. fully charged Can't talk to or hear group members ●Make sure you are using the same frequency, same CTCSS/DCS and same 2-Tone as your group members. ● Your group members may be out of the communication range.
Optional Accessories Ni-MH Battery BH-T600A Earbud Style Ear Microphone ES-M1 Regular Charger (Ni-MH) Earholder Style Ear Microphone (with tube) EH-M2 Earholder Style Ear Microphone EH-M3 Switching Power Supply Remote Speaker Microphone SM-06M01 18
Frequency Chart Model: Serial Number: Channel Transmit Transmit Receive Receive Frequency CTCSS/DCS Frequency CTCSS/DCS 1 2 3 4 5 6 7 8 9 10 11 12 13 14 15 16 HYT endeavors to achieve the accuracy and completeness of this manual. All the above specifications and design are subject to change by HYT without notice. All the reproduction and translation of this manual without authorization of HYT is not allowed.