
User's Manual

2
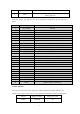
2. Structure design
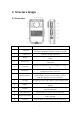
2.1 Front view
Item
Name
Description
1
IR sensor
The sensor will detect the brightness of the environment, and
then activate the IR light and switch to night vision mode.
2
Camera Lens
Full HD wide angle camera lens
3
IR light
Record clear image in HD in low light situations. 10 meters
visible.
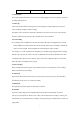
4
Battery cover
Remove this cover, you can take out the battery for
replacement
5
Cover lock
Press the lock and remove the cover, and then you can take it
out.
6
Microphone
Capture the environment voice during recording, and
communicate with the center server.
7
Working indicator
Red blinking means video recording, yellow blinking means
audio recording, solid green means standby or preview
mode.Blue light means network transmission.
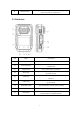
8
Laser light
Pinpointing an object from a distance, solid or blinking mode
9
Lighting
Short press the F button to enable the light for auxiliary
lighting.
10
Snapshot
Press this button to start capture the snapshots, even during
video recording mode.
11
Audio REC button
Press the button to start the audio recording only.
12
Muti-functional button
You can define this function of this button, the default one is
enable withe light.
13
SOS button
Press this button to send an alert info to the center server.