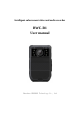
Intelligent enforcement video and audio recorder BWC-R1 User manual Shenzhen HUADEAN Technology Co.
Content 1. Introduction ................................................................................................................................. 1 2. Structure design........................................................................................................................... 2 2.1 Front view ........................................................................................................................... 2 2.2 Back view........................................................
Preface Thank you for using our products. Please read this manual carefully before using them. Please keep this operation manual for reference or consultation in the future. We do our utmost to ensure the correctness of the information in this manual. The information is changed due to product upgrade and other reasons without notice. Matters needing attention The protection level of this product reaches IP66 under IEC 60529 standard.
1. Introduction BWC-R1 is a intelligent body worn camera specifically designed for Law Enforcement. The camera features real time HD video, 1080P recording, support built-in 4G, WIFI and GPS function, and a high resolution still image capture visible on the LCD screen for instant playback, with wide angle; The rugged design is resilient to withstand demanding work environments faced by law enforcement officers, corrections, military and security detail.
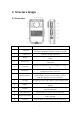
2. Structure design 2.1 Front view Item Name Description 1 IR sensor The sensor will detect the brightness of the environment, and then activate the IR light and switch to night vision mode. 2 Camera Lens Full HD wide angle camera lens 3 IR light Record clear image in HD in low light situations. 10 meters visible. 4 Battery cover Remove this cover, you can take out the battery for replacement 5 Cover lock Press the lock and remove the cover, and then you can take it out.
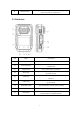
14 ON/OFF button Short press the button to open or close the lighting, long press it to power on or power off. 2.2 Back view Item Name Description 15 Speaker It’s the speaker to audio playback and voice report.
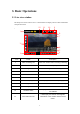
3. Basic Operations 3.1 Live view window The body worn camera LCD screen is a small monitor to display various camera information and operation status. 12 / 11 10 9 1 8 7 2 6 5 4 3 Item Name Description 1 Video recording icon Yellow icon means video recording is working. 2 Function Function prompt.
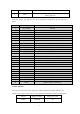
12 Defocus Current doubling Shooting parameter settings In view preview mode, tap the switch key to enter the shooting settings interface and select "Video Settings / Photo Settings" Video Settings ID Menu Options 1 Video resolution 1080P30,,720P30 2 Video quality High,Low,Medium 3 Video clip Auto,10min,20min,30min ID Menu Options 1 Photo pixel 5M,8M,10M,12M,16M,21M,32M 2 Snapshot 1PCS,2 PCS,3 PCS,5 PCS 3 Camera timer Auto,10min,20min,30min Photo Settings 3.
5 Alarm Check the SMS or picture message sent from center server 6 Other Some other functions of the camera, such as app, hot spot, pointing and so on Select the “Setup”, you will enter into all the parameters configurations, the all items are as follow: ID Menu Options 1 Pre-recording OFF,ON 2 Post-recording 10sec,30sec,1min,2min,5min,10min,30min,OFF 3 Video loop OFF,ON 4 Security password ON/OFF, default is 000000 5 Position watermark ON/OFF, 6 Screen off 30sec,1min,3min,5min,OFF
80P30 1920*1080 30 2. Video quality Select video quality based on the need of video recording. High means the best quality, which will encoding with big bit rate. 3. Video clip Video clip selection defines the length of each video segment, and this option only is used for video recording, invalid for audio recording. Sub-option: Auto, 10 minutes, 20 minutes, 30 minutes; auto means it will create a file in almost 2GB size, and the time is about one hour, depends on the video resolution. 4.
9. Security password When this option is on, you have to type in the password if you want to playback and do configurations, the default password is:000000. 9. Position watermark When the option is on, the GPS info will display in the video image, even in the recorded video and streaming video. 10. Screen off Switch off the screen after a certain time if there is any operation, which will save the power consumption. 11.
This option means you can setup the tone for the incall from other BWC or from the center server, setup it as voice or only vibration. 18. Infrared mode If the users choose auto mode, during video recording(not preview mode), the IR will work when the environment is dark, similarly, when the environment is bright, the IR will be closed automatically. 19. Location Select the location model, GPS or Beidou. 20.
It means the frequency that camera upload the GPS data to the center server. 30. Default When it is set as ON, the camera will auto-reboot to clear all the settings of menu, but all the playback files will still be in the camera. 31. About It will show the information of the camera, network status, firmware version, CAM ID and so on. Mark:For the internal battery, only when the voltage more than 3.5v, it can works when remove the main battery. 4. Device using 1.
2. Turning off the camera In preview mode, long press for 3 seconds, the camera will save the current status and power off. Meanwhile, the status indicator will turn off. 3 Recording Video In preview mode, short press to start recording. Meanwhile, the status indicator will turn red and flash, and the recording icon will turn to red. Short press again to stop recording, and the video will be saved in MP4 format automatically.
8 Parameter configuration Click HOME key to enter the menu interface,and click Setup icon to enter into the parameters configure interface, you can setup all the camera parameters here, such as resolution, network settings and so on. 9 Intercom Click HOME key to enter the menu interface,and click Intercom icon ,enter into the intercom interface , and select online users for video or voice intercom, you can finish it by sliding the end button.
1. Replace battery ① Press the battery cover lock down, and do not loose it ② Push the battery cover parallel to the direction of the arrow and remove it. 2. Charging the Battery Remark: When you recharge the body camera, please make sure it is OFF. Also, even you don’t use the camera for a long time; please recharge it every 3 months. 1.Charge the camera Connect this camera and adapter via USB cable, and connect adapter to power supply to charge the battery.
1. Charge the battery Connect the battery charger to the power supply to charge the battery. In charging status, the status indicator will turn red. Once the battery is fully charged, the status indicator will turn green. ★ As we are committed to constantly improving our products, some details may not be in conformity with the actual products. Please accept our understanding for the inconvenience caused by the actual products. FCC Compliance This device complies with part 15 of the FCC Rules.
This device is designed and manufactured not to exceed the emission limits for exposure to radio frequency (RF) energy set by the Federal Communications Commission of the U.S. Government: The exposure standard for wireless mobile phones employs a unit of measurement known as the Specific Absorption Rate, or SAR. The SAR limit set by the FCC is 1.6W/kg.