ROBOTIC VACUUM CLEANER USER MANUAL (Before using this product,please read the safety instructions below and follow all the routine safety precautions)
Content 1. Wi-Fi Setup Instructions 2.Safety Instructions 3.Product Components 3.1 Name of Parts 3.2 Products Specifications 3.3 Product feature 4. Instructions for Use 4.1 Attention 4.2 Remote Controller Instructions 4.3 Operating Instructions 5. Product Maintenance 5.1 Side Brush Cleaning and Replacement 5.2 Cleaning of Dust Box and Filter 5.3 Maintenance of Water Tank Components 5.4 Maintenance of Rolling Brush Components 5.5 Maintenance of Other Components 6. Common Faults 6.1 Common Faults 6.
Wi-Fi Setup Instructions Wi-Fi Setup Instructions Scan the QR code in Figure 1 to download and install “WeBack” APP, or download and install from other APP stores. Figure 1 Open App, directly log in if you have a “WeBack” account; if not, you can select “New User” Forget Password Figure 2 Figure 3 to sign up, and click on " " after login.
Wi-Fi Setup Instructions Wi-Fi Setup Instructions Figure 5 Figure 6 When you see the APP enter interface Figure 5,you can start using APP to control your ROBOT.Tap the device to enter the main interface of APP (Figure 5), from this interface you can choose different cleaning modes, also to check the cleaning process/status. Tap the “more” Key(Figure 6) to enter the multi-functional panel (Figure 7).
Safety Instruction Before using this product,please read the safety instructions below and follow all the routine safety precautions. Please read the instructions carefully and keep them for future reference. Any operation that does not conform to the instructions may cause damage to the product. Safety considerations of Main Body and Accessories Warning 01.Do not disassemble,repair or refit the product without authorization;otherwise it may damage the product or pose a hazard. 02.
Safety Instruction 09.Before using the product,please remove all vulerable items on the floor,such as glass, lamps,and items such as wires and curtains that may entangle with the side brush and suction passages. 10.When the dust box is full,please empty it before using again. 11.Please do not use the robot to clean the construction waste. 12.The operating temperature of the product ranges from 0 degree Celsius to 40 degrees Celsius;please do not use it in a high temperature environment. 13.
Safety Instruction Warning 01. When skin or clothing is exposed to the battery electrolyte,immediately wash with clean water to avoid inflammation of skin,etc. 02. Do not use the rechargeable battery on other devices.This battery is only suitable for this robot. 03. If the battery’s outer box is found to be deformed and expanded,or leakage of electrolytes is found, do not charge or continue to use to avoid danger. 04.
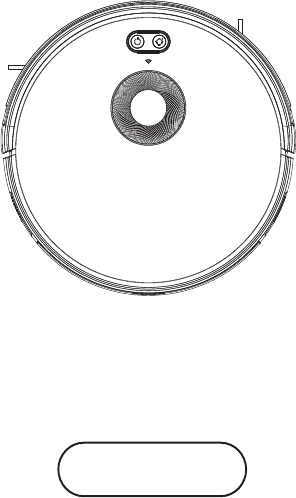
Product Components 3.1Name of Parts Main Body Charging Base 2XAAA batteries Remote Controller Power Adapter Cleaning Tool Water Tank Component Side Brushes High-efficient Filter Mop Accessories of some models may be slightly different and they are subject to the actual received products.
Product Components Main Body 1.Bumper 2.Control Button 3.WIFI Indicator 4.Laser Components Main Body 1.Universal Wheel 2.Electrode Slice 5. Side Wheel 6.Suction Port 7 3.Side Brush 7.Dust box 4.
Product Components Main Body 1.DC Power Jack 2.Power Switch 3.Dust box/Water tank release botton Dust Box 1. Pre-filter 2.High-efficient filter 3.Filter sponge 8 4.Dust Box 5.
Product Components Water Tank Component 1.Tank sealing cap 2.Water tank 3.Mop Charging base 1.Charging indicator 2.DC power jack 9 3.
Product Components 3.2 Product Specification Structure Diameter of the main body Thickness of the main body Net weigh of the main body 330mm 101mm 3.1kg Electronic Voltage Battery capacity Main body button type 14.8V 2600mAh LED button Accessory Water tank capacity Dust box capacity Cleaning cloth(polyester cotton) 350ml 600ml 295X100X4mm Process Parameters Charging Type Operating Duration Charging duration 10 Manual/Automatic Approx.
Product Components 3.3 Product Characteristics Multiple smart cleaning modes 4 cleaning modes are designed to suit different needs, which can be switched by the remote controller and App, greatly improves the cleaning efficiency and saves 30% of the power. Humanized design It is simple to operate, pressing the Control Button to start cleaning. Follow the Voice Prompt and let the robot start working for you.
Instructions for Use 4.1 Attention When it is working, please help to remove the unfriendly obstacles. Put the furniture and home appliances such as tables and chairs in the house neatly, the robot will clean up smoothly to give you a clean new home. If the robot works at the stairway, the edge of the step, or the entrance to the narrow area among the furniture, etc, please place a fence to ensure it is safe and running smoothly.
Instructions for Use Please do not stand in narrow places such as thresholds and aisles to avoid missing sweeping. When the robot is working, please ensure that the object with the thickness less than 1.8 cm is not placed in the cleaning area to prevent the machine from climbing and jamming. Please pay attention to remove sundries , such as the power cords, toys, etc, which are scattered on the ground may catch or entangle the Robot.
Instructions for Use 4.2 Remote controller instruction Power On/Off Display Screen Plan Cleaning (Smart Cleaning) Return for Auto Charging Confirm Direction Suction Setting Clock Setting Edge Cleaning Schedule Setting When the robot is in the vicinity of the charging base and the virtual protection wall, it may not be able to distinguish the instructions issued by the remote controller. if you do not use the remote controller for a long time, please take out the battery.
Instructions for Use Plan Cleaning button No matter what mode the robot is in, this button will bring it to the plan cleaning mode. Return for Auto Charging Pressing this button to shift the mode as recharging, and the logo will be displayed on the screen of the remote controller. Forward /+ At the standby mode, press this button to continue moving forwards, and release it to return to standby mode. At the Schedule setting mode, press this button to increase the number.
Instructions for Use 4.3 Operating Instructions Placement of the Charging Base Place the charging base on the flat floor and against the wall. Do not place any objects Switch on the robot, then the Control button will turn on the white light, and enter the Selected mode. if the Robot is not activated within 10 minutes, the robot will enter Sleep mode.
Instructions for Use Charging modes Please keep the power switch turned on before charging the machine. Charge mode A Fix the charging pin into the DC power jack of the robot and plug in the power supply. Charge mode B: Press Return for Auto charging button on the remote controller or Press Recharge icon on App to auto dock the Robot with the charging base.
Instructions for Use Automatic Recharge This product conforms to European ERP energy consumption standard When Cleaning is completed or the battery is too low,the robot will automatically start finding the charging base to charge itself. Pls keep the charging base in power,otherwise the machine will not be able to find the charging base. Charging instruction 01. For the very first operation, please let the robot run out of power. 02. Please charge the robot for 12 hours for the first time of operation.
Instructions for Use Switching Modes Power on 01. Make sure the power switch on the side of the robot is turned on. 02.Press the Control button“ ” or the Cleaning mode on the remote controller to run the robot. Pause The pause function is to switch the robot from the operating mode to the selected mode, and the robot can be paused by the following operations: 01.Press the Control button on the robot to pause the robot. 02.Press the power on/off button on the remote controller to pause the robot.
Instructions for Use Use of Water Tank When charging, please remove the water tank to avoid danger How to add water Open the tank sealing cap, fill it with enough water and slowly inject water When charging, please remove the water tank to avoid danger How to fix the microfiber mop? Seal the tank sealing cap,then fix the microfiber mop to the velcro on the bottom of the water tank 20
Instructions for Use When charging, please remove the water tank to avoid danger How to install the water tank? Press the release button on the dust box to remove it then install the water tank Schedule Cleaning You can set the current local time on your robot by pressing the Clock Setting 21
Instructions for Use ☆ Once the power switch is turned off, all schedule will be canceled. ☆ Once the schedule setting is succeeded,the robot will start working at the scheduled time everyday Press the"Schedule Setting" button to set the scheduled cleaning time for the robot.(e.g. Setting 6:30 am to the robot, the robot will start cleaning at 6:30am every day at the standby mode.) ☆ At the Schedule Setting mode,follow the voice prompts to confirm all your operations. 1.
Instructions for Use Cleaning Modes Plan Cleaning (S shape Cleaning) The robot will perform the plan cleaning in S shape according to the room environment.
Instructions for Use 断点续扫 扫地机 当前位置 扫地机搬 动后位置 导航到断点 导航回充 Relocation During the cleaning process, move the robot after the suspension, when restart, the robot will seek relocation Resume During cleaning process, the robot will back to charging base automatically After fully charged, the robot will back to the place where it stopped before and continuing cleaning Laser Relocation In a single room, when the robot moves for a few rounds(at least one round), the laser module will establish the map of curre
Product Maintenance 5.1 Side brush cleaning and replacement Check the side brush condition from time to time to see if it has been damaged or wrapped with foreign objects. Clean the side brush with a cleaning tool or a rag. When the side brush is damaged and cannot be used, please replace it in time, L and R side brush should be corresponding. 5.
Product Maintenance Open dust bin cover, and dump garbage Remove the primary filter 26
Product Maintenance Open the high-efficient filter cover, and remove the high-efficient filter and filter sponge. It is not recommended to wash the high-efficient filter with water. Please put off the debris carefully. Wash the dust box and pre-filter.
Product Maintenance 1. Dry the dust bxo and filter components. Keep them dry to ensure a longer service. 2. After the pre-filter is used for 15-30 days, it should be washed once. 3. The maximum service life of the high-efficient filter is 3 months. 1. Reinstall the pre-filter and high-efficient filter in the dust box. 2. Before installing the filter, make sure that the high-efficient filter and the pre-filter are dry. 3. Do not expose the high-efficient filter and the pre-filter to sunlight.
Product Maintenance Cover the dust box and fix it into the main body. 5.3 Maintenance of Water Tank Press the release button to take out the water tank.
Product Maintenance Reomve the mop Wash and dry th 30
Product Maintenance Pour out the rest of water from the water tank Clean the water tank and dry 31
Product Maintenance 5.4 Maintenance of Rolling Brush Components Open the rolling brush components Remove the rolling brush and clean off all debris and hair.