ROBOTIC VACUUM CLEANER USER MANUAL (Before using this product,please read the safety instructions below and follow all the routine safety precautions)
FCC Caution. This device complies with part 15 of the FCC Rules. Operation is subject to the following two conditions: (1) This device may not cause harmful interference, and (2) this device must accept any interference received, including interference that may cause undesired operation. Any Changes or modifications not expressly approved by the party responsible for compliance could void the user's authority to operate the equipment.
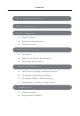
Content 1. Wi-Fi Setup Instructions 2.Safety Instructions 3.Product Components 3.1 Name of Parts 3.2 Products Specifications 3.3 Product feature 4. Instructions for Use 4.1 Attention 4.2 Remote Controller Instructions 4.3 Operating Instructions 5. Product Maintenance 5.1 Side Brush Cleaning and Replacement 5.2 Cleaning of Dust Box and Filter 5.3 Cleaning of Water Tank and Mop 5.4 Maintenance of Other Components 6. Common Faults 6.1 Common Faults 6.
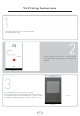
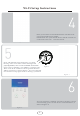
Wi-Fi Setup Instructions Scan QR code in figure1 to download and install "WeBack" app. Touch APP.If you do not have a account, touch More,REGISTER. After logging in, touch ADD A DEVICE. Figure 2 Figure 3 Scan the QR code of the device or the QR code on the right side,or manually enter Device name to confirm the device model,turn on the “Power switch” by following APP instructions and go to the next step.
Wi-Fi Setup Instructions Enter your wireless network information and the Wi-Fi password and then press NEXT. NOTE: Make sure your mobile device and the vacuum are connected to the sam e Wi-Fi network. Figure 5 Press and hold the home button for 3-5s until hearing“Two voice di di”before releasing it and purple light blink , then touch CONFIRM ACTIVATIN. Once setup is complete, you will hear a prompt tone” Three voice di di”and device management interface will be presented, as shown figure 7.
Wi-Fi Setup Instructions You can click the icon “setting of device”, as shown in Figure 9, to get the method to connect smart speaker application, such as Alexa, Google home and Siri.
Safety Instruction Before using this product,please read the safety instructions below and follow all the routine safety precautions. Please read the instructions carefully and keep them for future reference. Any operation that does not conform to the instructions may cause damage to the product. Safety considerations of Main Body and Accessories Warning 01.Do not disassemble,repair or refit the product without authorization;otherwise it may damage the product or pose a hazard. 02.
Safety Instruction 07.Please turn off the power switch on the side of the robot when the product is out of service for a long time. 08. Please check carefully to see if the power adapter is connected to the socket prior to use,to avoid damage to the robot. 09.Before using the product,please remove all vulerable items on the floor,such as glass, lamps,and items such as wires and curtains that may entangle with the side brush and suction passages. 10.
Safety Instruction Warning 01. When skin or clothing is exposed to the battery electrolyte,immediately wash with clean water to avoid inflammation of skin,etc. 02. Do not use the rechargeable battery on other devices.This battery is only suitable for this robot. 03. If the battery’s outer box is found to be deformed and expanded,or leakage of electrolytes is found, do not charge or continue to use to avoid danger. 04.
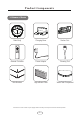
Product Components 3.1Name of Parts Main Body Charging Base Suction Port Remote Controller Power Adapter Cleaning Tool Side Brushes High-efficient Filter Water Tank Component Accessories of some models may be slightly different and they are subject to the actual received products.
Product Components 1 2 3 4 Main Body 1.Bumper 2.Decoration Cover 3.Button 4.Clamshell 8 Main Body 1.Universal Wheel 4. Battery Cover 7.chassis 2.Electrode Slice 5. Rolling brush components 8. Water Tank with Mop 8 3.Side Brush 6.
Product Components Main Body 1.Clamshell 2.Dustbin Components of Dustbin 1. Pre-filter 2.Cover of dustbin 3.Dustbin 9 4.Pre-filter 5.
Product Components Charging base 1.Charging indicator 2.DC power jack 3.Charging terminal Water Tank Component 1. Mop 2. Velcro 3. Water input hole 10 4.
Product Components Diameter of the main body 330mm 3.2 Product Specification Structure Diameter of the main body Thickness of the main body Net weigh of the main body Electronics 320mm 81mm 2.5kg Voltage Battery capacity Button type on main body Accessory Dust bin capacity Water tank capacity 10.8V 2600mAh LED button Operating parameter Charging Type Manual/Automatic Operating Duration Approx.100min Charging duration 240min-300min 450ml 180ml 3.
Instructions for Use 4.1 Attention When it is working, please help to remove the unfriendly obstacles. Put the furniture and home appliances such as tables and chairs in the house neatly, the robot will clean up smoothly to give you a clean new home. If the robot works at the stairway, the edge of the step, or the entrance to the narrow area among the furniture, etc, please place a fence to ensure it is safe and running smoothly.
Instructions for Use Please do not stand in narrow places such as thresholds and aisles to avoid missing sweeping. When the robot is working, please ensure that the object with the thickness less than 1.8 cm is not placed in the cleaning area to prevent the machine from climbing and jamming. Please pay attention to remove sundries , such as the power cords, toys, etc, which are scattered on the ground may catch or entangle the Robot.
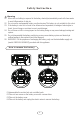
Instructions for Use 4.2 Instruction for remote controller Power on/off Direction Automatic cleaning /standby Edge cleaning Mopping Spot cleaning Return for auto charge Low suction Max suction In the area near the charging dock and virtual wall, the robot may not be able to recognize the commands issued by the remote control.If you will not use the remote control for a long time, please remove the batteries.
Instructions for Use Return for Auto Charging Pressing this button to shift the mode to recharging ▲Forward Press this button to continue moving forwards, the robot will stop automatically when encountering obstacles ▼Back Button Press this button and robot will rotate 180 degrees Left Arrow Press this button, the robot will turn left Right Arrow Press this button, the robot will turn right Automatic cleaning/standby During operation, press this button to stop the robot, and it still restart working at
Instructions for Use 4.3 Operating Instructions Placement of the Charging Base Place the charging base against the wall,leaving the safety distance left and right each 1 meter and front 2 meters. Warning: don’t put it close to the mirror ,avoid direct sunlight.
Instructions for Use Auto charge Pls press button , robot will start auto charging When the cleaning is finished or the power is too low, the robot will automatically start looking for the charging stand to charge. Please keep the charging stand powered on, otherwise, the machine will not be able to find the charging stand for charging Notes on charging A.When the battery is low, light always on B.When the robot is charging, the light flashes C.After fully charged, light always on D.
Instructions for Use Switching Modes Standby mode Power on , light always on, the robot just standby (purple light means wifi didn't connect to servicer .
Instructions for Use Water tank Usage When charging, please remove the water tank to avoid danger. Water Tank Assembly: There is corresponding velcro under the tank,fix the absorbent mop to the bottom of the water tank according to the corresponding part,open the tank sealing cap,fill it with 1/2 or 2/3 clean water,and seal the lid of the water tank. When charging, please remove the water tank to avoid danger.
Instructions for Use Cleaning mode Random cleaning Robot runs 5 meters forward, then starts to turn, when encountering obstacles during operation, the robot will turn its direction Edge cleaning Robot will sweep along the largest edge of the room Spot cleaning The robot is centered on the starting point, counterclockwise direction for spot cleaning, when encountering obstacles, it will clean in the opposite direction.
Product Maintenance 5.1 Side brush cleaning and replacement Check the side brush condition from time to time to see if it has been damaged or wrapped with foreign objects. Clean the side brush with a cleaning tool or a rag. When the side brush is damaged and cannot be used, please replace it in time, L and R side brush should be corresponding. 5.2 Dust box and filter cleaning Open the upper cover and take out the dust bin.
Product Maintenance Take out the HEPA Open the dust box cover and take out the pre-filter.
Product Maintenance Clean the dust bin,HEPA ,filter ,clean the filter after 15days using Change to new HEPA /3-4 Months Air all components till they are dry completely.
Product Maintenance Assemble the pre-filter and high-efficient filter in the dust box 5.3 Cleaning of Water Tank and Mop Remove the mop like the picture.Rinse it thoroughly and lay it out for airing. Please do not use the dripping mop directly,so as to avoid the product slipping and causing danger. Applicable Environment of Water Tank with Mop Component: Wooden floor,tile floor,marble floor and painted hard floor,etc.
Product Maintenance 5.
Product Maintenance Clean the cleaner and suction channel through cleaning tooling 26
Common Faults 6.1 Faults Description Faults Can not charge Cleaner can not work well Possible Reasons Solutions Charge pin didn’t touch well of cleaner and charge station Keep Charge pin touch well of cleaner and charge station The indicated light of charge station did not work ,charge station didn’t connect with power . Check the adopter and charge stations, the plug connect well.
Common Faults 6.2 Replaceable Modules Dust bin Top cover Right wheel set Left wheel set Side brush set Fan Components Right side brush Right side brush Direction wheel Suction &middle brush exchange set Battery battery cover Application: The product is suitable for cleaning house, hotel rooms, and small offices and provides good cleaning for various floors,such as wooden floor,hard floor,tile floor,and short-pile carpets (short-pile should be shorten than 1.5cm),etc.
Your Partners For a Cleaner Home Manufacturer: Shenzhen Hua Xin Information Technology Co.,Ltd. Address:Section A,10/F,Block 1,No.