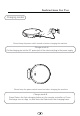
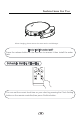
Instructions for Use Charging modes Please keep the power switch turned on before charging the machine. Charge mode A: Fix the charging pin into the DC power jack of the robot and plug in the power supply. Please keep the power switch turned on before charging the machine. Charge mode B: Press Return for Auto charging button on the remote controller or Press Recharge icon on App to auto dock the Robot with the charging base.
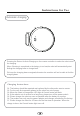
Instructions for Use Automatic charging Pressing the Return for Auto Charging on the remote controller to make the robot return for charging. When Cleaning is completed or the battery is too low,the robot will automatically start finding the charging base to charge itself. Pls keep the charging base energized,otherwise the machine will not be able to find the charging base. Charging lnstructions 01. The battery should be repaired and replaced by the after-sales service center. 02.
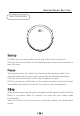
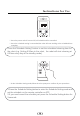
Instructions for Use Switching Modes Startup 01.Make sure the power switch on the side of the robot is turned on. 02.Press the Control button or the Cleaning mode on the remote controller to start the robot. Pause The pause function is to switch the robot from the operating mode to the selected mode,and the robot can be paused by the following operations: 01.Press the Control button on the robot to pause the robot. 02.Press the power on/off button on the remote controller to pause the robot.
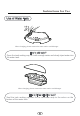
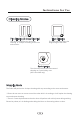
Instructions for Use Use of Water Tank When charging, please remove the water tank to avoid danger. How to add water? Open the tank sealing cap, fill it with enough water and slowly inject water into the water tank. When charging, please remove the water tank to avoid danger. How to fix the microfiber mop? Seal the tank sealing cap,then fix the microfiber mop to the velcro on the bottom of the water tank.
Instructions for Use When charging, please remove the water tank to avoid danger. How to install the water tank? Press the release button on the dust box to remove it then install the water tank. Schedule Setting Cleaning You can set the current local time on your robot by pressing the Clock Setting button on the remote controller,then press Confirm button.
Instructions for Use ☆ Once the power switch is turned off, all Schedule will be cancelled. ☆ Once the schedule setting is succeeded,the robot will start working at the scheduled time everyday. Press the"Schedule Setting" button to set the scheduled cleaning time for the robot.(e.g. Setting 6:30am to the robot, the robot will start cleaning at 6:30am every day at the standby mode.) ☆ At the Schedule Setting mode,follow the voice prompts to confirm all your operations. 1.
Instructions for Use Cleaning Modes Plan Cleaning (S shape Cleaning) The robot will perform the smart plan cleaning in S shape according to the room environment. Edge Cleaning The robot will clean along the longest edge of the room. Spot cleaning The robot will perform the concentrated cleaning on a special dirty area. (APP controlled only) Mopping Mode The Robot will perform the S shape cleaning with mop according to the room environment.
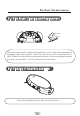
Product Maintenance 5.1 Side Brush Cleaning and Replacement Check the side brush's condition frequently to see if it has been damaged or entangled with other objects. Clean the side brush with a cleaning tool or cloth. When the side brush is damaged and can not be used,please replace it as soon as possible. L and R correspond to each other. 5.2 Cleaning of Dust Box and Filter Press the release button to take out the dust box.
Product Maintenance Dump all debris form the dust box into the garbage. Remove the pre-filter.
Product Maintenance Open the high-efficient filter cover, and remove the high-efficient filter and filter sponge. It is not recommended to wash the high-efficient filter with water. Please pat off the debris carefully. Wash the dust box and pre-filter.
Product Maintenance 1. Dry the dust box and filter components. Keep them dry to ensure a longer service. 2.After the pre-filter is used for 15~30 days, it should be washed once. 3. The maximum service life of the high-efficient filter is 3 months. 1. Reinstall the pre-filter and high-efficient filter in the dust box. 2.Before installing the filter, make sure that the high-efficient filter and the pre-filter are dry. 3. Do not expose the high-efficient filter and the pre-filter to sunlight.
Product Maintenance Cover the dust box and fix it into the main body. 5.3 Maintenance of Water Tank Press the release button to take out the water tank.
Product Maintenance Remove the mop. Wash and dry the mop.
Product Maintenance Pour out the rest of water from the water tank. Clean the tank and dry it.
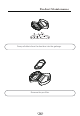
Product Maintenance 5.4 Maintenance of Rolling Brush Components Open the rolling brush components. Remove the rolling brush and clean off all debris and hair.
Product Maintenance 5.5 Maintenance of Other Components Electrode slice Sensor Use the cleaning tools or a dry soft cloth to periodically clean the electrode slice of robot chassis and the sensor window. Charging terminal Use a cleaning tool or soft cloth to clean the charging terminal.
Common Faults 6.1 Faults Description Faults The robot can not be charged. The robot is stuck during work. The robot goes back to recharge without finishing the cleaning work. Possible Reasons Solutions The electrodes between the main body and the charging base are not contacted properly. Make sure that the electrodes between the main body and the charging base are properly contacted. The charging base is switched off while the robot is switched on,which leads to the loss of power.
Common Faults 6.
FCC Caution. This device complies with part 15 of the FCC Rules. Operation is subject to the following two conditions: (1) This device may not cause harmful interference, and (2) this device must accept any interference received, including interference that may cause undesired operation. Any Changes or modifications not expressly approved by the party responsible for compliance could void the user's authority to operate the equipment.
Your Partners For a Cleaner Home