ROBOTIC VACUUM CLEANER Manual
FCC warning: Note: This equipment has been tested and found to comply with the limits for a Class B digital device, pursuant to part 15 of the FCC Rules. These limits are designed to provide reasonable protection against harmful interference in a residential installation. This equipment generates, uses and can radiate radio frequency energy and, if not installed and used in accordance with the instructions, may cause harmful interference to radio communications.
Menu 1.Wi-Fi Setup Instructions 2.Safety Instructions 3.Product Components 3.1 Name of Parts 3.2 Products Specifications 3.3 Product Characteristics 4.Instructions for Use 4.1 Attention 4.2 Remote Controller Instructions 4.3 Operating Instructions 5.Product Maintenance 5.1 Side Brush Cleaning and Replacement 5.2 Cleaning of Dust Box and Filter 5.3 Maintenance of Water Tank Components 5.4 Maintenance of Rolling Brush Components 5.5 Maintenance of Other Components 6.Common Faults 6.1 Common Faults 6.
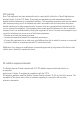
Wi-Fi Setup Instructions Wi-Fi Setup Instructions App download Scan the QR code in Figure 1 to download and install “Grit” APP,or search "Grit" in the App stores to download and install. Figure 1 xxxxx@xxxxx.com Sign up *Enter a mobile phone number or an email account for registration,if mobile phone number registration is not available,please choose to register by an email account.(Figure 2) * On the registration page, please don't forget to input Verify Code to login.
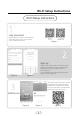
Wi-Fi Setup Instructions Wi-Fi Setup Instructions Activate the device *Do as Figure 7,press Control button and hold for 3-5seconds until the machine beeps.The Wi-Fi indicator flashes and voice prompts "Connecting network",which means the device enters configuration mode,click "Confirm Activation" to enter the "Connect to the device" interface and follow steps as Figure 8. *Depending on the signal strength of the Wi-Fi, it may take few seconds or more. Figure 7 Figure 8 *The device only support 2.
Safety Instruction
Safety Instruction
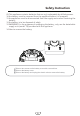
Safety Instruction 06.This appliance can be used by children aged from 8 years and above and persons with reduced physical, sensory or mental capabilities or lack of experience and knowledge if they have been given supervision or instruction concerning use of the appliance in a safe way and understand the hazards involved. Children shall not play with the appliance. Cleaning and user maintenance shall not be made by children without supervision 07.
Safety Instruction 09.This appliance contains batteries that are only replaceable by skilled persons. 10.the battery must be removed from the appliance before it is scrapped; 11.the appliance must be disconnected from the supply mains when removing the battery; 12.the battery is to be disposed of safely. 13.WARNING: For the purposes of recharging the battery, only use the detachable supply unit (model: T8) provided with this appliance. 14.
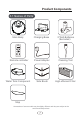
Product Components 3.1 Names of Parts Main Body Remote controller Water Tank Component Charging Base 2*AAA Batteries (Excluded) Power Adapter Cleaning Tool Side Brush High-effecient Filter Mop Accessories of some models may be slightly different and they are subject to the actual received products.
Product Components Main Body 1.Bumper 2.Wi-Fi Indicator 3.Control Button 4.Camera Main Body 1.Universal wheel 5.Side wheel 2.Electrode slice 3.Side brush 6.Rolling brush components 4.Barrery cover 7.
Product Components Main Body 1.DC power jack 2.Power switch 3.Dust box release button Dust Box 1.Per-filter 2.High-efficient filter 4.Dust box 5.Dust box cover 3.
Product Components Water Tank Component 1.Tank sealing cap 2.Water tank 3.Mop Charging base 1.Charging indicator 2.DC power jack 10 3.
Product Components 3.2 Product Specifications Structure the the the Electronic 14.
Product Components 3.3 Product Characteristics Multiple smart cleaning modes 4 cleaning modes are designed to suit different needs,which can be switched by the remote controller and App,greatly improves the cleaning efficiency and saves 30% of the power. Humanized design It is simple to operate,pressing the Control Button to start cleaning. Follow the Voice Prompt and let the robot start working for you.
Instructions for Use 4.1 Attention When it is working, please help to remove the unfriendly obstacles.Put the furniture and home appliances such as tables and chairs in the house neatly, the robot will clean up smoothly to give you a clean new home. If the robot works at the stairway, the edge of the step, or the entrance to the narrow area among the furnitures, etc,please place a fence to ensure it is safe and running smoothly.
Instructions for Use Please do not stand in narrow places such as thresholds and aisles to avoid missing sweeping . When the robot is working, please ensure that the object with the thickness less than 1.8 cm is not placed in the cleaning area to prevent the machine from climbing and jamming. Please pay attention to remove sundries , such as the power cords, toys, etc,which are scattered on the ground may catch or entangle the Robot.
Instructions for Use 4.2 Remote controller instruction Power On/Off Display Screen Plan Cleaning (Smart Cleaning) Return for Auto Charging Confirm Direction Clock setting Suction setting Schedule Setting Edge Cleaning controller controller.
Instructions for Use Plan Cleaning button No matter what mode the robot is in,this button will bring it to the plan cleaning mode. Return for Auto Charging Pressing this button to shift the mode as recharging,and the logo will be displayed on the screen of the remote controller. Forward /+ At the standby mode,press this button to continue moving forwards,and release it to return to standby mode.At the Schedule setting mode,press this button to increase the number.
Instructions for Use 4.3 Operating Instructions Placement of the Charging Base Place the charging base against the wall. Do not place any objects within 3.3 ft to the left / right and 6.6 ft to the front, and do not place any mirrors or other reflective objects within this distance. Switch on the robot, which makes the Control button green, and enter the Selected mode.if the fobot is not activated within 10 minutes,the robot will enter Sleep mode.