Collaboration Touch Screen User Manual Newline Interactive Inc. www.newline-interactive.
Welcome to the world of TruTouch. Thank you for choosing TruTouch Xseries Collaboration Touch Screen. Please use this document to maximize your user experience. This device complies with part 15 of the FCC Rules. Operation is subject to the following two conditions: (1) This device may not cause harmful interference, and (2) this device must accept any interference received, including interference that may cause undesired operation.
Contents Safety Instruction ............................................................................................................................. 3 1 Overview......................................................................................................................................... 7 1.1 Introduction .................................................................................................................................................................. 7 1.2 Parts ..............
.6.1 Manually End Meeting ............................................................................................................................................ 42 4.6.2 Automatically End Meeting ..................................................................................................................................... 43 4.7 Shortcut Settings and Applications ............................................................................................................................. 44 4.7.
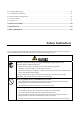
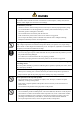
Put the product on a stable surface. An unstable surface includes and does not limited to an inclined plane, a shaky stand, desk or platform, which might cause the turnover and damage. Use the battery correctly. Galvanic corrosion, electric leakage and even fire may be caused by improper battery usage. It is recommended to use the designated type of battery and install the battery by correct electrodes (positive and negative electrodes). Do not install and use new battery with the used one.
Pull out the power plug during thunderstorms. Do not touch the product when lighting to avoid electric shock. Install or place components which power supply voltage is high enough to cause personal injury in places out of the reach of children. Do not cover or block up any vents on the product. The overheated components may cause fire, damage the product and shorten the service life. Do not put the venting surface of the product facedown.
Advice for watching: Use the product in an environment with comfortable light. It is harmful to your eyes to watch in a too bright or too dark environment. Relax your eyes after a period of time for watching. When you are watching, the distance which is 3 to 7 times of the screen height should be kept, and it is the best distance to protect eyes and prevent eyestrain. Adjust the volume to an appropriate level, especially at night.
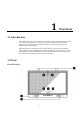
1 Overview 1.1 Introduction The Collaboration Touch Screen adopts the advanced capacitive touch technology and All in One design, and integrates video, audio, touch, writing, and multi-media presentation functions. This product does not need additional devices, installation and wiring, and commissioning and maintenance. Dedicated software is customized for the assistant meeting.
The top and bottom cameras cannot be used at the same time. The indicators of the top and bottom cameras are turning white when in use and off when not in use.
1.
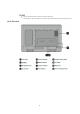
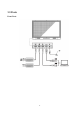
Rear Ports Front Buttons 10
Buttons Operations Functions Short press Power on/off Short press Decrease volume Long press for more than 1 second Decrease volume continuously Short press Increase volume Long press for more than 1 second Increase volume continuously Short press Open the menu Short press Return to the last menu/Exit Short press Go to the home page 11
1.
Buttons Functions Return to Previous/Exit Go to the Home Page Open the Menu Switch to Top Camera Switch to Bottom Camera Increase Volume Decrease Volume Settings Switch Source to HDMI Front Switch Source to HDMI Rear Switch Source to VGA Switch Source to Internal PC Page Up Page Down Toggle Display Mode Zoom Out (PC) Zoom In (PC) 13
2 2.
Installation Direction Installation Height 2.2 Installation Precautions Weight Loading The back of the panel is equipped with holes in VESA standard. Please use a VESA standard mounting system. When using a mobile cart, please ensure the mobile cart has no less than 60kg loading capacity. Weight of the unit: 79.
When using wall-mount bracket, please ensure the wall can support the weight of the unit. We recommend that the wall surface is reinforced, and have a loading capacity twice the weight of the unit. Please consult a professional installer for wall-mount installation. Do not install the unit where it might be hit by a door. Ventilation Ensure adequate ventilation and/or air conditioning environment. We recommend to keep certain distance from the side of the unit to the wall or panels.
17
3 Getting Started 3.1 Power On Step 1 Plug in the power plug to the power outlet, and plug in the power connector to the side of the unit. Please ensure the power is in the range of 100V- 240Vwith frequency at 50Hz/60Hz ±5%. The power current must be grounded. Step 2 Turn on the general power switch located on the side of the unit. 3.2 Power Off Step 1 Press the power button on the front panel or the power button The Save meeting discussion page is displayed as follows. 18 on the remote control.
on the front panel or the power button on the remote control Step 2 Press the power button again. The Really end your meeting dialog box is displayed as follows. Step 3 In the Really end your meeting dialog box, click Yes. The meeting start page is displayed as follows.
on the front panel or the power button Step 4 Press the power button again to power off the panel. The power indicator turns off. on the remote control Step 5 If you are not going to use the unit for an extended period of time, we recommend you to switch off the general power switch. 3.3 Positioning If the cursor position has a big deviation from the actual touch point, calibration is used to eliminate the deviation.
Step 4 Select in the Tablet PC Settings window.
Step 5 Use finger or pencil to click and hold the center of the flickering cross . Do not release it until moves to the next positioning point. Complete the calibration process as instructed. Step 6 After the calibration is complete, the Digitizer Calibration Tool dialog box is displayed. Click Yes to save calibration data. To ensure writing accuracy, you are advised to use the pencil released with the product for positioning. Positioning errors may cause failure of touch functions of the display.
4 Operating the Touch Screen 4.1 Home Page When the unit is turned on, it will show the Meeting Start page. The user can touch the screen to start a meeting, and the unit will go to the Home page. See the following figures.
Figure 4-2 Home Page Collaboration The user can touch here to start the default UC programs, or touch the small triangle to set three shortcuts for frequently used UC programs. The default UC program is the one used last time. Whiteboard The Whiteboard provides whiteboard and screen annotation functions. Sources The user can select one of the four sources to display, including HDMI Front, HDMI Rear, Internal PC and VGA.
4.2 Assistant Meeting 4.2.1 Newline Assistant Introduction Newline Assistant is a tool used to obtain applications required by users on Windows system. On Android system, you can start Windows applications by clicking one button. Installation Step 1 Connect Internal PC correctly. Step 2 On the home page, click Sources. Step 3 On the displayed signal source selection page, select PC. The Windows page is displayed. Step 4 Log in to the website www.newline-interactive.
The Windows icon on the left navigation area is available only when the Collaboration Touch Screen has Internal PC. Add Applications on Android System Step 1 On the application customization page, click to view applications on Android system. Step 2 In the application list displayed on the right area, click add the application. A maximum of 3 applications can be added. that has been added.
Step 2 Click to return to the home page. Click the triangle at the upper right corner of Collaboration and select Add on the displayed menu. The customization page is displayed.
Step 3 On the customization page, click Newline Assistant in Step 1.
Step 4 Add applications on the page described in Step 3. on the right of an application to In the application list displayed on the right area, click add the application. A maximum of 3 applications (including Android and Windows applications) can be added. is displayed on the right of an application that has been added. Step 5 Return to the home page, click the triangle at the upper right corner of Collaboration, and click the added application on the displayed menu.
4.3 Whiteboard Writing or Annotation On the whiteboard page, you can select pen type, width, and color to write or annotate. Also erase selected content or clear all contents. File management Preview, select, copy or delete a file. To access the whiteboard meeting, click Whiteboard. See the following figure. SN Icon Name 1 Switch between writing and annotation modes. 2 Hard pen 3 Highlighter 4 Eraser 5 Clear 6 Undo 7 New slide Only writing mode has this function.
4.3.1 Whiteboard Functions New Slide and Settings Create a new slide In writing mode, click to create a new slide. A maximum of 20 slides can be created. See the following figure. Slide settings Click and hold to set the background color of new slides. See the following figure.
Whiteboard Mode Click and at the lower left corner of the whiteboard to switch whiteboard modes. : Annotation mode The background is transparent and the real-time image of the current signal source is displayed. You can comment on presentation content such as Office documents and pictures as required. See the following figure. : Writing mode The background is in mono color. You can write content as required. See the following figure.
Pen Type On the whiteboard, two types of pens are supported: hard pen and highlighter. Their icons are and . Hard pen: used to write. Highlighter: used to comment. Characters covered by comments are visible. Line Type and Color On the whiteboard, click and hold or . The line type and color selection page is displayed. You can select the line type and color for writing. See the following figure.
Screenshot In comment mode, click to save the current image as a picture, as shown in Figure 4-3. After the meeting is ended, save screenshots in the Save meeting discussion dialog box, as shown in Figure 4-4.
Figure 4-4 Save meeting discussion Clear On the whiteboard page, click shown in the following figure.
Cancel On the whiteboard page, click figure. to undo the latest operation, as shown in the following 4.3.2 Slide Operations You can preview, select, and delete a created writing slide. Slide Preview Click at the lower right corner of the whiteboard. All writing slides are displayed. Click one slide to switch to the slide for other operations. See the following figure. Only 8 slides are displayed in each column, and the remaining slides are displayed in the second column.
Slide Selection and Deletion Click . The and buttons are displayed. You can select and delete a writing slide as required. See the following figure. Click the slide: to select the current slide. Click : to select all slides. Click : to delete selected slides. Click : Buttons on the left are replaced with Click : to close the Navigation page. . 4.4 Signal Source On the home page, click Sources. The signal source selection page is displayed.
4.5 External Storage The product supports connection to external storage devices. On the external storage page, you can view files stored in all external storage devices (for example, the USB flash disk and SD card) and preview, select, copy, delete and search content in each storage device. 4.5.1 External Storage Page On the home page, click External Storage as shown in the following figure.
4.5.2 File Preview By default, files saved to internal storage are displayed. You can click at the upper left corner to view all external storage devices connected to Android USB and preview a specified external storage device. See the following figure. 4.5.3 File Filtering For your convenience, the system displays files by category, for example, document, picture, audio and video. You can click the icons on the left tool bar to filter files. The system supports two view modes: list and thumbnail.
4.5.4 File Search Click and enter the key word in the search box. Files matching the key word are listed. The system supports second filtering for searched files. Click the filtering tool bar below the search box to filter searched files based on PPT, PDF, DOC, XLS, Audio, and Video, as shown in the following figure.
4.5.5 File Operations Click to perform operations on files in the storage, including select all files or one file, copy, delete and cancel, as shown in the following figure. Click the file: to select the current file. All: Select all files. Copy: Copy selected files. Delete: Delete selected files. Cancel: Cancel current operation.
4.6 End Meeting 4.6.1 Manually End Meeting On the home page, click . The Save meeting discussion page will be displayed. The meeting will be ended and timer will stop. File Naming Save slides created during the meeting and annotation screenshots on the meeting record page, as shown in the following figure. The picture is named as the creation time. You can slide right or left with one finger to switch pages.
− Click No. The meeting continues and the system stays on the Save meeting discussion page. If the meeting notes can’t be saved to USB drive or SD card successfully when ending meeting, please use USB drive or SD card smaller than 32GB and change the file system into FAT 32 format. 4.6.2 Automatically End Meeting If the period without operations on the screen exceeds 90 minutes, the system will lock the screen automatically to protect your privacy.
4.7 Shortcut Settings and Applications Slide one finger down for 40 to 80 mm from the top of the screen, the Shortcut Settings and Applications pages are displayed. As shown in the following figure.
4.7.1 Shortcut Settings After a top-down slide, the Shortcut Settings page is displayed by default, as shown in the following figure. Clock Settings Click to add the required time zone, and click Time Formats to set the time display mode (analog clock or electronic clock).
Brightness Adjustment Drag the slider beside the icon to adjust the brightness. Volume Adjustment Drag the slider beside the icon to adjust the volume. Microphone Mute Mode Click to enable or disable the microphone mute mode.
Wi-Fi Settings Click to enter the system settings page and select the Wi-Fi hotspot to be connected. Wired Network Settings Click to enter system settings page and set information about the wired network.
Camera Settings Click to enter system settings page and set the default camera used by the display and anti-flickering information.
System Settings Click to enter system settings page. Setting items are shown in the following figure. 4.7.2 Applications In the assistant meeting, click Applications to fast select and start applications on Android system, and slide right and left on the screen to view all applications, as shown in the following figure.
5 Serial Port Control Connect RS-232 port to the PC or controlling device. Enable RS-232 serial port connection and complete the following configuration. Port: COM1 (Set according to PC or controlling device’s port number) Bit rate 19200 Odd/even check None Data bits 8 Stop bit 1 The following table lists the button controlling code and return code.
Function Controlling codes Return codes VGA 7F 08 99 A2 B3 C4 02 FF 01 0D CF 7F 09 99 A2 B3 C4 02 FF 01 0D 01 CF Page Up 7F 08 99 A2 B3 C4 02 FF 01 13 CF 7F 09 99 A2 B3 C4 02 FF 01 13 01 CF Page Down 7F 08 99 A2 B3 C4 02 FF 01 14 CF 7F 09 99 A2 B3 C4 02 FF 01 14 01 CF VOL - 7F 08 99 A2 B3 C4 02 FF 01 17 CF 7F 09 99 A2 B3 C4 02 FF 01 17 01 CF VOL + 7F 08 99 A2 B3 C4 02 FF 01 18 CF 7F 09 99 A2 B3 C4 02 FF 01 18 01 CF Menu 7F 08 99 A2 B3 C4 02 FF 01 1B CF 7F 09 99 A2 B3 C4 02 FF 01 1B 01 CF
Function Controlling codes Return codes Query the firmware version number 7F 08 99 A2 B3 C4 02 FF 01 3D CF 7F 09 99 A2 B3 C4 02 FF 01 3D 01 CF Set Display Mode 7F 08 99 A2 B3 C4 02 FF 07 XX CF 7F 09 99 A2 B3 C4 02 FF 07 XX 01 CF XX indicates the mode. 00, 01, 02 and 03 indicate standard, bright, soft and custom modes respectively.
Function Controlling codes Microphone status 7F 09 99 A2 B3 C4 02 FF 01 45 XX CF 7F 08 99 A2 B3 C4 02 FF 01 45 CF Read the value of backlight brightness Return codes XX=01 indicates that the microphone is mute. XX=02 indicates that the microphone is not mute. 7F 09 99 A2 B3 C4 02 FF 01 49 XX CF 7F 08 99 A2 B3 C4 02 FF 01 49 CF 53 Note: XX indicates the value of backlight brightness (0-100), corresponding to the hexadecimal number system (00-64).
6 Parameter Value Display Backlight LED Display Area 1209.6 x 680.4mm Active Screen Size 55" Display Ratio 16:9 Resolution 1920*1080Pixel Display Colors 8-bit, 16.7M colors Brightness 370nit Contrast 4000:1 Viewing Angle 178° Response Time 8ms Life Time 30000h Speaker Speaker Position Forward Rated Impedance 8Ω(±15%) Freq. Response 80Hz(±20%) - 18kHz Output S.P.L. 82±3dB Max. Power Output 30W Microphone Sensitivity -28dB±3dB Frequency Response 100Hz - 7.
Parameter Value Polar Patterns Omnidirectional Total Harmonic Distortion (THD) less than 1% at 6dB SPL Pickup range 8m Quantity 4 Camera Position Top x 1 & Bottom x 1 (Only one can use in the same time) Sensor 2M Pixels Lens 86° Video Resolution 1920*1080@30fps (Max) Frame Rate 30fps/60fps Electrical Power Consumption Working Voltage Maximum <120W Standby Mode≤0.
Parameter Value Working Temperature/Humidity 0°C-40°C/10%-90% Mounting (optional) Wall-mounted / Floor Stand Outline Dimension 1320×886×87mm Packing Dimension 1470×265×995mm Net Weight 36Kg Gross Weight 45Kg Ports Front Interface Inputs Microphone(3.5mm)×1, HDMI×1, USB(Touch)×1, USB(OPS)×1, USB(Android)×1 AV Inputs HDMI(MHL*)×1, VGA×1, USB(Touch)×2, Audio× 1 AV Outputs 3.5mm Line out x 1, HDMI x 1 (only video) Other USB2.0×2, RS232×1, RJ45×1, USB3.
Parameter Value Android Software Input Resource Preview Yes On Screen Annotation Yes Discussion Board Yes The above-mentioned specifications are for reference only. Newline may change the specs without additional notice. Contact local distributors for more details.
7 More Information For more information Please visit www.newline-interactive.com. Contact Us for Support Please email us at support@newline-interactive.com. Newline Interactive Inc. 101 East Park Blvd.
8 FCC Statement This device complies with part 15 of the FCC Rules. Operation is subject to the following two conditions: (1) This device may not cause harmful interference, and (2) this device must accept any interference received, including interference that may cause undesired operation. Note: The manufacturer is not responsible for any radio or TV interference caused by unauthorized modifications to this equipment. such modifications could void the user’s authority to operate this equipment.