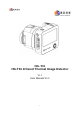
HG-T01 HG-T01 Infrared Thermal Image Detector V1.1 User Manual V1.
Table of Contents Reading Tips .............................................................................................................................. 3 Symbol Description ........................................................................................................... 3 Usage Advice - Please Read before Using the Product ................................................... 3 Product Overview ....................................................................................................
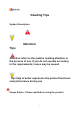
Reading Tips Symbol Description Attention Tips Attention refers to the matters needing attention in the process of use.
! The detector uses a very sensitive thermal sensor. Therefore, under no circumstances (power on or power off) should the lens be directly aimed at the source of intense radiation (such as the sun, direct laser beam or reflection, etc.), otherwise it will cause permanent damage to the detector! ! The original packaging box must be used during transportation. Do not shake or collide with the detector violently during use and transportation.
Product Overview HG-T01 infrared thermal image detector is a non-contact, highly sensitive and intelligent infrared imaging detection system that does not need to be equipped with a computer. It can be externally connected to audio and video device, and can be flexibly and conveniently deployed.
Frame rate: 15Hz Temperature measuring range: 20-50 (*Note 1) Temperature measuring accuracy: 0.5 (with blackbody 0.3) (*Note 2) Temperature measuring area: meet the requirements of simultaneous temperature measuring of more than 5 points Temperature measuring distance: 1-4m Visible light camera resolution: 3280*2464 Display screen: 4.
Battery life: >3h WIFI frequency band: 2.4GHZ Working temperature: 10 ~ 40 (*Note 3) Storage temperature: -20 ~ +70 Product size: 119x130x107mm Net weight (without batteries): 560g Accessories: tripod, battery, power adapter, HDMI extension cord, HDMI to VGA cord, audio extension cord, TF card, blackbody (optional) *Note 1: If the temperature measurement range is exceeded, the temperature measurement accuracy will decrease.
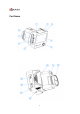
Part Name 8
① ON/OFF ⑨ ②Record key Touch screen ⑩Battery compartment cover ⑪ Visible light lens ③ Photo key ⑫ Thermal imaging lens ④ Direction key ⑬ Tripod threaded hole ⑤USB port ⑭Lanyard buckle ⑥ Audio output jack ⑮ Type-C port ⑦HDMI output ⑯ TF card slot ⑧ Power port Part Introduction ①Long press the ON/OFF key for 3 seconds to turn on, and long press it for 3 seconds to turn off. When connecting with other display devices, short press it for 1 second to project images to the display.
⑦Output high-definition video signal through this interface, and can connect the display, television, projector and other equipment. ⑧Connect the DC 12V-3A power adapter and the battery can be charged after connection. If it is used for a long time, it is recommended to connect the adapter. ⑨ Display the picture through this screen, and can operate the detector through the touch function at the same time.
Interface Introduction Load the battery or connect the external power supply, long press the ON/OFF key for 3 seconds to start up, and then enter the system interface after starting up.
This device provides two control methods: one is to directly touch the screen, and the other is to use the arrow keys. The following mainly explains how to use the arrow keys. Home page operation: Press the "OK" button, and a check box will pop up on the interface. Use the up, down, left, and right buttons to select the icon, and press "OK" to enter the relevant page.
Settings It is necessary to set the relevant parameters of the equipment before using the product.
Temperature unit Celsius or Fahrenheit is optional depending on the user Ambient temperature Enter the current ambient temperature. If the ambient temperature is not entered within 3 minutes after starting up, the system will automatically detect the ambient temperature and fill it in. If more accurate measuring accuracy is needed, please manually enter the current ambient temperature.
Distance: set the distance between the detector and the temperature measuring target to make the temperature measurement more accurate. Please set it within the range of 1-4m. If the distance is not within the range, there may be errors in measurement. Humidity: set the relative humidity of the environment where the detector is used. Used in normal indoor environment, the system has been set, and it is not necessary to set it separately.
Alarm temperature range Set the alarm temperature range in the blending mode, that is, the device will alarm if the detected temperature is within this range. Alarm prompt: The target recognition box displays red, the periphery of screen also flashes red, and the text prompts "Warning: abnormal temperature"; the buzzer produces 1 long "beep", and the audio outputs 4 "beeps".
---------------------------------------------------------------------------------------------------------------- Sound Setting Buzzer switch Select to turn on or off the buzzer sound. Coaxial audio output Select to turn on or off the audio output.
Other Settings 18
Multi-language Both Chinese and English languages are currently supported Screen brightness adjustment Adjust the brightness of LCD screen Firmware revision number Check the version number of the firmware. If the version is updated, the device can download and upgrade the firmware when connected to WIFI. Please connect the adapter during the upgrade, and do not power off during the upgrade.
Mode Introduction Visible Light Mode The function mode of pure camera, in which functions such as photo taking, video recording and playback viewing can be carried out. Click to select the function of photo taking or video recording. for photo taking or video recording, and click it again to stop the Click recording if it is in the video mode. Click to enter the photo album for relevant playback viewing, editing and deleting functions.
Thermal Imaging Mode In this mode, thermal imaging display and temperature measurement can be performed.
Tmax is the maximum temperature value measured in the imaging picture. Click Tmax in the upper left corner to hide or display the Tmax cursor in the picture. Tmin is the minimum temperature value measured in the imaging picture. Click Tmin in the upper left corner to hide or display the Tmin cursor in the picture. T0 is the temperature value measured at the fixed center point in the imaging picture, and the cursor is fixed at the center of the picture.
Add Blackbody In the blending mode, blackbody can be added in order to improve the measurement with higher accuracy. Click the icon to add blackbody.
Put the blackbody at a fixed distance of 3m from the lens, and it can be arranged outside the upper left corner or the upper right corner of the picture without being blocked. Set the blackbody temperature well (the fixed temperature of blackbody used in the Product is 37). Next, click on the screen, move the green box and surround the blackbody target with the green box, wait for more than 3 seconds, and the measured temperature of the blackbody will be automatically filled in.
temperature interval, it is suspected, and the AI recognition box is orange if the suspected is detected. Every time it is detected, it will be included in the suspected count for statistics. Click "Suspected Count" to view the contents of suspected photos. (The photo taking function of "Suspected Temperature" should be turned on in Alarm Setting) Alarm count It means that if the measured target temperature meets the set value of alarm temperature interval, it is an alarm, and the alarm is detected.
The battery compartment is in the handle of the instrument. Buckle open the push button of the battery cover, and open the battery compartment to load and unload the battery as shown in the below figure. Attentions for Use of Battery: -------------------------------------------------------------------------------------------------------Two 18650 lithium batteries (3.7V 3350mAh) are used in the Product to supply power in series, and the users can replace the batteries of the same brand model by themselves.
Do not pull out the battery when the device is turned on. Overheating of the battery may affect the product performance, please do not use it in high temperature environment (above 40). In case of any leakage, peculiar smell, self heating, deformation (including bulge), discoloration or any other abnormal phenomenon of the battery during use, charging or storage, please remove the battery and stop using it under the premise of ensuring safety. The normal working temperature range of the battery is 5 ~ 40.
Installation and Use of Product HDMI Output Connection HDMIHDMIHDMI The display device with HDMI port can be connected to HDMI port of the detector (the equipped HDMI extension cord can be used for transfer if the display device is relatively far away from the detector).
Diagram of Tripod Installation 29
Diagram of Site Layout The distance between the detector and the object to be measured should be within 1-4m. As shown in the above figure, place the detector at an angle of 45 with the corridor, and ensure that the object to be measured can stay within the green box of the video for 1-3 seconds.
Disclaimer Thank you for purchasing the products of Shenzhen HighGreat Innovation Technology Development Co., Ltd. (hereinafter referred to as "HighGreat"). In order to make better use of the Product and ensure your safety, please read this statement carefully before use. Once the Product is used, it will be deemed as recognition and acceptance of all contents of this statement! HighGreat reserves the right to update this user manual.
2. Improper storage, such as strong impact or squeezing, or being placed in an inappropriate environment (such as water immersion or fire) 3. Improper maintenance, unauthorized disassembly, repair, modification or replacement of original accessories with those not supplied by HighGreat. 4. Make sure to use special battery and charging equipment provided by HighGreat, otherwise there will be explosion danger. At the same time, please dispose of the used battery correctly according to the instructions. 5.
FCC Caution: This device complies with part 15 of the FCC Rules. Operation is subject to the following two conditions: (1) This device may not cause harmful interference, and (2) this device must accept any interference received, including interference that may cause undesired operation. Any Changes or modifications not expressly approved by the party responsible for compliance could void the user's authority to operate the equipment.
Warranty Card /Purchase Information Serial No. Purchase Date Dealer Telephone Address User Name Telephone Address /Maintenance Records Repair Date Fault and Repair Conditions In need of maintenance service, please contact your dealer, or contact HIGHGREAT customer service in the following ways: Shenzhen HighGreat Innovation Technology Development Co., Ltd.
2/F, Building 6, Yuanlingzi Industrial Zone, Hengping Road, Yuanshan Street, Longgang District, Shenzhen E-mail: wdrones@szcencom.