Netac iMuz (C700) User’s Manual ShenZhen Netac Technology Co., Ltd.
Notice This manual contains information protected by copyright law. All rights are reserved. No part of this document may be used or reproduced in any form or by any means, or stored in a database/retrieval system without prior written permission from Netac Technology Co., Ltd. Netac®, OnlyDisk™ and is trademark of Netac Technology Co., Ltd. Netac has legal rights of monopolization usage, permission usage, transfer, unfoldment for this trademark, etc.
Others Windows 98 mentioned in this user’s manual refers to the first and the second edition of Windows 98. Files or data stored in iMuz cannot completely avoid being destroyed or lost due to improper use or other reasons. Please backup files and data when necessary. iMuz is not guaranteed to work properly on all computers. Netac Technology Co., Ltd. is not responsible for any loss arising out of using iMuz. The governing laws for this product are laws of the People’s Republic of China. 1.
.6.3 REPEAT ....................................................................................................................................... 19 4.6.4 FM SET ........................................................................................................................................ 20 4.6.5 REC SET...................................................................................................................................... 20 4.6.6 LCD ..............................................
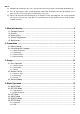
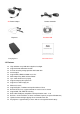
AC Power Adapter Remote Controller Earphone Installation CD Carrying Case Guarantee Card 1.
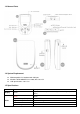
1.3 Name of Parts 1.4 System Requirement IBM Compatible PC, Notebook with USB port Windows 98/Me/2000/XP/Server 2003, Mac OS 9.x/X USB Specifications 2.0/1.1/1.0 1.5 Specifications Sorts Items Description Display Screen High definition array LCD with indigo blue backlight (160X105 lattice) Stereo Stereo Earphone Output Frequency 50Hz ~ 15KHz Earphone Output Power 10mW + 10mW,28 Ohm SNR 90dB Distortion Degree 0.
Music Recording FM Power Supply Play Time Others Support ed File Types MPEG1, 2, 2.5 Layer3 (8~320Kbps, VBR), WMA (8~192Kbps), OGG (8~320Kbps) ID3 Tag Ver1.0/1.1/2.0 EQ NORMAL, ROCK, CLASSIC, JAZZ, U-BASS, USER Repeat ALL, SINGLE, DIR, SUB DIR, SHUFFLE Music Management Play-list (M3U, BMK) Recording Format MP3(32~320Kbps,44.1KHz) Recording Bit Rate MIC (32~128Kbps) Frequency Bound World(87.
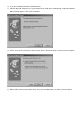
2) Insert the installation CD into the CD-ROM driver. 3) Connect iMuz with computer, the system would find an USB device automatically. “Add New Hardware Wizard” dialog appears, click “Next” to continue. 4) Please select “Search for the best driver for your device. (Recommended)”, and click “Next” to continue. 5) Wizard shows where to locate iMuz driver. Only select “CD-ROM drive”, and click “Next” to continue.
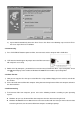
6) System would automatically detect the driver. Please click “Next” in the following steps and click “Finish” in the last step to finish the installation. 2.2.2 Connecting 1) Press PLAY/PAUSE button to power on iMuz, then connect it and the computer with a USB cable. 2) “USB attached” would appear to prompt status after iMuz connected with computer successfully. 3) Double click “My Computer”, you would find a new icon named “Removable Disk”, representing iMuz.
2) IMuz would be power off automatically after disconnecting from computer safely. 3. Usage 3.1 Basic Operation 3.1.1 Power On/Off iMuz would enter MUSIC mode automatically after power on. iMuz would play the track that it is playing before power off last time automatically, if you set “AUTO PLAY”. (Please refer to “4.6.7 SYSTEM” for details) If you set “POWER OFF”, iMuz would power off automatically when the stop time exceeds the setup time. (Please refer to “4.6.
3.2.2 Connecting Connect Remote Controller with Earphone/Remote Controller Jack of iMuz, and Earphone with Earphone Jack of Remote Controller. 3.2.3 Usage The definition of buttons on Remote Controller are same as mainframe except holding PLAY/PAUSE button to turn power on. Please refer to the foregoing description for details. The HOLD switch on Remote Controller can lock the buttons on Remote Controller, and no icon appears on the “Lock” area of the LCD. 3.
4. Mode Operation 4.1 MUSIC Mode 4.1.1 Entering MUSIC Mode Enter browse status of MUSIC mode automatically after iMuz power on. IMuz would automatically play the track which is playing before power off last time if you set “AUTO PLAY”. (Please refer to “4.6.7 SYSTEM” for details) Please hold MODE button to enter mode window if iMuz is in status of other mode, then press VOL+ / VOL– button to select MUSIC mode, and PLAY/PAUSE button to play.
4.1.5 BMK Play-List BMK play-list is saved in directory \PLAYLIST of iMuz, and you can search or select it to play. (Please refer to “4.3 LIST Mode” for details) Press REC button to add the playing or selected tracks into BMK play-list when playing track or browsing file (You can set 100 tracks at best). Press REC button again to delete the track from BMK play-list. 4.1.6 Browsing Tracks Press MODE button to enter browse window in play/pause status.
The recording mode of MIC is Mono, and the recorded file is saved as MIC***.mp3 in the VOICE ENCODE folder automatically after record stopped, “***” is the serial number of recorded file. You can set the bit rate when MIC recording, please refer to “4.6.7 SYSTEM” for details. 4.2.3 LINE-IN Record Connect the iMuz and earphone of audio/video device or output jack of Line-in with a LINE-IN cable. Hold REC button to start LINE-IN recording. Please press PLAY/PAUSE button to pause or resume recording.
deleted files into/from BMK play-list) 4.3.2 Selecting List Press VOL+ / VOL- button to select previous/next play-list. Press PLAY/PAUSE / FF button to open a play-list. Press VOL+ / VOL- button again to select track after opened a play-list. 4.3.3 Playing List Press PLAY/PAUSE / FF button to play after selected track, then iMuz would play the tracks according to order of the play-list. Please refer to “4.1 MUSIC Mode” for the details. Press MODE / REW button to return to the previous menu. 4.
Press VOL+ / VOL- button to adjust volume. Press FF / REW button to adjust frequency, the frequency changes by 0.1MHZ. Press MODE button or hold FF / REW button to progress automatic searching channel. iMuz would stop searching and play automatically after found a channel. Press PLAY/PAUSE button to set preset channel, and press FF / REW to select a preset channel. i 4.4.2 Preset Channel Muz can save 20 preset channels.
IMuz would search the tracks in iMuz afresh after power on every time, and found index. IMuz can saved 5000 files and 10 level directories. You can search tracks in iMuz accurately through the former three letters of track in SEARCH mode. Press FF / REW button to switch the current searching letter. Press VOL+ / VOL- button to switch next/previous letter to search after selected letter. The range of searching letter is 0~9 and A~Z.
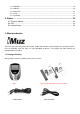
When selecting ROCK, the setting of output frequency is the following: When selecting CLASSIC, the setting of output frequency is the following: When selecting JAZZ, the setting of output frequency is the following: When selecting U-BASS, the setting of output frequency is the following:
When selecting USER, press VOL+ / VOL- button to set each item according to your fondness, press PLAY/PAUSE / FF to switch frequency, and MODE / REW to exit. 4.6.3 REPEAT Enter REPEAT window, you can select MODE, ON/OFF or SHUFFLE. Select MODE, then press VOL+ / VOL- button to set the range of paying track. ALL: Play all tracks in iMuz; SINGLE: Play one track; DIR: Play all tracks in a folder; SUB DIR: Play all tracks in the folder and subfolders.
4.6.4 FM SET Enter FM SET window, you can select the RADIO MODE, FM BAND MODE or SENSITIVITY. Press VOL+ / VOL- button to set the output signal as STEREO or MONO in RADIO MODE. STEREO: The output of frequency module is stereo signal; MONO: The output of frequency module is mono signal. Press “VOL+” / “VOL-“ button to set the FM band mode as WORLD or JAPAN in FM BAND MODE. JAPAN: The reception band is 76~108MHZ; WORLD: The reception band is 87.5~108MHZ.
Press “VOL+” / “VOL-“ button to set bit rate of LINE-IN and FM record in ENCODER. You can select 64, 96, 128, 256 or 320Kbps. Press “VOL+” / “VOL-“ button to set bit rate of MIC record in VOICE. You can select 32, 48, 64, 96 or 128Kbps. 4.6.6 LCD Enter LCD, you can set contrast of LCD, backlight time, scroll speed of ID3, display mode of playing time and language of menu or ID3. Press “VOL+” / “VOL-“ button to set contrast of LCD in CONTRAST. You can select a level between 0 and 10.
Press “VOL+” / “VOL-“ button to set display time as normal or reuerse time when playing track in TIME. NORMAL: The played time of track; REUERSE: The spare time of track. Press “VOL+” / “VOL-“ button to set language of menu and ID3 as ABC, 简 体 or 繁 體 in LANGUAGE. ABC: English; 简 体 : 體:Traditional Chinese. Simplified Chinese; 繁 4.6.
charge. Press “VOL+” / “VOL-“ button to set the effect of which bass of output audio are boosted partly when iMuz playing track and recording files in BASS BOOST. You can select LOW, MID or HIGH. Press “VOL+” / “VOL-“ button to set the effect of which treble of output audio are boosted partly when iMuz playing track and recording files in TREBLE BOOST. You can select LOW, MID or HIGH.
5.1 Firmware Update 1) Please access Netac website: http://www.netac.com.cn To download the Firmware update program of iMuz to update firmware of iMuz. 2) Copy the firmware update program which download from website into directory \FIRMWARE of iMuz, and disconnect iMuz from computer safely. 3) IMuz would update firmware automatically when power on again. Please do not operate for iMuz during update.
China Academy of Science & Tech Development, No.1 High-tech South St, Shenzhen, China 518057 Tel: +86-755-26727800 (Switchboard) +86-755-26727500, 26727510, 26727520 (Technical Support) Fax: +86-755-26727610, +86-755-26727620 Website: http://www.netac.com Email: sales@netac.com (Sales) support@netac.com (Technical Support) info@netac.