
User's Manual

Quick Operation Guide of Wireless NVR Kit Quick Operation Guide of Wireless NVR Kit Quick Operation Guide of Wireless NVR Kit Quick Operation Guide of Wireless NVR Kit
1 2 3 4
Wireless NVR Kit
Quick Operation Guide
Version:V3.0
1 Statement
Thank you purchasing our products, if you have
any questions or needs, please contact us.
This manual applies to wireless network video
recorder.
The company based on product feature
enhancements and updates the contents of this
manual, and will be regularly updated or improved
products or processes that are described in this manual.
Updates will be added to the new version of this
manual without prior notice.
If the description of the manual doesn't match for t
he material object ,prevail in kind.
2 Attentions
Please check when unpacking boxes, confirm the
items and lists.
Please don’t make the kit fall to ground or be hit by
strong forces.
Please keep good ventilation environment around
this product.
Avoid installation in severe vibration environments.
Please avoid environment with much humidity, dust,
extreme heat or extreme cold of the power supply
carefully.
Please avoid environment with much humidity, dust,
extreme heat or extreme cold of the power supply
carefully.
Please keep the product box to facilitate transfer or
removal of the equipment.
Please make sure to turn off power of all items
during installation. Check the voltage properly.
Please contact the distributor or service center if
the kit is damaged or not working.
3 Open-package inspection
After receive product, please open gift box then check
accessories. If any damage or lack,kindly please
contact to the distributor.
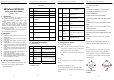
Packing list
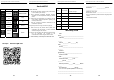
4 Product description
4.1 Wireless Camera
S/N Item Description
1
Antenna
interface
Install antenna
2 Setscrew Fixed bracket
3 Knob Adjust the camera angle
4
Network
interface
Connector for LAN
5 Power Supply 12VDC power supply.
4.2 Wireless NVR
5 Installation of device
5.1 Install wireless camera
Note:1.Disconnect the power to the NVR before installing
a hard disk drive (HDD). A factory recommended
HDD should be used for this installation.
2.The maximum of hard disk capacity supported is
4TB.
Steps:
(1) Drill mounting holes, push in screws and fasten the
screws.
(2) Connect Power adapter to socket.
(3) Loosen the setscrew and knob,adjust the camera
angle according to your surveillance need,then fasten the
screws.
5.2 Install wireless NVR
Steps:
1. Install the hard disk with a cross screwdriver
(1) Unfastening the screws on the rear
panel,and side panel.
(2) Remove the cover from the NVR.
(3) Connect the data cable and power cable to
HDD.
(4) Fasten the screws on the bottom to fix the
HDD.
(5) Re-install the cover of the NVR and fasten screws.
2. Cable Connection
(1) Connect mouse to USB interface .
(2) Connect to monitor by HDMI cable or VGA
cable.
(3) Connect to internet by network cable via router(or
switch).
(4) Connect to 12VDC adapter and turn on
power,the Power indicator would turn red.
Notes:
In order to guarantee the video quality, IPC antenna
should try to keep in parallel or tangent with NVR
antenna.Because the signal of surrounding antenna is
much stronger ,but much weaker if antenna endpoints
back off direction.
Correct method Fault
method
S/N Item Quantity
1 NVR Host 1
2 Screw bag(4 screws for HDD) 4
3 USB Mouse 1
4
1 meter network cable(for IPC
code match)
1
5
DC 12V@2A Power supply
(NVR)
1
6
Product user manuals 1
7
Wireless IP Camera 4/9
8
DC 12V@1A Power supply (for
IPC)
4/9
9
Screw bag(4 screws for HDD) 4/9
S/N Item Description
1
Antenna
interface
Install antenna
2
Network
interface
Connector for LAN
3
VGA
interface
DB9 connector for VGA
output
4
HDMI
interface
HDMI video output connector
5
USB
interface
USB ports for additional
devices such as USB mouse,
U disk
6
Power
Supply
12VDC power supply.