
User's Manual

Using the Atlas as a wireless remote*
1. Turn off the camera and the Phottix Atlas transceiver.
2. Attach the correct Phottix Atlas Shutter Release Cable for your camera
make and model to the Flash In/Out Port on the transceiver.
3. Attach the other end of the cable to the camera’s remote port.
4. Turn on the camera and Phottix Atlas transceiver.
5. Consult your camera manual for specific settings for remote use.
6. Using a second Phottix Atlas transceiver will allow for remote wireless
shutter release functions. The Atlas test button will work as a single-stage
shutter button – one press will autofocus the camera and take a photo.
* On compatible cameras
Using the Atlas as a wireless remote in WRS Mode*
WRS Mode – Wireless Remote Sync Mode – allows you to use the Atlas as a
wireless shutter release and fire remote flashes – in sync. Using this function
requires a minimum of three Atlas transceivers – one on the camera, one to be
used as a wireless remote, and one (or more) to trigger remote flashes and
strobes.
1. Turn off the camera and the Phottix Atlas transceiver.
2. Slide the Atlas transceiver into the camera hot shoe.
3. Attach the correct Phottix Atlas Shutter Release Cable for your camera
make and model to the Flash In/Out Port on the transceiver.
4. Attach the other end of the cable to the camera’s remote port.
5. Turn on the camera and Phottix Atlas transceiver.
6. Move the WRS Mode Switch on the camera Atlas transceiver to the ON
position.
Consult your camera manual for specific settings for remote use.
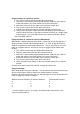
Channel Settings
WRS Mode works using two channels – one channel for the wireless remote and
the on-camera Atlas, another channel for remote flashes or strobes.
Flashes and strobes need to be set one channel higher than the two transceivers
used to trigger the camera. Example:
Wireless Remote Channel On Camera Channel Flash/Strobe Channel
1 1 2
2 2 3
3 3 4
4 4 1
7. Set the wireless remote, on camera, and flash/strobe transceivers to the
correct channels (above)