
User's Guide


7
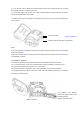
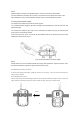
2.4.2 Fixation with the brackets
Install mounting bracket reliably on fixed object (e.g. on the wall or on the tree), screw the bracket screw
into the screw hole at the bottom of the camera and tighten it. Adjust the camera shooting angle and
tighten all the screws. Below is the figure:
Notice: If the camera is installed close to the ground, ensure that the bottom of the camera is more than
20CM from ground.
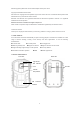
2.5 Power on the camera
Toggle the【Function switch】to “Photo”or “Video”gear, the 4G signal lights and network indicators will light
up, indicating the camera is on. 4G signal lights share three states: red/emerald green/blue, which
represents 4G signal in turn: weak/medium/strong;The networking indicator has two states: red/blue. If red
is always displayed, it means that the network fails. If blue is always bright, it means the networking is
successful.
2.6 Mode switching between video and photo
When the【Function switch】is in the "Photo" or "Video" position, push this key to switch between photo
mode and video mode.
1. When the【Function switch】is in the "Photo"position, the camera will automatically default to "Photo
Mode";
2. When the【Function switch】is in the "Video"position, the camera will automatically default to "Video
Mode";
2.7 Power off the camera
Push the【Function switch】to "OFF" gear,the camera will be completely shut down. After the camera is off,
it only can be turned on again after waiting 3 seconds.
Notice: The camera will automatically save the file if the【Function switch】is pushed while the camera is
working.
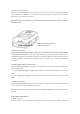
3 User guide of the camera
3.1Monitor shooting
Install the camera into the shooting area and adjust the camera direction to ensure the lens is aligned to
Screw the bracket screw into the
screw hole and tighten it