User Manual FHD Wireless IP Camera Model: X2 V1.
Table of Contents Security Warning ........................................................................................................................................ 1 1 Overview .................................................................................................................................................. 1 1.1 Key Features ................................................................................................................................. 1 1.2 Read Before Use..........
Security Warning 1. Please change the password of your camera regularly, using a combination of numbers, letters and special characters. 2. We recommend that you regularly update your camera to the latest available software and firmware versions to help ensure the best experience for your camera. 1 Overview FOSCAM FHD Wireless IP Camera is an integrated wireless IP Camera with a color CMOS sensor which enable to view in Full High Definition resolution.
Nightvision with 940nms LEDs ,no light pollution Support image snapshot Support dual-stream Support Micro SD Card storage up to 128GB Support IR-Cut auto switch Support two-way audio Supports one-button calling function Support ONVIF protocols Multi-level users management with password protection Motion Detection alarm via E-Mail and FTP Provide free Android and iPhone APP for viewing live video provide free Central Management Software to manage and monitor multiple cameras Supp
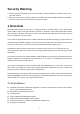
1.4 Physical Description Front panel Rear panel Front panel: Microphone: Built-in microphone. Lens: Fixed focus lens. Micro SD Card slot: Supports up to 128GB SD card for storing the video. Speaker: Built-in speaker Status light/ One-button call /Reset Status light: The flashing status of the Status light are shown in the following table. Flashing Status Description Constantly bright (orange) Powered on Flashing(blue) every 0.
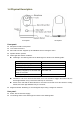
1.5 Hardware Installation 1.5.1. Place Your Camera on a Flat Surface You can place your camera on a flat surface (desk, shelf, Table, etc.). 1.5.
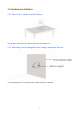
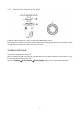
1.5.3 Mount Your Camera to the Wall Install the mounting plate on a wall or ceiling with supplied fxing screws. Note: Align points a and b to insert the camera base to the mounting plate. Rotate so that points a and b are aligned, this attaches the camera securely to the base. 1.6 Micro-SD Card This camera supports Micro SD Card. When you plug in the SD card during the camera work process, please reboot the camera again, or else the SD Card may be cannot work well.
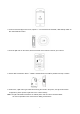
2 Access the IP Camera 2.1 Wireless Connection via Foscam App Download and open the Foscam App from the App Store or Google Play Store. Once open, please register for a Foscam account, or sign in if you have one already. 1. Please Connect the power adapter to the camera, and wait for a few moments until the camera alerts you that the “Ready for WiFi confguration.” 2. Make sure that your smartphone is connected to your wireless router (It has to be on the 2.4GHz channel if you have a dual-band router).
3. From the Foscam App home screen, tap the “+” icon and select "IP Camera", after that tap “Next” on the “Add Cameras” screen. 4. Scan the QR code on the sticker, which is located on the bottom or side of your camera. 5. Under “WiFi connection” select ”Ready” and then Enter your WiFi's password and tap "confirm". 6. At this time, a QR code is generated and hearing the sound in the phone, the QR code for WiFi confguration, please point the QR code to the camera directly.
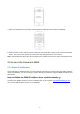
7. Wait a few moments for a message confrming that the setup process has been completed. 8. From the home screen, tap the play icon within the video feed box to bring up the camera credentials screen. For your security, please set a new username and password for your camera. Note: Your smartphone will need to be connected to the 2.4GHz channel if you have a dual-band router. 2.2 Access the Camera in WAN 2.2.
2.3 Using the VLC player The camera supports RTSP streaming, here you can view the camera by VLC player. RTSP URL rtsp:// [user name][:password]@IP:Port number/videostream The part in the square brackets can be omitted. user name & password: The user name and password to access the camera. This part can be omitted. IP: WAN or LAN IP address. Port NO. : If there is the RTSP port number on the Port page, you must only use RTSP port number. otherwise, you must only use http port number.
Sometimes you may need to enter the user name and password for another time. Click OK and you can see the real-time preview.
If you cannot play the video in the VLC player, please check the port mapping. NOTE: If you modify the camera’s username or password, you had better reboot the camera to apply the new username and password in authentication in the VLC. 2.4 IP camera connection to the server Device supports ONVIF 2.2.1 protocol, You can easily access NVR with ONVIF or server with ONVIF. 2.5 Works with Alexa 2.5.
2.5.2 How to confirm if your Foscam camera supports working with Alexa or not? 1. The currently supported required firmware should be 2.x.2.10 or higher; 2. The Foscam app version should be 2.2.9 or higher. 2.5.3 How to confirm the host name of Alexa account? 1. Please login the Alexa app and go to “Settings”. 2. Please choose “About”. 3. Then you will see the host name of your Alexa account. 2.5.4 How to set up Foscam cameras working with Amazon's Alexa? 1.
Note:How to confirm the host name of Alexa account? 3. Please choose the correct region according to your Alexa account’s host name. If you are not sure what host name of your Alexa account is, please refer to here. 4. Please open the Alexa app to search for Foscam skill, enable to use it and link your Foscam account to the Alexa app.
5. Then you can choose the option “DISCOVER DEVICES” to add Foscam camera to the Alexa app or speak “Alexa, discover devices” to the Echo show directly. 6. After camera is added to the Alexa app, you can speak directly to the Echo show to get the camera’s live stream shown up by voice command. The voice commands: Once your Foscam camera is connected to your Echo show, you can use the following voice commands to get and stop the camera’s live stream.
Spanish. 2.5.5 How to add Foscam cameras to Alexa app manually? 1. Please make sure you have enabled the “Work With Alexa” and set a name for your camera on Foscam app. 2. Please login the Alexa app and choose “Devices” and tap on “+” symbol. 3. Please choose “Add Device”. 4. Please choose “Camera”. If there is no camera option, please choose “Other”.
5. Please choose “DISCOVER DEVICES” to search for Foscam cameras. Then your camera will be added to the Alexa app.
3 Surveillance Software GUI 1. Connect the camera to the LAN network (Router or Switch) via network cable. 2. Connect the power adapter to the camera. 3. Connect the Computer to the LAN network (Router or Switch) via network cable 3.You can download the “Equipment Search Tool” 3from foscam.com/tools to your computer, then ccess the camera directly, the icon shows as below: Note: Keep the camera in the same subnet of your router and computer. .3.
Section2 Stream The camera supports two stream modes: Main stream and sub stream. Select Main stream if you want to access the camera from LAN and sub stream will be better if you want to access the camera from Internet. Note: Select sub stream to ensure a more fluent video under narrow network bandwidth. Section3 Select the language You click on the language dropdown list to select language. Section4 login the camera Click “Login” button.
3.3 Surveillance Window 1 2 5 3 4 6 Section 1 FOSCAM Logo/ Live Video / Settings/Playback : FOSCAM LOGO : Path to surveillance window. Click this button to go back to the surveillance window : Path to Administrator Control Panel, Click it, to go to Administrator Control Panel and do advanced settings. : Click this button to go back to the Playback panel to view the stored audio files stored in the SD Card.
Stream The default stream supports multiple modes, For example: HD Mode/720P/23fps/2M meanings: Stream type / Resolution / Maximum frame rate/ Bit rate. (Different models support different specific mode. ) Stream type : It is used to identify the stream type. Resolution The bigger the resolution, the better of the image quality is. If you are accessing the camera via internet and want to get more fluent video streaming, please select resolution VGA.
Pan/Tilt Control 1----- Up control button, 3------Left control button, 5----- Up-Left control button 6----- Up-Right control button 7----- Down-Left control button 8----- Down-Right control button 2-----Down control button, 4------Right control button, Click this button and go to center 21
Section 4 Preset settings / IR LED Lights / Color Adjustment Preset settings IPCam supports 16 preset positions, which is considered enough for DIY home & small business surveillance market The default preset position is Topmost, Bottom most, Left most, right most, you can add other preset positions. Add Click this icon to save the position you need the camera to remember Delete Select one preset position and click this button to delete it.
Schedule: Select it and the IR led light will be off at the schedule period. If you want to define or change the IR led lights schedule time, please go to Settings--->Video---> IR LED Schedule page. Color Adjustment In this page, you can tune Brightness, Contrast, Saturation, and Sharpness to get higher quality. Section 5 OSD If you have added time and camera name in the video, you can see it in the live window. Go to Settings ---Basic settings---Camera name panel, and you can change another device name.
8----- Full Screen Click it to make full-screen, or you can double click the surveillance screen to make full-screen. Double click again and exit full-screen.
4 Advanced Camera Settings Click the button “Settings”, goes to Administrator Control Panel to make advanced camera settings. 4.1 Setup Wizard Please go to section 3.2 to find the way to set it. 4.2 Status Status contains four columns: Device Information, Device Status, Session Status and Log, it will show you various information about your camera. 4.2.1 Device Information Camera Name: The Device Name is a unique name that you can give to your device to help you identify it.
4.2.2 Device Status On this page you can see device status such as Alarm status/ Record Status , WIFI status and so on. 4.2.3 Session Status Session status will display who and which IP is visiting the camera now. 4.2.4 Log The log record shows who and which IP address accessed or logout the camera.
Reboot the camera and clear the log records. 4.3 Basic Settings This section allows you to configure your camera’s Name, Time, Mail, User accounts, Multi-Device, Status Light and Voice Prompt. 4.3.1 Camera Name You can define a name for your camera here such as apple. Click Save to save your changes. The alias name cannot contain special characters. 4.3.2 Camera Time This section allows you to configure the settings of the internal system clocks for your camera.
Time Zone: Select the time zone for your region from the dropdown menu. Sync with NTP server: Network Time Protocol will synchronize your camera with an Internet time server. Choose the one that is closest to your camera. Sync with PC: Select this option to synchronize the date and time of the Network Camera with your computer. Manually: The administrator can enter the date and time manually. Note select the date and time format. use DST: Select the daylight saving time from the dropdown list.
How to change the password? Firstly, select the account which you want to change the password, then select “Change password”, enter the old password and the new password, lastly click modify to take effect. How to add account ? Select one blank column, then enter the new user name, password and privilege, last click Add to take effect. You can see the new added account on the Account list.
Delete :Select the account which you want to delete, then click Delete button to take effect. NOTE: The default admin account cannot be deleted, but you can add other administrator users. How to change the username ? Firstly, select the account which you want to change the username, then select “Change username”, enter the new password, lastly click modify to take effect.
4.3.4 Multi-Camera If you want to view multi-surveillance screens on one window, you need to login one camera, and set it as the main device, and do Multi-Device Settings, add other cameras to the first one camera. Before you do multi-cams settings, you need to assign different port such as 81, 82, 83, 84, 85, 86, 87, 88 to the cameras if there is 8 cams installed. The firmware within the camera can support a maximum of 9 devices monitoring all at the same time.
1 Click it, camera model, alias, host and HTTP Port will be filled in the following boxes automatically. 2 Enter the User name and password of the 2nd camera. 3 Click Add to take effect. Back to Surveillance Windows, and click Four Windows option, you will see four cameras you added.
4.3.5 Status Light On this page, you can enable or disable Enable Status Light. Select “Yes” to enable or select “No” to disable.
4.3.6 Voice Prompt On this page, you can enable or disable voice prompt. Select “Yes” to enable or select “No” to disable. 4.4 Network This section will allow you to configure your camera’s IP, Wireless Settings, Port, Mail Settings, FTP Settings, P2P and Onvif. 4.4.1 IP Configuration If you want to set a static IP for the camera, please go to IP Configuration page. Keep the camera in the same subnet of your router or computer. Changing settings here is the same as using the Equipment Search Tool.
Set the same Subnet Mask and gateway of the camera with your PC. There are two DNS servers. You can set any of them. Same with gateway is also OK. If you don’t know the DNS server, you can use the same settings as the Default Gateway. 4.4.2 Wireless Settings Step 1: Choose “Settings” on the top of the camera interface, and go to the “Network” panel on the left side of the screen, then click “Wireless Settings.
Click the Scan button and the camera will detect all wireless networks around the area. It should also display your router in the list. Click the Scan button to search for wireless networks. Click the Page number to see other wireless networks devices if there are more than 10. Step 2: Click the SSID (name of your router) in the list, the corresponding information related to your network, such as the name and the encryption, will be filled into the relevant fields automatically.
Step 3: Please click on the Save button after all settings have been entered and disconnect the network cable. Never shut down the power of the camera until the IP camera is able to connect to the wireless network. The LAN IP address will disappear on the window of Equipment Search Tool when the camera is configuring a wireless connection. Wait about 1 minute, the camera should obtain a wireless connection, and the LAN IP of the camera will show again on the window of the Equipment Search Tool.
Select which camera you’d like to change the port for, and right click . Modify the Http Port . Enter the Username and password, click OK. Step 2: Enter the username and password of the Administrator (default username is admin with a blank password), and click “OK” to apply changes. Step 3: Wait around 10 seconds, you’ll see that the camera’s LAN IP address has changed. In our example it was changed to 2000, so we see http://192.168.1.110:2000 in Equipment Search Tool.
If the camera cannot be accessed, please make sure the port forwarding is succeed. HTTPS port: The default port is 443. You can use the url to access the camera: https:// IP + HTTPS port. ONVIF port: By default, the ONVIF port is set to 888. Also, they can be assigned with another port number between 1 and 65535(except 0 and 65534). But make sure they can not be conflict with other existing ports. (C2 only) RTSP port: The default port is 554.
and SMTP Port must be set to 465 or 25 or 587, which port you choose should be decided by which Transport Layer Security you select. 2---- SMTP Username/ password ID account and password of the sender email address 3---- Sender E-mail Mailbox for sender must support SMTP 4---- Receiver Mailbox for receiver need not support SMTP,you can set 4 receivers 5---- Save Click Save to take effect 6---- Test Click Test to see if Mail has been successfully configured.
6) The receiver is denied by the server. Maybe because of the anti-spam privacy of the server 7) The message is denied by the server. Maybe because of the anti-spam privacy of the server 8) The server does not support the authentication mode used by the device 4.4.5 FTP Settings If you want to upload record files and images to your FTP server,you can set FTP Settings. Figure a Figure b FTP server: If your FTP server is located on the LAN, you can set as Figure a.
4.4.6 P2P Access the IP Camera by Smart Phone (Android or iOS operating system) First of all, you must open the P2P function of the IP Camera at “Settings --> Network --> P2P.” Foscam App named Foscam on App Store and Google Play for iOS and Android devices. NOTE: If the QR code scanning is not successful, please input the UID on the bottom of the camera manually. 4.4.7 Onvif On this page, you can enable the Onvif port and RTSP port.
stream video settings. Stream Type: There are four types to identify different streams you have set. If select the HD Mode, the clearer video will become, and it will take up more bandwidth; If select the Smooth Mode, the bandwidth is very narrow, and bit rate is large, that will lead to video can not play well. The Equilibrium Model is a value between HD Mode and Smooth Mode. Resolution: The camera supports multiple types, For example: 960P, 720P, VGA.
select No, the Bit Rate is unchanged. 4.5.2 On Screen Display This page is used to add timestamp and device name on the video. Display Timestamp There are two options: Yes or NO. Select Yes and you can see the system date on the video. Display Camera Name There are two options: Yes or NO. Select Yes and you can see the device name on the video. 4.5.3 Snapshot Settings On this page you can set the snapshot pictures’ image quality and the storage path. Manual snap Quality: Low, Middle and High.
camera will snap pictures to the FTP or SD card automatically. If you select the FTP, you can set the file name which the picture save to (Only C1). Enable timing to capture To enable capture interval, follow the steps below: 1 Select Enable Motion detection 2 Capture interval:The interval time between two captures. 3 Select the capture time Capture anytime Click the black button up the MON, you will see all time range turn red.
Step 1: Enable motion detection function. Step 2: Sensitivity---- It supports five modes: Lowest, Lower, Low, Medium and High. The higher the sensitivity, the camera will be more easily alarmed. Select one motion sensitivity. Step 3: Trigger interval--- The interval time between two motion detection.
D Recording If you select this checkbox, when the motion has been detected, the camera will record automatically and store the record files to the SD Card. Make sure the camera has inserted SD card and you have set the SD card as the Alarm record files storage path, please go to Record—> Storage location page to verify this settings. The default alarm record time is 30s and pre-alarm record time is 5s, please go to Record—> Alarm Record page and change the alarm time settings.
③ Press the left mouse and drag it on the time boxes, you can select the serial area. Step 7: Click Save button to take effect. When the motion has been detected during the detection time in the detection area, the camera will alarm and adopt the corresponding alarm indicators. NOTE: You must set the detection area and detection schedule, or else there is no alarm anywhere and anytime. 4.6.2 Sound alarm The C1 does not support this feature.
If the Sensitivity is set to “High”, the camera will detect the sound whose more than 55db. If the Sensitivity is set to “Medium”, the camera will detect the sound whose more than 65db. If the Sensitivity is set to “Low”, the camera will detect the sound whose more than 75db. If the Sensitivity is set to “Lower”, the camera will detect the sound whose more than 85db. If the Sensitivity is set to “Lowest”, the camera will detect the sound whose more than 95db. 4.
4.7.3 Local Alarm Recording This page you can enable the local alarm record and Local Alarm record time. 4.7.4 Schedule Recording When the video is selected as FTP, the device supports scheduled recording. When the parameter Recording Location is set SD Card on the Storage Location page, you can configure parameters as shown in follow figure.
When the video is selected as SD card, the device supports pumping frame recording. When the parameter Recording Location is set SD Card on the Storage Location page, you can configure parameters as shown in follow figure.
Record full strategy: When the SD card is full, you can choose to cover the previous recording, or stop recording. Audio Record: You can choose "yes" or "no". NOTES: Scheduled recording only supports video saved to the SD card or FTP server. The schedule recording will stop while alarm recording is beginning, and it will continue automatically after alarm recording end. You can refer to "alarm schedule." in "Alarm" about editing the time of recording Schedule. 4.7.
The default storage path of alarm record files is SD card, when the available size of SD card is less than 256M, the old record files will be deleted automatically. SD Card Management: After click the button, you should enter the username and password of the camera. Then you can manage the recording files of the camera in the SD card. The SD card management is only effective when access the camera in LAN. 4.8 PTZ This page will allow you to change the pan/tilt speed and Start-up options. 4.8.
Go to Preset point: Select one preset position and save it. When rebooting, the camera will pan/ tilt and stops at the preset position you have set. 4.9 Firewall This section explains how to control the access permission by checking the client PC’s IP addresses. It is composed of the following columns: Block access from these IP addresses and Only allow access from these IP addresses.
4.10.1 Back-up& Restore Click Backup to save all the parameters you have set. These parameters will be stored in a bin file for future use. Click Browse and select the parameters file you have stored, then click Submit to restore the restore the parameters. 4.10.2 System Upgrade Click “Download the latest firmware”, you will see the following screen. And click “save” to save the firmware on your computer locally. Your current firmware version will be displayed on your screen.
Click Browse, choose the correct bin file and then click System upgrade. Don’t shut down the power during upgrade. After upgrading, you can see the upgrade result. Upgrade Firmware by Equipment Search Tool Double click the Equipment Search Tool shot icon , select the Camera IP that you want to upgrade the firmware. Then select Upgrade Firmware and enter the username and password, choose the firmware file, and upgrade. Figure 4.
CAUTION: We recommend that you regularly update your camera to the latest available software and firmware versions to help ensure the best experience for your camera. NOTES: Read the upgrade documentation (readme.txt file) in the upgrade package before you upgrade. Upon downloading the firmware check the sizes of the .bin files. They must match the size in the readme.txt file. If not, please download the firmware again until the sizes are the same. Your camera will not function correctly if a corrupt .
5 Playback On this page you can view the record files stored in the SD card. Section 1 Define the Record files time and Type : The storage path of record files : Here supports three types: current day, current month and All records. Another way, select the time on the time&date manually. : The type of records files, Here supports two typs: Normal record, Alarm record and All records. : Click this button to search all record files satisfy the conditions you selected.
Section 2 Search record files On this panel you can see all record files satisfy the conditions you set. Section 3 Play/Stop/Audio/Full screen buttons Please select one record file before use these buttons. Click this button to play the record files Click this button to stop the record files Open or stop audio Click this button to make full screen, and double click left mouse to exit full screen.
6 Appendix 6.1 Frequently Asked Questions NOTE: Any questions you would meet, please check Network connections firstly. Check the working status revealed by the indicators on the network server, hub, and exchange. If abnormal, check the network connections. 6.1.1 Equipment search tool cannot find the camera After power on camera and connect it to router by Ethernet cable, open Equipment Search Tool it cannot find any camera IP address. Shows a blank window like below.
6.1.2 Install plugin for Internet Explore Suggest use IE browser to log in the camera and install the plugin for the first time, then you can use it on other browser as well. Just remember to allow the plugin to run. See below for steps to install plugin via IE browser. Step 1: User IE browser to log in the camera for the first time, it will prompt to ask your install the plugin on the bottom of IE browser. Step 2: Click Run to continue the installation of the .exe plugin.
62
Step 4: Click Finish and reboot IE browser to log in the camera.
Note, for Safari on MAC OSX it’ll show a link “Plugins are not found, click me to download” just above login windows of the camera. Please click it to download plugin and follow wizard to install. See this link for help if after installed plugin but still cannot login camera: http://www.foscam.com/faqs/view.html?id=14 6.1.3 Unable to connect to router wirelessly After setup wireless configuration, and input the wireless password correctly, save the settings.
If above are all confirmed, power off and on the camera and router may help camera to connect. Step 5: Please log-in the router and check if the MAC filter feature is enabled. Camera has wired and wireless MAC, they are different. If your router has wireless MAC filtering turned on, it’ll block camera to connect. Please turn it off, or add camera’s MACs in the allow list. Step 6: Please change the wireless channel, and the wireless encryption of router to have a try.
Note: 1) Please DO NOT forget to set the alarm schedule, the alarm schedule is red. 2) Please make sure your camera time is correct. 3) Please DO NOT forget to set the alarm area, the detected area is covered by the red grids. Or for some models you can setup 3 detection zones in total. Step 2: Setup the Storage Location Go to Settings > Record > Storage Location, and set the “Recording Location” to “SD card and click Save.
Step 1: Setup Mail Settings Before you set, please make sure that your email for sender enabled SMTP. And get your Email SMTP server, SMTP port, TLS information ready. Please go to Settings > Network > Mail Settings menu to setup your email firstly. Note: (1) Please make sure that your sender email supports SMTP; (2) Please click on Save before you click on Test; (3) Make sure the test result is success. (4) After succeed, you will receive a test email in the mailbox of Sender.
4. Set your schedule. Do not forget to click on Save after you finish settings. If there is motion trigger, camera will alarm and you can receive alarm emails. Note: (1) Please DO NOT forget to set the alarm schedule, the alarm schedule is red. (2) Please make sure your camera time is correct. (3) Please DO NOT forget to set the alarm area, the detected area is covered by the red grids. Or for some models you can setup 3 detection zones in total. 6.1.
(1) Update app and camera’s firmware to latest version, (2) Power off the camera then power back on, (3) Delete camera from app then re-add it back, also lower camera’s resolution. 6.1.9 Camera is added by others When use myfoscam.com cloud or Foscam app, one camera can only be added to one account at the same time.
Manual Pan/Tilt Angle Horizontal:355°& Vertical: V=270° IR Range High performance IR-LEDs, IR Range up to 8m(26ft) Supports two-way audio Audio Input/Output Built-in Mic & Speaker Audio Compression PCM/G.726 Wireless Standard IEEE802.11b/g/n 2.4GHz: Data Rate IEEE802.11b: 11Mbps(Max.); IEEE802.11g: 54Mbps(Max.); IEEE802.11n: 150Mbps(Max.). Network Frequency bands 2.4-2.
6.4 CE & FCC Electromagnetic Compatibility (EMC) FCC Statement FCC Warning This device complies with Part 15 of the FCC Rules. Operation is subject to the following two conditions: (1) This device may not cause harmful interference, and (2) this device must accept any interference received, including interference that may cause undesired operation. NOTE 1: This equipment has been tested and found to comply with the limits for a Class B digital device, pursuant to part 15 of the FCC Rules.
to the point-of-purchase, which may have regional specific warranty implications. If you purchase your FOSCAM product from online store, please contact the point-of-purchase and ask for return/replacement/repair service. Limited Hardware Warranty FOSCAM products are warranted to be free from manufacturing defects in materials and workmanship starting from the shipping date of FOSCAM.
Warranty is void if purchase from unauthorized distributor or reseller. Warranty is void if trade-mark, serial tags, product stickers have been removed, altered or tampered with. Warranty is void for mishandling, improper use, or defacing the product. Warranty is void for physical damage, altered, either internally or externally, improper or inadequate packaging when returned for RMA purposes.
FOSCAM shall not be liable under any circumstances for any consequential, incidental, special or exemplary damages arising out of or in any connection with this agreement or the products, including but not limited to lost profits, or any claim based on indemnity or contribution, or the failure of any limited or exclusive remedy to achieve its essential purpose or otherwise. Purchaser's exclusive remedy, as against FOSCAM, shall be the repair or replacement of defective parts.
purchased by the customer. Without the prior written permission of Foscam company, all the contents of relevant operating instructions manual affiliated to the product must not be reproduced, transmitted, transcribed or stored in a retrieval system, or translated into other languages. Our company will reserve the right to improve and modify the product and corresponding manuals. The company reserves the right of final interpretation on our products.
7 Obtaining Technical Support While we hope your experience with the IPCAM network camera is enjoyable and easy to use, you may experience some issues or have questions that this User’s Guide has not answered. If you have problem with FOSCAM IP camera, please first contact FOSCAM reseller for solving the problems. If our reseller cannot provide service, please contact our service department: support@foscam.com CE Certificate Website: https://www.foscam.com/company/ce-certificate.