
User Manual


7
Introduction of components
6
Quick start guide
1.Long press the power button on the remote control, after hearing three beeps, release the button to complete the boot;
2.Place the lifebuoy on its back in an unobstructed place on its back, press the lifebuoy switch, the indicator lights will flash alternately and then
the green light will flash slowly. When the green light flashes slowly, the blue light flashes slowly to complete the satellite search; Note: The
satellite search takes about 1 minute, which is mainly affected by factors such as interference from different environments.
3.Press the button A on the remote control, the button A lights up, the blue light of the lifebuoy flashes slowly to a constant light, and the bright
yellow warning light flashes on the edge, it is unlocked, and the location of the lifebuoy is the Home Point;
4.After unlocking, you must wait for about 2 seconds, and then push the left joystick forward slightly, and the two motors can rotate without
abnormality, and the lifebuoy can be put into the water for navigation operation;
5.Affected by different water environment, you can press the button B shortly. When the button B is lit, it is the course lock mode, which can ensure
a long-distance and relatively straight sailing route. Short press the button B again, the light of button B is off, then switch back to manual mode;
6.When you need the lifebuoy to return home automatically after sailing a certain distance, press and hold the button B. When the button B flashes
quickly, the automatic return is activated. When the lifebuoy automatically returns to the shore, please short press the button B to end the automatic
return to avoid unnecessary losses.
The smart remote control lifebuoy with 2-level low voltage protection
Level 1: When the voltage is lower than 23v, the lifebuoy will trigger the first level of voltage protection, and the lifebuoy will automatically switch to
the mode of returnning home point, which can be released by switching to the manual mode.
Level 2: When the voltage is lower than 21.7v, the lifebuoy will trigger the second level of voltage protection, the lifebuoy will stop driving, and it can
be released by switching to the manual mode.When the voltage is low, please stop driving the lifebuoy as soon as possible and charge it in time.
Note:
1.After the remote control is turned on, make sure that the button A and B are in the light off state, if the lights are always on or keep flashing, please
short press it to turn off the lights;
2.Satellite search is affected by local environmental factors, and the absolute time and success rate cannot be guaranteed. If the satellite search
cannot be completed for a long time, please do not use the auto-return mode;
3.By short pressing the button A, you can unlock and lock it, and you can also refresh the home point. In order to avoid the lifebuoy from hitting the
shore without stopping in time when it returns automatically, the lifebuoy can be sailed to 10 meters offshore to refresh the home point;
4.If the lifebuoy is thrown or in use, the lifebuoy is turned to the bottom up: in manual mode, you can directly pull the left joystick back to make the
lifeboat flip back and face upwards for normal use; and in the course correction mode, the lifebuoy will be Automatically flip back to the front (make
sure the water depth is more than 1.5 meters when flipping, otherwise the automatic flip may fail).
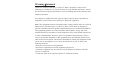
Nameplate
1.Propeller: high-power dual-propelle r;
2.Reflective strips: reflective strips can be attached for
easy identification;
3.Rope hole: a safety rope with a diameter of 10mm or
less can be worn;
4.Rear armrest: easy to grasp when being carried by the
rescuer or during daily transportation;
5.Indicator light: The l ifebu oy sta tus wi ll be displayed
when it is just turned on, and the highlight warning li ght
will be activated after unlocking;
6.Mounting platform: used to mount external equipme nt
such as spotlights;
7.Bumper strip: used for anti-collision;
8.Switch: turn the machine on when pressed, turn it off
when pressed again;
9.Multifunctional mounting platform: used to mount and
install more multi-function devices to be developed ;
10.Charging port: It is used for charging, please pay
attention to the correct direction when charging; Note:
Please pay attention to tighten the charging port cover
before launching the lifebuoy,
11.Front armrest: used to be gr asped by the rescuer;
12.Equipment compartment: Intelligent electronic
control equipment compartment. Because there is a
satellite positioning module in the equipment
compartment, please do not completely cover the upper
part when it is used in the water;
13.Nameplate: display lifebuoy information;
14.Soft handle: easy to extract, grasp, etc.
Propeller
Reflective strip
Rear armrest
Indicator light
Mount platform
Bumper strip
Switch
Multifunctional mounting platform
Front armrest
Equipment
compartment
Charging port
Soft handle
De scr ip tio n o f c omp one nt s
Rope hole