
Product Info
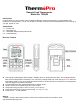
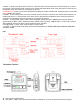


Table Of Contents
- Congratulations on your purchase of the Professional Remote Cooking Thermometer, a programmable radio frequency food thermometer. You will now be able to remotely monitor the time and temperature of food cooking on your grill, smoker or oven.
- Buttons
- Buttons
- Measure meat temperature to USDA doneness temperature range
- 1. Press MODE to select thermometer mode. The upper display will show a small MEAT and a meat type such as BEEF.
- 4. Once the temperature of meat reaches the preset doneness level, the receiver will beep and the LCD backlight will turn red.
- Measure meat temperature set to your specific taste
- Procedure for typical use on an outdoor grill
- The following typical example will go through the steps to have the Professional Remote Cooking Thermometer alert you to when a beef steak is cooked to medium (USDA doneness level) and remind you to rotate hot dogs in 5 minutes.
- 1. Turn on the grill.
- 2. Follow the synchronization/pairing procedure.
- 3. Place steak and hot dogs on grill rack.
- 4. Insert probe sensor into the center of thickest portion of the steak. Avoid touching bone or heavy fat areas. Assume the meat temperature is 45 (F.
- HELPFUL HINTS
- HELPFUL HINTS
- Always wear a heat resistant glove to touch the stainless steel probe sensor or wire during or just after cooking. Do not touch with bare hands.
- Cleaning
- Always wear heat resistant glove to touch the stainless steel probe sensor or wire during or just after cooking. Do not touch with bare hands.
- Keep the stainless steel probe sensor and wire away from children.

Remote Food Thermometer
Model No. TP806B
Introduction
Congratulations on your purchase of the Professional Remote Cooking Thermometer, a programmable radio
frequency food thermometer. You will now be able to remotely monitor the time and temperature of food cooking on
your grill, smoker or oven.
Components
1. 1 - receiver unit
2. 1 - transmitter unit
3. 1 - detachable stainless steel probe sensor
4. 2 - 2*AAA batteries.
Receiver Features
LCD (Liquid Crystal Display) with backlight – Displays all icons, temperature and timer. The backlight will flash
Blue once the temperature increases by 10 ºF from when cooking starts, then it will change to Yellow w
hen the
tem
perature is within 15 ºF of the set temperature and then it will turn Red when it reaches the set temperatur
e.
S
ee LCD diagram for detailed information.
Programmable alert with preset temperatures for specific foods.
23-hour, 59-minute countdown timer and count up timer
Temperature range of probe: 15.8˚F to 572˚F (-9˚C to 300˚C)
.
Tem
perature tolerance of internal food reading: +/-1.8˚F (+/-1.0˚C).
Power source – 2 AAA batteries
.
Buttons
1. M
ODE – Press to select thermometer or timer mode. Press and hold for 2 seconds to enter
Synchronization/Pairing mode.