
Users Manual

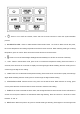
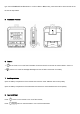
Table Of Contents

3、To pause the count up timer, press the START/STOP/CLEAR button. TIMER ▲ will become solid.
4、If you wish to clear the timer, press and hold the START/STOP/CLEAR button.
15. Synchronize/Pair Transmitter and Receiver
The transmitter and receiver were already paired at our manufacturing facility. Usually you do NOT need to
re-synchronize or re-pair the units. You just plug in the probes, insert batteries, turn on the receiver and the
transmitter and wait for a few seconds, you will see the temperatures shown on both receiver and transmitter and
the units are ready for use.
However, in some unusual cases, the transmitter and receiver are no longer paired, then you may need to
re-synchronize them by following the below steps:
a. Insert two AAA batteries into the receiver, the signal icon on the display will flash。
b. Insert two AAA batteries into the transmitter, insert the stainless steel probes into the corresponding plugs in
the transmitter. The LCD display will show the current temperatures of each probe.
d. Hold the button for three seconds on the receiver to enter the synchronization mode .
e. Wait for a moment until the temperature reading shows on the receiver display, it means the
synchronization/Pairing is completed. Your professional remote cooking thermometer is now ready for use.
Note: The synchronization between the transmitter and the receiver won't be lost even if you replace the
batteries.
16. Helpful Hints
· If the receiver and / or the transmitter do not show the temperature, wait for the probe to reach room
temperature. Push the probe jacks harder into the transmitter and twist them back and forth so they make good
contact. If the problem persists, it is likely the internal probe wire has shorted out either through moisture or heat
damage.