
User's Manual


BATTERY INSTALLATION AND ACTIVATION
Notes:
Always replace all batteries at the same time; do not mix old and new batteries. Do not mix alkaline,
standard (carbon-zinc) or rechargeable (ni-cad, ni-mh, etc.) batteries.
For maximum performance in normal conditions we recommend using good quality alkaline batteries.
When temperatures are near or below freezing (32°F / 0°C), alkaline batteries can lose power resulting in a
loss of remote transmission. If you reside in an area that experiences frequent temperatures near or below
freezing, we recommend using lithium batteries to minimize the loss of transmission.
NOTE: please recycle or dispose of batteries per local regulations.
WARNING: Batteries may pose a choking hazard. Do not let children handle batteries.
PRECAUTION: Do not dispose of batteries in fire. Batteries may explode or leak. Remove the batteries if the
thermometer or remote sensor will not be used for a long period of time.
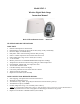
Battery Installation of Base Unit
Remove the vinyl label from the LCD of the base unit.
Open the battery door at the back of the base unit and insert (2) AA batteries according to the polarity
markings. Replace the battery door.
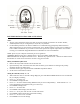
Insert the end of a paper clip into the hole in RESET and push the button.
Set the clock and calendar as follows.
Setting the Calendar, Clock, °C / °F:
When either the clock or calendar is being displayed, press and hold the MODE button for 3-4 seconds until
the year display is flashing
Press + or – to set the year
Press MODE to display the date
Press + or – to set the month and day (Month and day are not set independently. Push and hold + or – to
fast scroll through to the month and day you want to set).
Press MODE to display time
Press + or – to set the time
Press MODE and the display will show 12 hr
Press + or – to set your clock to 12 hr or 24 hr time format
Press MODE and the temperature field will be flashing
Press + or – to select °F or °C format
Press MODE to lock in the settings