
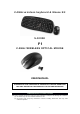
User Manual

-
3
-
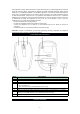
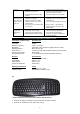
Installing/Replacing Batteries
This Wireless Optical Mouse operates on two ‘AAA' (UM-4) siz
e
batteries (not included).
1. Slide Power Switch to “OFF”.
2. Remove the battery compartment cover located at the botto
m
cabinet.
3. Remove all old batteries at the same time (if any).
4. Following the polarity diagram shown inside the batter
y
compartment, insert two fresh ‘AAA' (UM-4) size alkalin
e
batteries or Ni-MH rechargeable batteries (not included).
5. Replace the battery compartment cover making sure it i
s
securely closed.
6. Slide Power Switch to “ON” to use.
IMPORTANT
: Be sure that the batteries are installed correctly. Wrong polarity may
damage the unit.
7. When the mouse response or cursor movement slows down noticeably, the batteries are
becoming weak and need to be replaced. Please remove all the old batteries and
replace with fresh good quality alkaline or NiMH batteries as soon as possible.
WARNINGS!
Batteries must be installed or replaced by an adult.
The use of good quality alkaline batteries is recommended.
Place batteries based on the polarity shown on the battery compartment.
Only use the recommended type of batteries.
Non rechargeable batteries are not to be recharged
Rechargeable batteries are only to be charged under adult supervision
Rechargeable batteries are to be removed before being charged.
DO NOT mix different types of batteries together.
DO NOT mix new and old batteries together.
If you do not use the product for an extended period of time, we recommend that you take
out the batteries. Remove exhausted batteries from the product. Battery leak may
cause damage.
DO NOT short circuit the terminals of the battery.
DO NOT throw batteries into an open flame. They may explode.
Keep the packaging for future reference as it contains important information
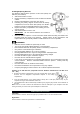
Installing of the USB Receiver (Compatible with OS: Windows 2000/XP/Vista/7 and Mac OS X
10.5 – 10.6)
1. Remove the Battery Compartment Cover and carefully slide out the US
B
Receiver from its designated compartment adjacent to the batter
y
compartment.
2. Insert the USB Receiver of the Optical Mouse directly into a USB port (USB 1.1-3.0) of your
computer running on either Windows or Mac OS.
3. Your USB Receiver will be automatically installed by the plug and play function of the Windows or
Mac OS.
Note: There is no need to remove the USB Receiver from the USB port of your computer even after
turning off unless you need to free up the USB port for other device.
OPERATING INSTRUCTIONS
Left Button
Use this button to select an item from a pop up or pull down menu or to click a function button.
Right Button
Use this button to access the quick menu of a related function.