
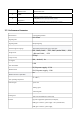
Specifications


Observe the ray of light fall to the smallest point on the surface of the object. When the light is rotated to the smallest
point, the focal length is adjusted. Note that the smaller the focus adjustment, the more delicate the effect of image
tuning, if the focal length is not adjusted well, there may be no engraved image.
1.2.4 Power Supply
This model can be powered by USB and DC adapters.
USB power supply: USB adapter + type-c cable. To ensure good engraving effect, please use the original adapter and
cable link.
DC adapter power supply (optional) : this model can be equipped with 12V DC adapter power supply, can be
purchased according to your actual needs.
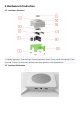
1.2.5 Indicator Light
(Indicator light location diagram)
Working state (blue highlight) : when cengraving, it is always on, when not engraving, it is off.
Power supply (red highlight) : always on after normal power on, flashing when in upgrade mode.
Connection status (green highlight) : bluetooth or USB connection is always on and off when disconnected
1.3 Operation Process
Computer control engraving: connect the power -- connect the computer -- open engraving software -- import the print
picture -- adjust the focus -- send the picture -- click preview print -- confirm the position to be carved -- start preview
and printing -- finish printing -- unplug the power cord;
Mobile phone control engraving: connect the power -- connect bluetooth -- import the printed picture -- import the
printed picture -- adjust the focus -- send the picture -- click preview print -- confirm the position to be carved -- start
preview and printing -- finish printing -- unplug the power cord;
(pictures and detailed steps for PC software and APP)