Multimedia All In One Interactive Display User Manual
Contents I Product interface ............................................................................................ 错误!未定义书签。 II Product functions ............................................................................................ 错误!未定义书签。 1 Launcher ................................................................................................... 错误!未定义书签。 1.1 Homepage ...................................................................................... 错误!未定义书签。 1.1.1 Shortcut ..........
.4 System ............................................................................................ 错误!未定义书签。 3.4.1 Date and time ...................................................................... 错误!未定义书签。 3.4.2 Lang&input ........................................................................ 错误!未定义书签。 3.4.3 Power state.......................................................................... 错误!未定义书签。 3.4.4 Update .................................................................................
VIII Safety Instructions .......................................................................................
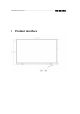
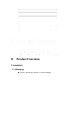
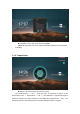
II Product Functions 1 Launcher 1.1 Homepage Theme 1: Switch the themes in “System settings”.
Theme 2: Switch the themes in “System settings”. Theme 3: Switch the themes in “System settings”.
1.1.1 Shortcuts Gallery Calendar Calculator Browser Apps Miracast Miracast: Click “Miracast” and enter the interface of wireless transmission screen. More details on “Miracast”. Calculator: Click “Calculator” and open it. More details on “Calculator”. Calendar: Click “Calendar” and open it. More details on “Calendar”. Gallery: Click “Gallery” and open it. More details on “Gallery”. Browser: Click “Browser” with internet connection to access the Internet.
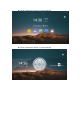
Display the current date, time and week. Set the formats of date and time in “System Settings”. 1.1.3 Countdown/Famous quotation Long press “Countdown” to select the prompts of popup settings of “Countdown” or “Famous quotation”.
Countdown: Fill in the name of event and date. Famous quotation: Fill in the content of famous quotation from Monday to Sunday. 1.1.4 Temperature Monitor the temperature of machine in time. The temperature is < 65 ℃ , then the color of characters is green. If the temperature is 65 ≤ temperature < 85 ℃ , the characters is yellow and popup is shown to choose turn off the machine or not. While the temperature is ≥85℃, the characters will turn red and machine is forced to shutdown after 5 seconds.
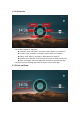
1.1.5 Status icon The corresponding icons show the connection status of USB flash drive, network and bluetooth and click each icon to open each own settings. 1.1.6 Wallpaper The system provides 10 pieces of wallpaper with automatic rotate multicast, and the interval of rotation is 10 seconds. You can customize the wallpaper in “System Settings”.
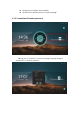
1.2 Signal source preview Slip to the right on the homepage and enter the interface of signal source preview. The signal source preview list shows the connected signal source and supports to switch signal with a click. 1.3 Sidebar 1. Return 2. Homepage 3. System settings 4. File Management 5. Hide sidebar 6. Input 7. Control panel 8.
1.3.1 Reveal sidebar Click icons or on both sides of interface to reveal sidebar. 1.3.2 Return Click icon “Return” to get back to last page. 1.3.3 Homepage Click icon “Homepage” to get back to the Android homepage. 1.3.4 System settings Click icon “System settings” to reveal the interface of system settings on current page and refer to “3 System settings”. 1.3.
1.3.6 Hide sidebar Click icon”Hide sidebar” to fold sidebar and only to display icon “Hide sidebar”. It’ll automatically hide itself within no operation in 10 seconds. 1.3.7 Input list Click icon “Input” to unfold and display signal source list for switching channel into selected signal source.
If current channel has no signal, the below interface will be displayed on screen. 1.3.8 Control panel Click icon “Control panel” to unfold and display control panel on current page.
Ethernet: Click icon “Ethernet” to turn on/off wired network. WLAN: Click icon “WLAN” to turn on/ff wireless network. Hotspot: Click icon “Hotspot” to turn on/off hotspot. Screen shut: Take a screen shut of the current screen. It supports adjustable screen shot area or full screen shot and also supports to insert the screen shut into whiteboard directly. Child lock: Open the child lock to lock touch function of screen and touch function is out of service. Child lock mark is on the top left.
Timer: 1. Choose 00:00:00 and start to time. 2. Choose no 00:00:00 and start to count down. Click icon “Bell” to open remind function. When count down is over, system will remind you with a sound. 3. Start timer on full screen. Intelligent eye protection: Click icon to turn on/off intelligent eye protection mode. Protect users’ eyes through reducing blue light and turning interface into yellow light mode. Touch sensitive: Click icon to turn on/off touch sensitive function.
1. Slide lock 2.
3. Pattern lock Sound and brightness adjustment Sound adjustment: Drag slider to adjust system volume. Brightness adjustment: Drag slider to adjust the backlight brightness. Or tun on the automatic mode to adjust brightness based on ambient brightness variation.
System application: Quickly open applications like whiteboard, timer, wireless transfer screen, photos, calendar, browser. Personal application: Display the third-party application manually installed by the user and click to open the corresponding application.
1.3.9 Power options Click icon “Power options” to display power options on current page. Turn off OPS: Only to shut down OPS. Powered off: Shutdown main board and OPS. Restart: Restart the main board. Sleep: Turn of the backlight. Awake machine through touching, clicking on remote control or press any key on key board. 1.4 Box Long press with five fingers on any place of interface to quickly drag box to the location of touch.
1.4.1 Return Back to previous page. 1.4.2 Whiteboard Open whiteboard. 1.4.3 OPS Enter OPS channel. 1.4.4 Homepage Back to Android interface. 1.4.5 Multitask View the current running process. Click icon on the top right corner or slide process to left/right to close the process. Click icon “Delete” on the bottom to shutdown all process at once.
1.4.6 Annotation Enter the annotation mode to annotate with writing marks on current page and refer to “5 Annotation”. 2 File Management 2.1 File classification Whole, Whiteboard, Picture, File, Video, Music, Compression sack and APK. Choose different classification to quickly check different context.
2.2 Routing selection Plug in USB flash drive and the name of it will show. Choose it and enter its file classification. 2.3 Operation management Select, copy, paste, move and delete files.
2.
3 System settings 3.1 Network 3.1.1 WLAN Open the wireless network and the available wireless network can be displayed automatically. Click icon “scan” in the upper right corner to refresh the network list. Click on the network list and fill in the correct password to connect to the network.
Click icon “plus” on the bottom to add the network. 3.1.2 Ethernet Turn on the Ethernet and appear access to IP option. Choose to access IP automatically and connect to network after plug in network cable. Select manual settings to set IP address, default gateway, subnet mask, DNS1 and DNS2.
3.1.
Customize hotspot name, encryption method and password. Display connected devices and add connected device blacklist. Open QR code and scan code to get hot spot name and password. Display advanced options to select AP frequency band and set the maximum number of connections. 3.1.4 Network state Displays current network connection mode, IP address, subnet mask, gateway, DNS1 and DNS2.
3.2 General 3.2.1 Theme The system provides 3 sets of themes by default. Choose to switch themes to present different UI effects on the homepage. 3.2.2 Wallpaper The system provides 10 pieces of wallpaper with automatic rotate multicast. Users can upload the customized wallpaper.
3.2.3 Box Set the time of box hiding: Always-on, 5 seconds/ 10seconds/ 15seconds/ 20 seconds. Set the form of box hiding: Fold into small circle or disappear. 3.2.4 Sound and backlight Adjust the volume. Adjust backlight brightness manually or automatically.
3.3 Advanced 3.3.1 Printer View the installation of printer service guide. 3.3.2 Input Set up boot channel: 1. Fixed channel: Access to a fixed channel after the boot. 2. Memory channel: Access to previous connected channel after the boot.
Signal source access: 1. Automatic jump: Access the signal source, it’ll automatically jump to the corresponding channel. 2. Pop-up prompts: Access the signal source, a pop-up appears asking whether to jump to the source channel. Channel name: Customize the channel name. After changing the name, the corresponding channel name of the whole system will be modified synchronously. Automatic awake: Turn on automatic awake.
3.4 System 3.4.1 Date and time Automatic: Turn on to automatically synchronize network time. Time format: 24hr or 12hr. Date format: YYYY/MM/DD or MM/DD/YYYY. Time zone: Select the time zone.
3.4.2 Lang&input Language: Support 3 kinds of language, which is Simplified Chinese, Traditional Chinese and English. Input: Default Android Keyboard. Manually switch to others.
3.4.3 Power state Boot options: Choose ON after boot or Choose Standby mode after boot. Sleep: without operation for 1min, without operation for 5min, without operation for 10 min, without operation for 15min and without operation for 20min and Always-on. Standby: Turn on standby and choose time to automatic standby after 30min/60min /90min/custom without signal.
Auto On:Set time to auto on/off. 3.4.4 Update Update: View the firmware version number and update the firmware online. Set OTA server.
3.4.5 Security Screen lock: 1. Choose screen lock mode: Password lock, Pattern lock and Pattern lock. 2. Screen auto lock: Sleep for 5 seconds/ 10 seconds/ 30 seconds/ 1 min/ 10 mins to lock screen. Apps lock: Set the password. Select the password-protected application and enter the password to open the password-protected application 3.4.6 Factory reset Restore to factory settings will delete all operation records and saved contents, and restore the device to factory state.
3.4.7 Privacy Policy Access to privacy agreement. 3.4.8 About View native information, including name (editable), RAM, storage, resolution, Android version and Mac address.
4 Whiteboard 4.1 Standard mode 4.1.1 Writing Function description: Set the thickness, color, and opacity of handwriting. Operation mode: Click the dot in the writing setting area to change the thickness of the handwriting. The current thickness of the handwriting is blue dot. Click to open the color panel to switch the color, and the color transparency can be set at the bottom of the color panel.
4.1.2 Erase Function description: Erase the handwriting on the whiteboard. Choose different ways to erase. Operation mode: Click “Erase” button to enter erase mode which provides three ways. But in fact, there are four ways. First, click “Dot erase” is like a rubber. Second, click “Circle erase” is to delete the selected area. Third, click “Erase all” to clean all the contents of current page. Besides, last, intelligent erase is available for using full palm to erase.
4.1.3 Shape Function description: Draw lines, rectangles and other shapes. Operation mode: Click "Shape" button to show the shape panel. Select the shape and then slide it on the screen to draw the shape. 4.1.4 Selection Function description: Scale and move the selected elements or selected areas. Operation mode: Click "Select" button to switch to the selection mode.
4.1.6 Redo Function description: Undo the previous step. Operation mode: Click "Redo" button and cancel and undo the previous step in the canvas. 4.1.7 Single/Multi-point Function description: Switch single or multi point. In single-point mode, use two fingers as gesture to scale or move the canvas. In this mode, it only supports one touch. In multi-point mode, it supports multi touch decided by the touch settings. Operation mode: Click “single/multi-point” button to switch single/multi-point state.
of pen. Blue dot represents the current thickness of pen. Click set the color of thick pen. Click thin pen thick pen to to set the color of thin pen. 4.2.2 Clean screen Function description: Clean the content of current page. Operation mode: Click “Clean screen” button to empty the content of current page. 4.2.3 Undo Same as 4.1.5 4.2.4 Redo Same as 4.1.6 4.
4.3.1 New Function description: Create a whiteboard. Operation mode: Click “New” on the menu. It’ll pop out the saving operation. Click “Yes” button, then save the current file first and create a new whiteboard later. The process of saving is the same as “3.1.3 Save”. Click “No” button, then create a new whiteboard directly. 4.3.2 Open Function description: Open local whiteboard.
4.3.4 Save as Function description: Save the current whiteboard file as another whiteboard file. Operation mode: Same as ”4.1.3Save”. 4.3.5 Insert Function description: Insert an image to the whiteboard file. Operation mode: Click "Insert" button in the menu panel to bring up file management. Focus on picture classification and click the selected picture to insert the picture into the white board. 4.3.6 Scan Function description: Generate webpage link QR code.
Note: Make sure you have a network connection and normal access to the Internet before using the code sharing function. 4.3.7 Email Function description: Mail the current whiteboard content to the specified user. Operation mode: Click "Email" button in the menu panel and call up the mail sending panel. Enter the email address of receiver and click send to complete sharing. It supports no more than 10 receiver and prompts the success of sending email.
4.3.8 Setting Writing mode switching 1. Function description: Switch writing mode into Classic mode/Standard mode. 2. Operation mode: After entering the Settings panel, click the mode you need to switch in the writing mode. If the current whiteboard content is not saved, it will prompt whether to save or not, and then follow the screen prompt to operate. After the switch is completed, the white board function panel will switch to the new mode state. Set the drawing board background 1.
other information. After setting and configuration, the email address entered by the user will be the sender. 4.3.9 Exit Function description: Exit the whiteboard. Operation mode: Click "Exit" button in the menu panel. If there is any content in the whiteboard, please complete the corresponding operation according to the screen prompt before exiting. If the whiteboard content is empty, exit the whiteboard application directly. 4.4 Page management 4.4.
4.4.3 Browser Function description: View page thumbnails. Operation mode: Click "Browse" button to pop up the page thumbnail and click to jump to the corresponding page. 4.4.4 Add Function description: Add a new page. Operation mode: Click “Add” button to insert the new page after the current page. 5 Annotation 5.1 Open annotation Click icon “Annotation” on the sidebar or box.
Only one side of the toolbar on the left and right side is activated and the tool icon in the toolbar on the activated side is highlighted to indicate the operable state, while the other side is gray to indicate that it is not activated. When touch the annotation icon in the left navigation bar to open the annotation, the left side of the popup annotation toolbar is the activated state.
5.2.2 Erase Click icon “Erase” to erase annotations. Four ways as follows: Dot erase: The eraser icon appears when erasing. Click eraser to erase across the handwriting. Circle erase: The circle erases only delete the handwriting of the selected area. When circle or across the area, the handwriting will be surrounded by red color which indicates it’s selected. Loosen the finger to complete delete.
5.2.3 Save Click icon “Save” in the toolbar to take a screenshot of the current annotation and save it. You can choose the file saving device freely.
5.2.4 Scan to share Click icon “Scan to share” in the toolbar. QR code will pop up. Scan the QR code to view the annotation. Before using this function, please ensure that the device network status is normal and the connection is smooth. Click the encryption button to randomly generate 4 access codes to encrypt the link. After scanning the code, the user needs to input the access code to view the comments. Click the QR code to enlarge. 5.2.5 Exit annotation Click icon “Exit” of toolbar.
III Working environment # Parameter 1 Working temp (surroundings) 2 Working humidity +5 Scale # ℃ ~ +40 ℃ 1 20% ~ 80% 3 IV Feasibility test # Test item Environment 1 High temp storage test Ta=+50℃ 240h 2 Cryogenic storage test Ta=-10℃240h 3 High temp working test Ta=+40℃240h 4 Cryogenic working test Ta=+5℃ 240h 5 Vibration test (non-working status) Frequency: 10~57Hz/amplitude (one direction): 0.075mm :58~500Hz/acceleration: 9.
Speaker 8Ω/15W*2 Wall mount B75 Network 100M / 12500KB (12.5M) Maximum operating frequency: The highest internal operating frequency is on the motherboard. DDR3 NT5CB128M16IP-EK / 128M * 16 The FBGA96 brand is South Asia. The operating frequency is 933MHz. The bit numbers are MU400, MU401. VI Packing list Display 1 Remote 1 (without battery) Power cable 1*1.
Wall mount 1 User manual 1 VII Environmental Protection and ROHS Restricted substances and its chemical symbols Unit Lead (PB) Mercury (HG) Cadmiu m (CD) Hexavalent chromium(Cr) Polybrominated biphenyls(PBB) Polybrominated diphenyl ethers(PBDE) Type 75 LCD DL75GUG1 _ o o Circuit board _ o o o o o Shell o o o o o o Glass panel _ o o o o o Speaker o o o o o o Remote control o o o o o o Power cable _ o o o o o Other cables _ o o o o o Horn _ o
Environment-friendly Use Period This mark refers to the time limit (ten years). The harmful substances contained in the electrical and electronic products will not cause serious pollution to the environment or serious damage to their personal and property under normal use conditions. Caution: Excessive use of fear may damage eyesight. Cautions : (1) Please take a rest for 10 minutes after using it for 30 minutes.
Operations: Avoid direct sunlight on the monitor and keep it away from the stove or other heat sources. Remove any objects that may fall into the ventilation holes or hinder the heat dissipation of the display electronics. Do not block the ventilation holes on the machine. When placing the monitor, make sure that the power plug and socket are easy to use.
—Temperature: + 5C ° ~ +40 C ° —Humidity: 20-80% RH The LCD panel temperature needs to be maintained at 25 degrees Celsius at any time to achieve the best lighting performance. Important: When not using the monitor, be sure to start the dynamic screen protector program. If the machine displays invariable static conten, be sure to start the screen timing reorganization application.
-- Increase the separation between the equipment and receiver. -- Connect the equipment into an outlet on a circuit different from that to which the receiver is connected. -- Consult the dealer or an experienced radio/TV technician for help. This equipment should be installed and operated with minimum distance 20cm between the radiator and your body.