
User's Manual


III. Mounting the camera to the wall
Note: In order to obtain the best product performance and avoid unnecessary
environmental disturbances, please pay attention to the following during the
installation process:
1.Do not install the product nearly to the heat sources, such as outdoor units
of air conditioners, kitchen exhausts, etc.
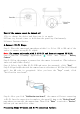
2.Make sure there are no reflections within 5 feet (1.5 meters) of the PIR sensor,
otherwise it will interfere with the normal function of the sensor.
3.Try to avoid installing the product on the side of a lively road. Frequent
pedestrians and vehicles will keep waking up the camera, resulting in frequent
alarm messages and extremely fast power consumption.
4.Do not install the product very far from the router, the product needs a good
WI-FI signal to work properly.
Tools needed:
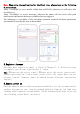
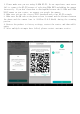
Step 1: Select the location where you need to install the camera, take the camera
and the phone to the location, and use the "Installation Guide" in the application
to diagnose the network and determine whether the WI-FI signal at the location
is good.
It is recommended to install the camera in a location with good WI-FI signal for
smooth camera operation.
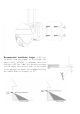
Step 2: Use Power Drill and four screws. Secure the camera metal bracket to the
wall, 8-10 feet off the ground (2.4m-3m) is recommended, snap the camera into
the metal bracket and secure the camera with the four thumb screw.