V2.0 Creality Sonic Pad User Manual SHENZHEN CREALITY 3D TECHNOLOGY CO., LTD.
Thank you for choosing our prodcuts. For the better experiecne, please read the entire instruction before operating the product. Our teams will always be ready to provide you the best service. Please contact us by phone or email provided at the end of this document if you encounter any problem with our product. In addition, you can visit our official website at www.creality.com to find relevant software/hardware information, contact details, operation, and warranty instructions.
Catalogue 01. Product Description 01 02. Packing list 01 03. Interface and button description 02 04. Operation Precautions 03 05. First use 03 06. Daily use 07 07. System upgrade 10 08. Advanced options 10 09. Time lapse video 14 10. Slicing software displays previews and thumbnails 16 11. Adaptation of other printers 18 12. The use of WEB operation terminal 20 13.
1. Product Description When the Creality Sonic Pad is connected to the FDM printer via a USB cable, it becomes the core system of the printer. Hardware Specifications CPU T800 RAM 2GB ROM 8GB USB 2.0 interface 4 Screen resolution & size 1024x600 & 7 Inch Wi-Fi protocol IEEE 802.11b/g/n LAN interface 100M Gsensor interface PS/2 Power interface DC 2.5 Input voltage 12V 2.
1. Creality Sonic Pad x1 2. 12V power adapter (including adapter) x1 3. G-sensor data cable x1 4. G-sensor x1 5. USB cable x1 6. USB drive x1 7. MicroUSB to MiniUSB connector x1 8. MicroUSB to Type-C connector x1 9. Instructions x1 10. Screw Pack x1 3.
USB 1 System status light M3 mounting Power indicator holes Power button USB 2 M3 mounting holes 4. Operation Precautions 1. Please use the product strictly in accordance with this manual to avoid personal injury and property damage. 2. Do not place the machine near any heat source or flammable or explosive objects. We suggest placing it in a well -ventilated, low-dust environment. 3. Please use the power adapter that comes with the machine to prevent damage to the machine. 4.
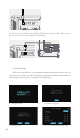
USB DC CAM LAN SENSOR 1.2 Connect the Creality Sonic Pad and 3D printer with a USB cable to your printer (Use the correct adapter if necessary). USB DC CAM LAN SENSOR 2. Boot Settings After the connection is completed, press the power button of the Creality Sonic Pad to enter the boot-up operation (follow the order of the guide instructions to configure the product). 04 2.1 Startup screen 2.2 Select language 2.3 Select region 2.4.
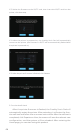
2.4.2 Add a network(optional) 2.4.3 The network connection is completed(optional) 2.5 Privacy setting, click next after 2.6 Device Rename reading and agree by selecting the checkbox 2.7 Printer firmware flashing 2.7.1 Select printer model(users need to open up the printer to check the motherboard chip model. 2.7.2 Taking the model Ender-3 S1 as an example, after selecting the model, you will enter the flashing guide page. Please prepare a card reader and memory card for the printer flashing.
2.7.3 Write the firmware to the SD/TF card, then insert the SD/TF card into the printer, click Next step. 2.7.4 After the printer is powered on, the Creality Sonic Pad will automatically connect to the printer. (the firmware in SD/TF will be automatically flashed after the printer is powered on) 2.7.5 After the printer firmware is flashed, click Restart. 3. Functional self-check After the printer firmware is flashed, the Creality Sonic Pad will automatically restart the printer.
6. Daily use 1. Print 1.1 Enter the Home page and click "Print". 1.2 Select the gcode file saved locally or in the USB drive, click on the to print the file.
1.3 Enter printing interface, the printer starts to print, and the screen will display printing information such as estimated time. 1.4 Parameters can be adjusted during the printing process, the specific parameters are shown in the figure. Note: Parameter adjustment can only be performed after the printer starts printing, and cannot be adjusted during the preparation process (such as heating). 1.5 During the printing process, you can choose to Pause/Stop printing.
1.7 Creality Sonic Pad will jump to the following interface after Emergency Stop, you need to manually click Restart to restore the connection. 2. Slicing file management 2.1 Enter the gcode selection page and perform the following operations. A Manage gcode files, USB drive and local files can be copy from and to each other or vise versa. Files can also be delete from here. B The sort type of the file. C In the model preview area, you can view the details of the slice file. D Click on to print the gcode file.
7. System upgrade 1. Online upgrade 1.1 On the home page, go to "Configurate" > "Other Settings" to check for new version. 1.2 Click System Upgrade and follow the on-screen prompts. After the upgrade is complete, the system will restart automatically. 2. USB drive upgrade 2.1 Please go to https://www.creality.com/pages/download Ecosystem to download the corresponding upgrade file. Decompression it and copy to the root directory of the USB drive.
2. Console Click the button to show/hide the console. 3. HOTEND PID calibration Click to enter the calibration page, set the hotend calibration temperature, click to start calibration, and confirm that the calibration is completed according to the prompts, the system will automatically save. 4.
5. Measuring resonances Go to Other settings, Advanced options, and click Measuring resonances. 5.1 Enter the Measuring resonances page, connect and install the sensor as shown in the figure. 5.2 After connecting the sensor and installing it, click Next step to enter the detection page.
5.3 Click Start test to start detection, the printer will reset to zero, and then perform automatic detection. 5.4 After the detection is completed, click Detection complete to exit the detection page. After saving the configuration, the Creality Sonic Pad will restart. 6. Automatic detection The self-test items can be freely selected. After selecting, click to start the detection and follow the guidance to complete the detection. After completion, you need to save the configuration. 7.
9. Time lapse video 1. Power off the Creality Sonic Pad before connecting the camera to the USB interface. Power it on then enter the Configure page and click the camera. 2. Go to the Camera page, click the camera icon, and check Connect camera. 3. Click the setting page.