Robotic Vacuum Cleaner User Manual Pisa read the Instructions carefully before using this product and keep it properly.
When using the product, please keep your vigilance and follow below information Please read the manual carefully before using the product. Please keep instruction 1} Products cannot be used by children under 8 veers of age or pastie with mental disabilities. if vou nest 10 use it, please do so under the supervision of the guardian. Firebase do not let children ride on the product or play the product as a toy.
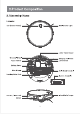
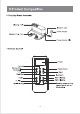
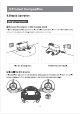
assembly Name + Master Key (Start or Pause) Witt Indicator Light Lower Vision Sensor Universal Wheel Charging Pole Pisces Eight Brushes Left Brushes Battery Cover Drive Wheels Roller Brush Assembly Dust Box/Water Tank Suction Assembly Dust Box / Water Tank Switch infrared buffer bumper
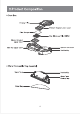
# Charging Stand Assembly Cleaning Tools Indicator Light Power Adapter Power Adapter Slots » Remote Control Screen Forward Setting time 7 Schedule Return home Left Right Stop/Start Backward Turbo Spot cleaning Full Go w Auto cleaning Wall following d = Seeping mode setting (water tank is not for this model }
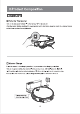
# Dust Hox Primary Filter Filter Sponge Efficient Bracket Upper Cover Dust Box Lower Cover Dustbin Key Dust Box Upper Cover Dustbin Key Water Tank Sealing Plug Water Rag
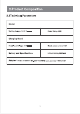
technical Parameters Master Working Voltage: 14.52 V Power Rating: 25W Charging Stand Rated Input Voltage: 18 V Rated output current: 0.
considerations Please refer to the following guidelines to check the cleaning area before the main engine works. Power lines and other debris scattered on the Please roll the carpet tassels or work on ground may trip up. Product must be removed short-hale rugs. A gap of less than 8 om on the bottom of the A guardrail should be placed at the sags of the furniture may cater the product. If you need fo duplex to ensure safe operation of the product. clean it, peas raise the furniture.
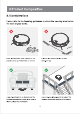
rapidity Operation Charging Preparation El Connect the adapter to the charging send Place the charging stand flat against the wall.
Start to charge El Turn On The Master Tum on the side power switch, “1” is the tum on, "0" Is the tum off. After the master finishes working, It is recommended not to shut down; keep the master in 8 state of charge so that it can perform is next job better. Fl Master Charge Place the master In the charging stand and pay attention to the charging pole piece Tum on the power switch, the robot will enter standby mode. (I) Red light/pink lighthouses Hg ht breathing light flashes indicates charging.