
Product Description


Shenzhen CHT Technology Co., Ltd.
Rev:1.4
first page A total of 7 pages
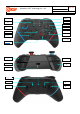
In the joystick sleep state, first hold down the left 3D rocker (L3 key), and then press "R" key. The channel light will light up and
flash left and right, and the joystick will enter the gyroscope sensor factory correction mode.Place the handle on a flat table and
press the "+" button. After release, the 4 channel lights will light up and all will be off in 3 seconds. After the factory completes the
calibration, the handle will return to the dormant state.(Before the product leaves the factory, the gyroscope sensor shall be
corrected according to this operation)
6. Factory mode setting of handle
When the handle is in hibernation state, hold down the left 3D rocker (L3 key) and the right 3D rocker (R3 key), and then press the
"docking" key. All the channel lights will be on, and the handle will enter the factory mode.After releasing the "docking" button, the
joystick returns to sleep state. Note that the "docking" button should not be pressed for more than 2 seconds during the setting
process.(The wake-up function of any key is turned off in the factory mode of the handle, which can avoid the problem that the
handle is often in the connection state caused by miscontact due to packaging and transportation.)
7. Exit factory mode
When the gamepad is in factory mode, only the "butt" button can open the gamepad.Long press the "butt" button of the handle,
and after successfully connecting the Switch host once, the handle will automatically exit the factory mode. After using the handle,
it can wake up with any key.
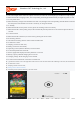
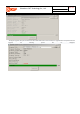
8. Calibrate the handle gyroscope inductor with Switch host
After the Switch host is successfully connected to the gamepad, return to the main menu of the screen and click "Settings" to
enter the Settings menu.Scroll down the setting menu, click the item "Handle and Sensor", scroll up the menu to expand to the
right, select "Calibration Gyroscope Sensor", and click "Calibration Handle" in the pop-up menu.The host enters the calibration
handle interface. First, place the handle on a flat desktop, and then follow the instructions on the screen. Long press the "-" or "+"
button of the handle to complete the gyroscope calibration.Gyroscope correction interface is as follows:
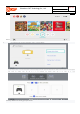
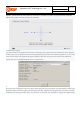
5. Use Switch host to calibrate the 3D joystick
After the Switch host is successfully connected to the gamepad, return to the main menu of the screen and click
"Settings" to enter the Settings menu.Drag down the setting menu, click the item "Handle and Sensor", scroll up
the menu list on the right, select "Calibration Rocker", press the rocker to be calibrated on the screen, enter the
confirmation interface of "Calibration Rocker", press the "X" button of the handle to appear the prompt menu,
and then press the "A" button to confirm the calibration.After entering the "Correction Joystick" correction