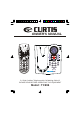
OWNER'S MANUAL ERASE In Use Ans On/Off Chg OGM PLAY STOP ON/OFF SKIP REPEAT ANS Mail 1 Mail 2 Mail 3 MIN UTE DAY CO DE SET HOUR Option Mail 4 ME MO PAGE 2.
Contents Safety Instructions........................................................................................................... 3 HANDSET CONTROLS................................................................................................... 5 BASE UNIT Controls........................................................................................................ 7 GettingStarted...................................................................................................................
Contents Function Settings.......................................................................................................21 A. Setting the Ringer Level................................................................................ 22 B. Changing the Language............................................................................... 22 C. Turning the First Ring ON or OFF................................................................23 D. Setting the Time and Date................................
Contents B. To erase all of the messages in an individual mailbox......................................32 C. To erase selected messages/memos.................................................................33 When the Memory is Full..........................................................................................33 Two-way Recording...................................................................................................33 Remote Access Codes.................................................
Safety Instructions IMPORTANT SAFETY INSTRUCTIONS To reduce the risk of fire, electric shock and/or injury, always follow these basic safety precautions when using your cordless telephone equipment. 1. Read and understand all instructions. 2. Follow all warnings and instructions marked on the telephone. 3. Do not use this telephone near a bathtub, wash bowl, kitchen sink, or laundry tub, in a wet basement, near a swimming pool, or anywhere else where there is water. 4.
Safety Instructions 16. 17. 18. 19. D. If the telephone does not operate normally by following the operating instructions. Adjust only those controls that are covered by the operating instructions. Improper adjustment may require extensive work by a qualified technician to restore the telephone to normal operation. E. If the telephone has been dropped or the case has been damaged. F. If the telephone exhibits a distinct change in performance. Never install telephone wiring during a lightning storm.
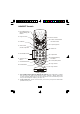
HANDSET Controls 1. New Call/Msg Waiting (Message Waiting) LED Indicator 2. Large LCD Screen 9. Batt Low Indicator 10. SCROLL UP-DOWN/SHIFT LEFT-RIGHT Button 3. Talk Button 11. Dir (Directory) Button 4. Volume Control (HI, MID, LOW) Switch 12. Headset Jack 5. TELEPHONE KEYPAD 13. #/Option Button Option 6. Temporary Tone (*) Button 7. Voice Mail/Func Button Voice Mail Func Scan Flash Re/Pa Edit Save Del 14. Re(Redial)/Pa(Pause)/ Save Button 15. Scan/Del (Delete) Button 16. Charge Contacts 8.
HANDSET Controls 3. Talk Button: Press to answer an incoming call or to place a call. Press to end a call. 4. HANDSET Volume Control (HI, MID, LOW) Switch: Select the receiver volume level (HI, MID, LOW). 5. TELEPHONE KEYPAD Buttons: Allows you to make a call depending on pressed button. (For TELEPHONE KEYPAD characters, see page 18.) 6. Temporary Tone (*) Button: Press to temporarily change the DIALING mode from PULSE to TONE for Rotary Service Users.
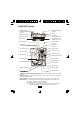
BASE UNIT Controls 14. TONE/PULSE SELECT SWITCH 1. ANNOUNCE ONLY INCOMING MESSAGE SELECT 15. RESET 2. MESSAGE ALERT 16. POWER-IN CONNECTION JACK 3. ON/OFF RINGER 9VDC 500mA 4. RING SELECT TS5R3R ON OFF RING SELECT RINGER ON OFF 17. TELEPHONE LINE CONNECTION JACK ICM ANNC TONE PULSE RESET MSSG ALERT SELECT TEL LINE 5. ERASE BUTTON 18. LED MESSAGE DISPLAY 6. OUTGOING MESSAGE BUTTON 19. BASE UNIT ANTENNA 7. SKIP BUTTON 20. PLAY BUTTON 21. STOP BUTTON 8. MB-1 BUTTON ERASE 9.
BASE UNIT Controls 5. ERASE BUTTON: Press to erase messages. 6. OUTGOING MESSAGES Button: Press and hold to record OGM messages. 7. SKIP Button: Press to skip messages. 8. MB-1 Button: Press to activate functions for mailbox 1 9. MB-2 Button: Press to activate functions for mailbox 2 10. HOUR Button: Press to set the hour during time setting, or press to set the seconds digit of the access code during coding setting. 11. CHARGE TERMINALS: For charging the HANDSET BATTERY PACK.
Getting Started Connecting Your Phone This section is a reference guide to the basic functions and operations of your cordless telephone. For more detailed descriptions of the operations and features of this telephone, refer to the Contents on page 1. 1. Carefully remove your cordless telephone from its shipping carton. If there is any visible damage, do not attempt to operate this equipment. Return it to the place of purchase. 2.
Getting Started 7. Install the HANDSET BATTERY PACK by plugging it into the BATTERY CONNECTOR inside the BATTERY COMPARTMENT. 8. Place the BATTERY PACK inside the BATTERY COMPARTMENT. BATTERY PACK 9. S l i d e t h e H A N D S E T B A T T E R Y COMPARTMENT COVER firmly into place in its closed position. 10. IMPORTANT: Before initial use, charge the HANDSET for 12 hours.
Cordless Telephone Operation Preparing for Use Before you can use your cordless telephone, you must charge the HANDSET for 12 hours. Failure to do so will require recharging of the BATTERY PACK more often. 1. Place the HANDSET on the BASE UNIT for 12 hours. 2. After 12 hours, remove the HANDSET from the BASE UNIT. Before you can use your cordless telephone, you must charge the HANDSET for 12 hours. Failure to do so will require more frequent charging of the BATTERY PACK.
Cordless Telephone Operation Placing Calls 1. Press the Talk button, the Call Timer starts to count. 2. Wait until you hear a dial tone and then dial the phone number. 3. When you have finished your call, press the Talk button again or place the HANDSET on the BASE UNIT. OR 1. Dial the phone number. 2. Press the Talk button. The number displayed will be dialed. 3. When you have finished with your call, press the Talk button again or place the HANDSET on the BASE UNIT. Redial Feature 1.
Cordless Telephone Operation Using the Headset Feature Your telephone can utilize a headset (included) to be connected to your HANDSET for you to enjoy hands-free communication. Insert the small plug on the end of the headset into the HEADSET JACK at the right side of the HANDSET. Follow the procedures discussed in “Receiving Calls” and Placing Calls” to receive and place a call. NOTE: When you plug the headset plug into the HEADSET JACK it automatically mutes the MICROPHONE and SPEAKER of the HANDSET.
Caller ID System Operation Caller ID System This telephone automatically displays an incoming caller’s name and telephone number together with the date and time of the call. It records up to 80 calls and stores the data in Memory. IMPORTANT: You must subscribe to the Caller ID service from your local telephone company to utilize this feature. Viewing Caller Information During Incoming Calls 1.
Caller ID System Operation Caller ID with Call Waiting When you subscribe to Call Waiting service from your local telephone company, this telephone will display the name and number of the second caller while you are having a conversation with the first caller. When a new call comes in while you are talking, you will hear a notification beep from the HANDSET and the volume is momentarily muted. The new caller’s name and phone number, if available, appears on the display.
Caller ID System Operation Caller List This phone automatically stores the last 80 calls received. It records call information such as caller’s name and telephone number together with the date and time of the call. The NEW CALL LED indicator will blink to indicate that you have a new Caller ID call stored in memory. Viewing the Caller List 1. With the HANDSET in STANDBY mode, press the SCROLL UP or DOWN button. 2. Any unviewed (new) calls will be displayed first. The most recent call will be displayed.
Caller ID System Operation 4. Press the Dir button to cancel dialing and return to STANDBY mode. 5. To end a call, either press the Talk button or place the HANDSET on the BASE UNIT. Storing Caller ID Records into the DIRECTORY (PHONE BOOK) 1. Press the SCROLL UP or DOWN store into the DIRECTORY (PHONE BOOK). 2. Press and hold the Re/Pa/Save button. 3. The display will show “SAVED.” button to find the record you wish to 4.
Caller ID System Operation Name and Telephone Number DIRECTORY (PHONE BOOK) This DIRECTORY (PHONE BOOK) lets you scroll through the list to find the person you need for one touch dialing. You can store up to 40 names and telephone numbers in the Memory. Viewing the DIRECTORY (PHONE BOOK) 1. Press the Dir button. 2. Press the TELEPHONE KEYPAD 2/ABC to 9/WXY button that corresponds to the first letter of a Caller’s name (a triple “beep” will sound if no entries are stored under those letters).
Caller ID System Operation Telephone Keypad Characters The TELEPHONE KEYPAD buttons are used to enter characters when entering names and numbers. Press the appropriate TELEPHONE KEYPAD button to get the following characters. You can store a maximum of 18 characters on the letter icon and a maximum of 22 digits on the number icon. Keypad Buttons 1st 2nd 3rd 4th 5th 6th 7th 8th 9th Press Press Press Press Press Press Press Press Press 1 Space 1 & ‘ ( ) .
Caller ID System Operation Placing Calls from the DIRECTORY (PHONE BOOK) 1. Press the Dir button. 2. Press the SCROLL UP or DOWN button to find the record you want to call. OR Press a TELEPHONE KEYPAD (2/ABC to 9/WXYZ) that corresponds to the first letter of a Caller’s name. Press the SCROLL UP or DOWN button to find the record you wish to call. 3. Press the #/Option button to change the displayed number to 7, 10, or 11 digits. The first dialing option displayed is the 11 digits for a long distance call.
Caller ID System Operation 5. When the entry is edited as you desire, press and hold the button to store the edited record. Re/Pa/Save Deleting a Stored Number in the DIRECTORY (PHONE BOOK) 1. Press the Dir button. 2. Press the SCROLL UP or DOWN button to find the record you wish to delete. 3. Press the Scan/Del button. The LCD screen will display “ERASE ITEM?” 4. To delete the record, press the Scan/Del button again. 5. Press the Dir button to return to STANDBY mode.
Caller ID System Operation Function Settings You can change the setting on the HANDSET in the functions menu. Access the functions menu by pressing and holding the Voice Mail/Func button. There are 11 settings in the functions menu which can be changed. You can scroll through the function menu in the listed order by pressing the SCROLL DOWN button. Settings can be accessed by pressing the corresponding TELEPHONE KEYPAD button.
Caller ID System Operation TELEPHONE KEYPAD Function 9 Voice Mail: Programs the one-touch number that enables easy access to the voice mail service provided by your telephone company. 0 MSG Waiting Delete: Clears current message waiting indication. * Area Code: This unit does not require any programming of an Area Code. However, this option could be used to add the local Area Code to numbers that were stored as 7-digits in the phone book and 10-digit dialing is required in the local calling area.
Caller ID System Operation 6. Continue with programming or press the STANDBY mode. Voice Mail/Func button to return to C. Turning the FIRST RING ON or OFF 1. Press and hold the Voice Mail/Func button to enter the menu. 2. Press the 3 button to go to the FIRST RING programming option. 3. Press the Flash/Edit button to change the setting. “On” will begin flashing. 4. Press the SCROLL UP or DOWN button to toggle between ON and OFF.. 5.
Caller ID System Operation E. Adjusting the Contrast 1. Press and hold the Voice Mail/Func button to enter the menu. 2. Press the 5 button to go to the CONTRAST programming option. 3. Press the Flash/Edit button to change the setting. “4” will begin flashing. 4. Press the SCROLL UP or DOWN button to toggle from 1 to 8 levels of contrast. 5. When the desired setting is displayed, press and hold the Re/Pa/Save button to save the setting. A long “beep” will sound to confirm the setting has been saved. 6.
Caller ID System Operation 5. When the desired setting is displayed, press and hold the Re/Pa/Save button to save the setting. A long “beep” will sound to confirm the setting has been saved. 6. Continue with programming or press the Voice Mail/Func button to return to STANDBY mode. NOTE: The standard and default flash time setting is 600 msec. This is the setting you should use to access standard telephone services such as call waiting. This setting is adjustable to allow for PBX and other special uses. H.
Caller ID System Operation J. Deleting Message Waiting Indication 1. Press and hold the Voice Mail/Func button to enter the menu. 2. Press the 0 button to go to the MESSAGE WAITING programming option. 3. Press the Flash/Edit button to reset the Message Waiting Indication. “DEL” will begin flashing. 4. Press and hold the Re/Pa/Save button to delete the indication. A long “beep” will sound to confirm the setting has been saved. 5.
Answering System Operation IMPORTANT: To ensure the proper operation of your Answering System: 1. Plug the AC ADAPTOR into the POWER-IN CONNECTION JACK. 2. Press the RESET button at the back of the BASE UNIT before initial use. Setting the Day/Time Stamp Press and hold down the SET button until you hear the announcement “Time is off, please enter new time.” Then, enter the current day and time. 1. ERASE In Use Ans On/Off Chg PLAY STOP OGM ON/OFF SKIP 2.
Answering System Operation A. Recording your OGM in the PRIMARY MAILBOX 1. Press and hold down the OGM button to record your message. 2. Begin speaking immediately after you hear, “Please record your announcement after the beep.” Continue to depress the OGM button. One second after completing your OGM, release the OGM button and the Answering System will announce, “End of Recording.” Your recorded message will be played back for your approval.
Answering System Operation B. Recording your OGM for Individual MAILBOX 1, 2, 3 or 4 1. Press a mailbox button, the corresponding MAILBOX LED indicator will blink. 2. Press and hold down the OGM button to record your message. 3. Begin speaking immediately after you hear, “Please record your announcement after the beep.” Continue to depress the OGM button. One second after completing your OGM, release the OGM button. The Answering System will announce, “End of Recording.
Answering System Operation NOTE: ICMs are limited to a maximum of 2 minutes. If the ICM is more than 2 minutes, the system “beeps” and hangs up; or if the Answering System’s MEMORY runs out, the Answering System announces, “Memory full” and hangs up. Setting to Announce Only During ANNC (Announce) mode, your system answers incoming calls with your recorded ANNC but will not record any ICMs. 1. Set the ANNC/ICM select switch to ANNC. The LED Message Display shows “Ao.” 2.
Answering System Operation Recording a Memo A. To record a Memo in the PRIMARY MAILBOX 1. Press and hold down the MEMO button to record your Memo. 2. Begin speaking immediately after you hear, “Please record your message after the beep.” Continue to depress the MEMO button. One second after completing your Memo, release the MEMO button and you will hear, “End of recording.” Day and time are automatically stamped at the end of the message.
Answering System Operation C. To interrupt a message. 1. Press the STOP button to end the playing of message. The Answering System will announce, “End of messages.” D. To repeat a message/memo. 1. Press the RPT button while playing a message. The Answering System repeats the current message in its entirety. E. To skip message/memo. 1. Press the SKIP button once. The Answering System stops playing, moves to the next message/memo and resumes playback.
Answering System Operation C. To erase selected messages/memos 1. While the unwanted message is playing, press the ERS button. The Answering System announces erasure of the selected message/memo. After the erasure is complete, the numeric order of the remaining messages will be rearranged. When the Memory is Full When there is no memory available for additional messages, the Answering System will announce, “Memory full,” but will not save messages.
Answering System Operation NOTE: If the RESET button is pressed, the Remote Access Codes return to the factory preset codes. Changing of the Remote Access Codes All of the digits of the Remote Access Codes are a combination of numbers 5, 6, 7, 8, 9, 0. IMPORTANT: Digits 1, 2, 3, and 4 cannot be used when changing the Remote Access Codes for any mailbox (including the PRIMARY MAILBOX). 1. Press a mailbox button for MAILBOX 1, 2, 3, or 4. For the PRIMARY MAILBOX, follow steps 2 to 6. 2.
Answering System Operation A. If you do not know the Instruction Code, press “*” button immediately. The Answering System will announce the Instruction Codes. Otherwise, if a command is not received by the Answering System within 10 seconds, it will automatically hang up. The following is the Remote Instruction Code Help Menu: Instruction Codes To playback Message press “2.” To repeat Message press “1.” To skip message press “3.” To stop press “8.” To playback announcement press “5.
Security System Security System Your cordless telephone uses a digital coding security system to prevent unauthorized use of your telephone line by another nearby cordless telephone. The system has its own identifying signal created by microcomputers in both the BASE UNIT and the HANDSET. Security Code This telephone has an internal security code with 65,536 possible combinations.
Recharging the BATTERY PACK Recharging the BATTERY PACK The nickel metal hydride (Ni-MH) BATTERY PACK in the HANDSET can be recharged many times using the built-in charger in the BASE UNIT. When the BATT LOW symbol appears on the LCD Screen, a “beep” sound will be heard every 12 seconds. This indicates that the BATTERY PACK needs to be recharged. Charge the BATTERY PACK at least once every 90 days of non-use to avoid battery failure.
Problem Solving Problem Solving Section For your assistance, we have listed below a few common problems. Phone does not work, check the following: 1. 2. 3. 4. BASE UNIT is plugged into a power source. HANDSET is charged. TONE/PULSE Select Switch is in the right position. TELEPHONE LINE CORD is plugged into the TELEPHONE JACK. Range of phone limited, check the following: 1. BASE UNIT is centrally located in your residence. 2. BASE UNIT is not located near appliances. No dial tone, check the following: 1.
Problem Solving If after pressing the Talk button, you receive three “beeps” and no dial tone, check the following: 1. BASE UNIT is plugged into a power source. 2. If you had a power failure or had unplugged the BASE UNIT, replace the HANDSET on the BASE UNIT for 2 to 5 seconds to reset the system. NOTE: If none of the telephones in the house are working, disconnect one set at a time to verify that none of the phones are causing the problem.
Technical Information Technical Information This cordless telephone uses radio frequencies to allow mobility. There are certain difficulties in using radio frequencies with a cordless telephone. While these are normal, the following could affect the operation of your system. Noise Electrical pulse noise is present in most homes at one time or another. This noise is most intense during electrical storms.
FCC Requirements FCC NOTICE The FCC requires that you be advised of certain requirements involving the use of this telephone. 1. This telephone is hearing aid compatible. 2. This equipment complies with Part 68 of the FCC Rules. A label on the BASE UNIT of this equipment contains, among other information, the ACTA Product Number and the Ringer Equivalence Number (REN) for this equipment. You must, upon request, provide this information to your telephone company. 3.
FCC Requirements RINGER EQUIVALENCE NUMBER NOTICE: The Ringer Equivalence Number (REN) assigned to each terminal device provides an indication of the maximum number of terminals allowed to be connected to a telephone interface. The termination on an interface may consist of any combination of devices subject only to the requirement that the sum of the ringer equivalence numbers af all devices does not exceed 5.
FCC Requirements NOTE: This equipment has been tested and found to comply with the limits for a class B digital device, pursuant to Part 15 of the FCC Rules. These limits are designed to provide reasonable protection against harmful interference in a residential installation. This equipment generates, uses, and can radiate radio frequency energy and, if not installed and used in accordance with the instructions, may cause harmful interference to radio communications.