CE CURTIS OWNER’S MANUAL goatskins Jesesansoged WEE TR NW 2.
Safety Instructions SAVE THESE INSTRUCTIONS A ‘When using your telephone equipment, basic safety precautions should always be followed to reduce the risk of fire, electric shock, and injury to persons, including the following: 1. Read and understand all instructions. 2. Follow all warnings and instructions marked on the product. 3. Unplug this product from the wall outlet before cleaning. Do not use liquid cleaners or aerosol cleaners. Use a damp cloth for cleaning. 4.
Safety Instructions D. If the product does not operate normally by following the operating instructions. Adjust only those controls that are covered by the operating instructions. Improper adjustments of other controls may result in damage and will often require extensive work by a qualified technician to restore the product to normal operation. E. If the product has been dropped or the cabinet has been damaged. F. If the product exhibits a distinctive change in performance. 13.
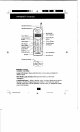
HANDSET Controls Handset Antenna Handset Receiver Message a LED Indicator TALK Button Volume Control ,— FRANCISCAN Button Button Cali Button | Option Button DIR Button = ga Redial/Pause Save Button JD Del Button Headset Jami : EE Flash/Edit Button = @ 4 Shift eft Burton ) Co) C3 shinrettButon 4 Buzzer ~~ Microphone Charge contacts [a] HANDSET Controls HANDSET ANTENNA Large LCD Screen: Shows call information, phone status, prompts and directory items.
HANDSET Controls TALK Button Press this button to place a call, answer a call, or end a call. OPTION Button — During you view the caller list, press to place a long distance call or to place a focal call. Calls Button ~ Press to see the caller list. DIR Button — Allows you fo retrieve a memory (name and phone number} from the personal directory {up to 40 memories} SAVE Button — Saves the changes on the listed items.
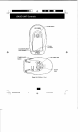
| + Ll BASE UNIT Controls PAGE Button Charge Contacts IN USE/CHARGE + LED Indicator+ TONE/PULSE TEL LINE Jack Switch DC sv Jack Base Unit (Bottom View) —1 [.
BASE UNIT Controls TELEPHONE LINE CONNECTION JACK POWER-IN CONNECTION JACK TONE/PULSE Select Switch IN USE/CHARGE LED Indicator: (IN USE) Lights up to indicate that the HANDSET is in TALK mode. (CHARGE) Lights up when the HANDSET is placed on the BASE UNIT for charging. PAGE Button: Press to page the HANDSET. CHARGE TERMINALS: For charging the HANDSET BATTERY PACK. For best performance, clean the CHARGE TERMINALS periodically with a damp cloth.
Getting Started Connecting Your Phone This section is a reference guide to the basic functions and operations of your cordless telephone. For more detailed descriptions of the operations and features of this telephone, refer ta the Contents on page 1. 1. Carefully remove your cordless telephone from its shipping carton. If there is any visible damage, do not attempt to operate this equipment. Return it to the place of purchase. 2.
Getting Started 1 AC ADAPTER PLUG DG 9V JACK AC OUTLET 7. BATTERY INSTALLATION (HANDSET) Remove the battery compartment cover of the handset by pressing the top of 4 the cover and sliding it down. 7 Bae a Connect the rechargeable battery 8. TONE/PULSE Select Switch: b A If your home is equipped with a tone dialing system, set the TONE/PULSE Select Switch to the TONE position. B. If you have a rotary dialing system, set the TONE/PULSE Select Switch to PULSE position. COMPARTMENT C.
Getting Started Press the (TALK button to confirm that you have a dial tone, If you do not get a dial tone, review steps 3 through 11. If you still do not have @ dial tone, refer to the Problem Solving section on pages 31 and 32 BELT CLIP HOOK With the back of the HANDSET facing up, insert one side of the BELT CLIP HOOK into the matching slot at the top side of the HANDSET. Press cow on the opposite side of the 4 BELT CLIP until the other hook locks into the slot on the side of the HANDSET. 9.
mm EN Desk Mounting Desk Mounting One of the special features of your telephone is the intrigue design of the MOUNTING BRACKET which can hold your phone at an angle of 30° when desk mounting. There are two positions to choose from: 1. NORMAL POSITION (MOUNTING BRACKET not reacquire: For normal position, as shown in Figure 1, place th: BASE UNIT on any desired but suitable location. Figure 1 2.
Wall Mounting Wall Mounting You may chaise to put the BASE UNIT of your cordless telephone on a wall. 1. With the back of the BASE UNIT facing up, nectarine the SHORT TELEPHONE LINE CORD to the TELEPHONE LINE CONNECTION JACK, 2. Insert the free end of the SHORT TELEPHONE 3 LINE CORD through the hole of the MOUNTING BRACKET, 3. Insert the hooks of the MOUNTING BRACKET {following the arrow direction for the WALL MOUNT) into the matching slots o: the BASE UNIT (as shown below).
Cordless Telephone Operation ! Preparing for Use Before you can use your cordless telephone, you mu: st charge the HANDSET for 12 hours. Failure to do so will require recharging « f the BATTERY more often. 1. Place the HANDSET on the BASE UNIT for 1 hours. 2. After 12 hoers, remove the HANDSET from 1 BASE UNIT, Before you can use your cordless telephone, y+ must charge the HANDSET for 12 hours.
Placing Calls 1. Press the QED button, the Call Timer st IN USE LED indicator will it up. 2. Listen for a dial tone. 3. Dial the phone number. 4. When you have finished your call, press th the HANDSET on the BASE UNIT. The B.. indicator will turn off. Using the Headset Feature Your telephone can utilize a headset (not included) to be connected to your HANDSET for you to enjoy hands-free communication Insert the small plug at the end of the headset info the HEADSET JACK at the right side of the HANDSET.
Nn TCI70 MANUALS. 143.85 7 Cordless Telephone Operation; Redial Feature 1. If you get a busy tone, press the button or place the HANDSET on BASE UNIT to hang up. 2. Later, press the GES button again. . Listen for a dial phone. Press the button. This will automatically redial the last telephone number you called. 5. When you have finished with your call, press the button again or place the HANDSET on the BASE UNIT.
Problem Solving Section For your assistance, we have listed below a few common problems. Phone does not work, check the following: 1. BASE UNIT is plugged into power source 2. HANDSET is charged. 3. TONE/PULSE switch is in the right position 4. TELEPHONE LINE CORD is plugged into the telephone jack. No dial tone, check the following: 1. TELEPHONE LINE CORD plugs are connected to the TELEPHONE JACK and TELEPHONE LINE CONNECTION JACK. 2. BASE UNIT is plugged into power source. 3.