
User's Manual


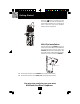

Getting Started
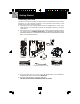
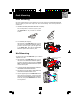
5. Insert one plug of the TELEPHONE LINE CORD into the house TELEPHONE JACK
and the other end into the TELEPHONE LINE CONNECTION JACK at the back of
the BASE UNIT. (If you have an older 4-prong TELEPHONE JACK, you will need an
RJ-11C TELEPHONE JACK ADAPTOR. This adaptor is available at the same place
you purchased your telephone.)
6. Raise or reposition the ANTENNA on the BASE UNIT for the best reception.
7. We recommend not placing this unit next to appliances. Doing so may cause
interference.
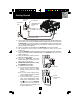
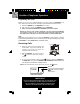
8. Install the HANDSET BATTERY PACK by plugging it into the BATTERY CONNEC-
TOR inside the BATTERY COMPARTMENT. The HANDSET LCD Screen will
display “RING:HI.”
9. Place the BATTERY PACK inside the
BATTERY COMPARTMENT.
10. Slide the HANDSET BATTERY
COMPARTMENT COVER firmly into
place in its closed position.
11. IMPORTANT: Before initial use, charge
the HANDSET for 12 hours.
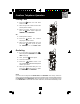
12. TONE/PULSE Select Switch:
A. If your home is equipped with a tone
dialing system, set the TONE/
PULSE Select Switch to the TONE
position.
B. If you have a rotary dialing system,
set the TONE/PULSE Select Switch
to the PULSE position.
C. If you are unsure which system you
have, set the TONE/PULSE Select
Switch to the TONE position. Press
the button on the HANDSET
and make a call. If the call connects,
leave the switch as is; otherwise set
to the PULSE position.
8
AC ADAPTER
TELEPHONE LINE CORD
TELEPHONE
JACK
120V WALL
OUTLET
POWER-IN
CONNECTION JACK
TELEPHONE LINE
CONNECTION
JACK
BATTERY PACK
BATTERY
COMPARTMENT
COVER