
Instruction Manual
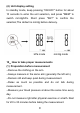

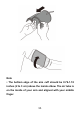
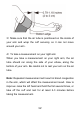
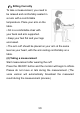
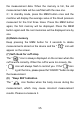
Table Of Contents
- 1、Unpacking Inspection
- 2、Packing List
- 3、Safety Precautions
- 4、Product Composition
- 5、Intended for Use
- 6、Classification of BP (Blood Pressure)
- 7、Product Parts
- 8、Preparation
- 9、Function Setting
- 10、How to take proper measurements
- ( 2 ) Attaching the arm cuff
- 1)Plug the arm cuff into your monitor by inserting t
- 2)Place your hand through the cuff loop. Pull the cu
- Note
- • The bottom edge of the arm cuff should be 0.79-1
- 3)Make sure that the air tube is positioned on the i
- 4)To take a measurement on your right arm
- When you take a measurement on your right arm, the
- (4) Taking a measurement
- (5) Memory function
- 11、Contraindications, Precautions, Warnings
- • DO NOT use this monitor on infants, toddlers, ch
- • DO NOT adjust medication based on readings from
- • DO NOT use this monitor on an injured arm or an
- • DO NOT apply the arm cuff on your arm while on a
- • DO NOT use this monitor in areas containing high
- • DO NOT use this monitor in oxygen rich environme
- • Consult with your physician before using this mo
- arterial sclerosis; poor perfusion; diabetes; preg
- • NEVER diagnose or treat yourself based on your r
- • To help avoid strangulation, keep the air tube a
- • This product contains small parts that may cause
- Stop using this monitor and consult with your phys
- • Consult with your physician before using this mo
- • Consult with your physician before using this mo
- • Consult with your physician before using this mo
- • DO NOT take measurements more often than necessa
- • ONLY inflate the arm cuff when it is applied on
- • Remove the arm cuff if it does not start deflati
- • DO NOT use this monitor for any purpose other th
- • During measurement, make sure that no mobile dev
- • DO NOT disassemble or attempt to repair this mon
- • DO NOT use in a location where there is moisture
- • DO NOT use this monitor in a moving vehicle such
- • DO NOT drop or subject this monitor to strong sh
- • DO NOT use this monitor in places with high or l
- 12、Common Q & A on Blood Pressure
- 13、Abnormal Phenomena and Handling
- 14、Maintenance
- 15、Product Specification

9
(4) Unit display setting
In standby mode, keep pressing "ON/OFF" button for about
10 seconds to enter the unit selection, and press "MEM" to
switch mmHg/kPa. Short press "SET" to confirm the
selection;The default is mmHg before delivery.
kPa mode mmHg mode
10、How to take proper measurements
(1) Preparation before measurement
--Remove the clothing on the arm.
--Always measure in the same arm (generally the left arm).
--Remain still and keep quiet during measurement.
--Relax as much as possible and do not talk during
measurement.
--Measure your blood pressure at about the same time every
day.
--Do not measure right after physical exercise or a bath. Rest
for 20 to 30 minutes before taking the measurement.