
User Manual


8.Start the engine and check that the machine is installed correctly.
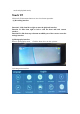
[Note] When the machine is installed correctly, the system work indicator lights
up; the machine starts into the recording state, and the video indicator lights
flicker. Please check whether the picture on the display screen is normal. If the
display screen is inverted, please contact us in time.
III. Function Profile
1. Use of automatic recording function
When starting the car engine, the recorder automatically starts and turns on the
recording function; when closing the car engine, the recorder automatically saves
the record content and shuts down the machine. Recorded image segments are
stored on TF card and the recorder will overwrite earlier recorded images when
TF card is full. The recorded time period can be set in the menu by itself, and the
range is 1 minute/3 minutes/5 minutes.
[Note] If you select any of "1/3/5" minutes, the recorder will overwrite earlier
recorded images when TF card is full;
The ordinary folder of front route is “front_norm”; the ordinary folder of back
route is “back_norm”
The locking folder of front route is “front_emr”; the locking folder of back route
is “back_emr”
The photography folder of front route is “back_photo”; the photography folder of
back route is “front_photo”
2. Use of manual recording function
Press the recorder [power key]. After the recorder starts, press OK key to start
the video recording. The video small dot flashes and shows the recording time.
To shut down, long press [power key] for 2 seconds, and the recorder can
automatically save the record and shut down.
3. Collision sensing function
This machine has a G-sensor inside. In case of a serious vehicle collision, the
recorder will lock the accident when this video is saved as a special image, while
the upper left corner of the display screen display lock icon. The locked image is
not covered by the loop.
[Reminder]
b. Collision sensor (G-sensor) supports sensitivity adjustment and can change the
settings in the setting menu according to actual needs.
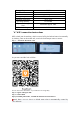
4. Date and time setting
In the video or standby state, the middle 1/3 part of the screen slides into the
setting interface or click the settings button to select the date settings. Adjust the
date and time by sliding up and down.