
User's Manual
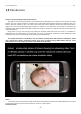


Table Of Contents
- 1.0 Introduction
- 2.2.3 Camera Live Menu Function Introduction
- 3.0 Wi-Fi Wireless
- 4.0 Remote Access Setup
- 5.0 Camera Settings
- 6.0 Troubleshooting
- 7.0 Installation Instruction
- 7.1 3G Solar Camera Install
- FCC STATEMENT :
- This device complies with Part 15 of the FCC Rules
- (1) This device may not cause harmful interference
- (2) This device must accept any interference recei
- Warning: Changes or modifications not expressly ap
- NOTE: This equipment has been tested and found to
- Reorient or relocate the receiving antenna.
- Increase the separation between the equipment and
- FCC Radiation Exposure Statement:
- This equipment complies with FCC radiation exposur

- 7 -
automatically, open CD-ROM Drive and double click on “Auto Run”.
Install “Camera Live” applications on your computer using “Install Software” option.
Click Finish to end the installation. You should now find a Camera live icon on your Desktop
2.2.2 Finding your Camera with Camera Live Utility
Now you have your camera attached and the software ready, you are ready to find your camera on your
network. Double-click the Camera Live icon on your Desktop to launch the Camera Live program.
The Camera Live utility should automatically find your camera if it is correctly connected (See image below).You
can use this program to set up cameras but we recommend that you use this program only to find your IP address. Then
do all setup by going directly to the camera using the IP address, either by double-clicking on the address or by typing
the number into your browser(with http:// in front)
If no camera is found it could be that your Antivirus or Firewall program is blocking the “Camera Live” program. In