
User's Manual

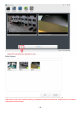


Table Of Contents
- 1.0 Introduction
- 2.2.3 Camera Live Menu Function Introduction
- 3.0 Wi-Fi Wireless
- 4.0 Remote Access Setup
- 5.0 Camera Settings
- 6.0 Troubleshooting
- 7.0 Installation Instruction
- 7.1 3G Solar Camera Install
- FCC STATEMENT :
- This device complies with Part 15 of the FCC Rules
- (1) This device may not cause harmful interference
- (2) This device must accept any interference recei
- Warning: Changes or modifications not expressly ap
- NOTE: This equipment has been tested and found to
- Reorient or relocate the receiving antenna.
- Increase the separation between the equipment and
- FCC Radiation Exposure Statement:
- This equipment complies with FCC radiation exposur

- 18 -
1) napshot: Press the Snapshot button to
capture a still image of the camera view,
these will automatically be saved to the My
Documents/ Pictures folder.
2) Video Clip: Press the video record
button to enable video recording to your
local computer. Once finished press the
button again to stop recording. The video
clip will be saved by default to the Videos
directory.
3) Settings: The Settings button allows you
to set the location where the snapshot and
the video clips will be saved.
4) S
1) Zoom: Click on the “+” button and
the cursor turns to a magnifier. Move
the magnifier to the desired location
and click on an image area.
2) Zoom Out: Press the
“-“button to return to the normal
view.
3) Full screen: Press the button to
enable full screen (this functionality
is available on
HD 720P and HD 1080P
models)
1)Mute: Click the Mute button to silence
the audio stream from the camera.
1) Volume: Slide the slide block
horizontally to adjust volume.