
User's Manual


8
INSTALLATION
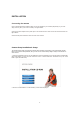
Connecting the camera
Using a standard Ethernet network cable, connect the camera to your network (depending on your own
setup, this may be to your router or switch). see figure below
Connect the power adapter to the power port on the camera and the other end into an electrical socket. see
figure below
Check that the power indicator is lit on the front of the camera.
Camera Setup Installation & Usage
The camera Setup utility can easily and quickly detect cameras connected to your local network and list
them on the Camera Setup window, also you can use the camera Setup utility to assign an IP address to
each camera.
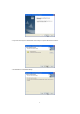
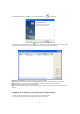
1. Insert the Installation CD into your CD-ROM drive and the installation screen should appear automatically
(See image below). If it does not, click “Start” then “Run”. In the text field enter “D:\autorun.exe” (if “D:” is the
letter of your CD-ROM Drive)
2. Click on “Install Software” and the following screen will be displayed.