
User's Manual


10
5. Click Finish to end the installation. You should now find a icon
on the desktop.
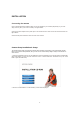
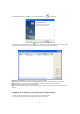
6. Double-click the Camera Setup icon on the Desktop to launch the program. The Camera Setup
utility should automatically find your camera if is correctly connected (See image below).
[Refresh] Click Refresh to search for cameras on the local network.
[Setup] Select the required camera and click Setup to configure the network settings for the camera.
[Open] Select the required camera and click Open to access the camera via a web browser.
[Exit] Click Exit to exit the Camera Setup window.
Note: Select and double click one of the cameras from the Device list, to open the camera view via the web
browser.
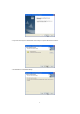
Assigning an IP address to the Camera with Camera Setup
1. Launch Camera Setup program to detect cameras on the local network.
2. Click on “Setup” button and the following setup interface will pop up.