
User's Manual


7
aee.com
7
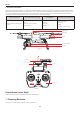
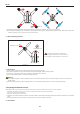
1.3 Quadcopter Battery Installation
Push the battery into the battery compartment in the correct direction (Figure 7). After the battery is properly installed, a “click” sound will be heard, indicating that the
battery has been fastened�
Figure 7
1.4 Caution
(1) Do not directly pull out the battery when the Quadcopter is switched on as it may damage the power supply connector�
(2) For long term storage, discharge the battery to 40%-50% power, and store in a specied battery box. Discharge/charge the battery once every three months to
maintain battery life�
(3) Replace the battery after it has been discharged over 300 times� Completely discharge a battery prior to disposal�
(4) Replace the battery if your current battery swells up or is damaged in any way, to avoid re and explosion.
(5) Do not charge expanded or damaged batteries�
(6) Please pay attention to the battery charging process in order to avoid accidents, and make sure there are no ammable or combustible materials around the
battery and the charger�
(7) Battery safety is extremely important� Please refer to Disclaimer for more precautions�
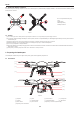
2 Preparing the Quadcopter
The Quadcopter consists mainly of the ight control system, gimbal, camera (optional) and power unit.
2.1 Introduction
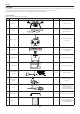
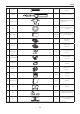
[ 1 ]
[ 2 ]
[ 3 ]
[ 4 ]
[ 7 ]
[ 5 ]
[ 6 ]
[ 8 ]
[ 9 ]
[11]
[10]
[12]
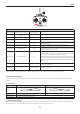
Figure 8
[ 1 ] Propeller [ 2 ] Motor [ 3 ] Front Indicator [ 4 ] Landing Gear
[ 5 ] Camera [ 6 ] 3-Axials Gimbal [ 7 ] Quadcopter Battery [ 8 ] Tail Indicator
[ 9 ] Power Switch [ 10 ] Rear Indicator [ 11 ] Battery Level LCD Segment Display
[ 12 ] Battery Level Check Button
An incorrectly installed battery may
cause
● Bad contact
● Affect ight safety
● Inability to take off.