
User's Manual


aee.com
26
3�2�1 Situations requiring recalibration
1) The accelerometer data are abnormal; the four arm lights blink fast�
2) The mechanical structure of the quadcopter changes�
3) The drift distance is signicant during ight.
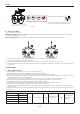
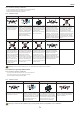
3�2�2 Calibration steps
1 2 3 4 5
S4
GPS
NRM
F M
Place the quadcopter on a
at and still ground; turn on
the remote control and the
quadcopter in sequence
After the quadcopter is normally
powered on, turn the S4 switch
on the remote control between
positions 1 and 3 for more than
5 times (i.e., 5 switch cycles);
the quadcopter tail light will
blink fast, and the quadcopter
will enter the calibration
standby mode(S4-->NRM)
Turn the joysticks of the remote
control to a lower toe-in shape
until the four arm lights go out,
and then return the joysticks to
the middle position�
Accelerometer command has
been sent successfully
When the four arm lights start
Remaining ON again, place
the quadcopter on the ground
upside down (in order to avoid
scratch of the housing, it is
suggested that sponge should
be applied)� Turn the joysticks
of the remote control to a lower
toe-in shape until the four arm
lights go out, and then return the
joysticks to the middle position
When the four arm lights start
Remaining ON again, lean the
four supports of the quadcopter
against a wall (with the nose
facing downward) to make it
perpendicular to the ground� Turn
the joysticks of the remote control
to a lower toe-in shape until the
four arm lights go out, and then
return the joysticks to the middle
position
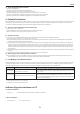
6 7 8 9
When the four arm lights
start Remaining ON again,
lean the four supports of the
quadcopter against a wall
(with the nose facing leftward)
to make it perpendicular to
the ground� Turn the joysticks
of the remote control to a
lower toe-in shape until the
four arm lights go out, and
then return the joysticks to
the middle position
When the four arm lights start
Remaining ON again, lean the
four supports of the quadcopter
against a wall (with the nose
facing upward) to make it
perpendicular to the ground�
Turn the joysticks of the remote
control to a lower toe-in shape
until the four arm lights go out,
and then return the joysticks to
the middle position
When the four arm lights start
Remaining ON again, lean the
four supports of the quadcopter
against a wall (with the nose
facing rightward) to make it
perpendicular to the ground�
Turn the joysticks of the remote
control to a lower toe-in shape
until the four arm lights go out,
and then return the joysticks to
the middle position
At last,If the four arm lights stop
blinking fast simultaneously,
it indicates the accelerometer
calibration is successful�
Otherwise, the accelerometer
should be recalibrated, if the
calibration is failed, the 3-Axials
gimbal will always shake which
should be specied here.
Warning:
In order to avoid accidental injury or loss, please remove the propellers prior to calibration.
3.3 Solutions for Gyroscope Abnormalities
3�3�1 Situations requiring recalibration
1) The gyroscope data are abnormal; the four arm lights blink fast�
2) The mechanical structure of the quadcopter changes�
3) The drift distance is signicant during ight.
3�2�2 Calibration steps
1 2 3 4
S4
GPS
NRM
F M
Place the quadcopter on a at and still
ground; turn on the remote control and
the quadcopter in sequence
After the quadcopter is normally
powered on, turn the S4 switch on the
remote control between positions 1 and
3 for more than 5 times (i.e., 5 cycles);
the quadcopter tail light will blink fast,
and the quadcopter will enter the
calibration standby mode
Turn the joysticks of the remote control
to an upper toe-out shape, wait until
the rear arm lights on the quadcopter
start blinking slowly, and then release
the joysticks� Gyro command has been
sent successfully� (Do not move the
quadcopter when it is calibrating)
At last,If the rear arm lights (red)
remain on, it indicates the calibration is
successful. Otherwise, the gyroscope
should be recalibrated�
Warning: In order to avoid accidental injury or loss, please remove the propellers prior to calibration.