
User's Manual


aee.com
14
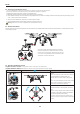
Vertical movements on the right joystick, controls the
quadcopter’s forward & backward pitch�
Push up to y forward and down to y backward.
The quadcopter will keep level and straight if the joystick
is centered�
Push the joystick further to increase pitch angle and
faster ight velocity.
Horizontal movements on the right joystick control left
and right pitch�
Push left to y left and right to y right.
The quadcopter will keep level and straight if the joystick
is centered
Push the joystick further to increase pitch angle and
faster ight velocity.
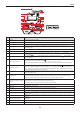
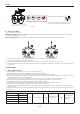
S2 S2S2 NULL
Position-1 Position-2 Position-3
The S2 switch is used for calibration of the joystick� Turn
S2 to position 3, then turn on the remote control, and at
this time the status indicator starts blinking (indicating
joysticks calibration starts)� Turn the left and right
joysticks clockwise and counter-clockwise respectively at
the maximum stroke for two circles, and then release the
joysticks� (ensure that the joysticks stay at the maximum
stroke throughout this process) Then, the status indicator
in the middle will go out. Last, turn S2 to position 1 , the
photo shooting & video recording indicator will light up
(green) . Now the calibration completes successfully.
S4:GPS S4:NRM S4:F M
Position-1 Position-2 Position-3
The S4 switch is used to switch the ight mode. Position
1 (GPS) is GPS mode; position 2 (NRM) is Normal mode;
position 3 is Follow Me mode
● In GPS mode, when all joysticks are in the neutral position, the quadcopter hovers at a xed-point.
● In Normal mode, when all joysticks are in the neutral position, the quadcopter remains level, but may drift in a horizontal direction.
● When S4 switch to GPS Mode, the motor can not be turned on until GPS is ready (the tail light remains on).
4.5 Frequency Pairing between Remote control and Receiver
The Remote control and receiver are paired before delivery. Normally, you can skip this procedure and directly use the quadcopter. However, if you change the
Remote control or Receiver, frequency-pairing is required.
Frequency Pairing Procedures
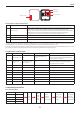
(1) Important: Be sure to remove propellers before pairing to avoid accidental injury�
(2) When the remote control is turned off, power on the quadcopter. Now the arm lights and the quadcopter tail light come on. When a "beep" sound is heard, turn
on the remote control; the remote control power indicator (red) will come on. When the "status indicator" on the remote control changes from red to blue, it
indicates pairing is successful�
(3) If the "status indicator" on the remote control does not change from red to blue (i.e. remains in red), repeat step (2) until the pairing is successful.
5 Preparing the Repeater
Quadcopter Wi-Fi Repeater is a wireless communication device that operates within the 2�4 GHz frequency band� It is used to extend the communication distance
between the mobile device and Quadcopter. Communication distance is affected by the surrounding environment, such as blockages due to trees, signal reection
by buildings, interference by other same frequency bands, etc., affecting ef
fective communication distance. Before every ight, ensure the Wi-Fi Repeater works
properly, otherwise communication issues between the mobile device and Quadcopter may occur.
5�1 Introduction