
User's Manual


aee.com
12
GPS
NRM
S1 S2 S3 S4
GPS
NRM
D
F M
S
E
NULL
[ 22 ]
[ 21 ]
[ 20 ]
[ 17 ]
[ 13 ]
[ 10 ]
[ 9 ]
[ 6 ]
[ 2 ]
[ 5 ]
[ 15 ]
[ 1 ]
[ 3 ]
[ 8 ]
[ 7 ]
[ 4 ]
[
11 ]
[ 12
]
[ 14
]
[ 16
]
[ 18
]
[ 19
]
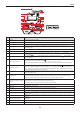
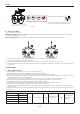
Figure 14
No. Description Specification Definition
1 Antenna Remote control signal transmission
2 Repeater For extending Wi-Fi signal reception range
3 Mobile device holder
For attaching mobile devices
4 Hook open/close button
Short press it once to open the hook on the quadcopter; press it again to close the hook (Remark: The hook is an
optional accessory)
5 Repeater base It is used to fix the repeater
6 Return button Long press it for 3s to send a go-home command to the quadcopter
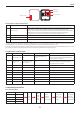
7 Speed switch S1
There are three speed modes; the speed decreases from up to down: 1. Sport mode
S
; 2. Drive mode ;3.
Economic mode ;
8
Calibration switch S2
It is a 3-channel switch. 1. (joystick calibration is OK); 2. NULL(Reserved function); 3. (start the joystick
calibration procedure)
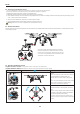
9 Gimbal control switch S3
Diagram of PTZ motion control switch positions
Lens turns upward (upper position)
Lens stops (middle position)
Lens turns downward (lower position)
When it is turned upward/downward, the lens direction changes slowly till the allowable maximum angle is reached
10 Flight mode switch S4
It is a 3-channel switch. 1.
GPS
: GPS mode; 2.
NRM
: NRM mode (normal mode); 3
F M
: Following mode
Remark: When the quadcopter is in the auto fly mode (auto return, low-battery auto landing), at the time when the
remote control signal is restored, switch between the GPS and NRM modes twice to end the auto fly mode and now
the remote control can regain control of the quadcopter
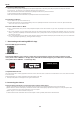
11 Remote control power indicator
Red, indicating the remote control power ON/OFF status (red light remains on when the power is turned on, and blinks
slowly in low-battery status)
12 Status indicator
Tri-color indicator
It can indicate the GPS signal status and flight mode of the quadcopter, and also the joystick calibration status.
Remark: For the sake of safety, the quadcopter should be turned off before joystick calibration
13
Photo shooting & video recording
indicator
Green light blinks slowly:Video recording.
Blinks once:When one photo is taken (single shot by Remote Control).
Green light remaining on: Indicates Remote Control starting up successfully.
14 Buzzer hole Warning tone
15 Strap hole Used to hang the remote control
16 Left joystick 2 channels;"up-down" channel controls gas, "left-right" channel controls yaw.
17 Right joystick 2 channels;"up-down" channel controls roll, "left-right" channel controls pitch
18 Airborne video recording button
Short press it to send command to the quadcopter to start video recording(
only to the AEE S61 camera mounted on
the quadcopter
)
19 Airborne photo shooting button
Short press it to send command to the quadcopter to take a photo(
only to the AEE S61 camera mounted on the
quadcopter
)
20 Video recording stop button
Short press it to send command to the quadcopter to stop video recording(
only to the AEE S61 camera mounted on the
quadcopter
)
21 Remote control power switch Slide it to the left position to power OFF the remote control; slide it to the right position to power ON the remote control
22 Battery compartment It is where the battery is installed