
User's Manual


11
aee.com
11
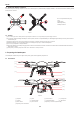
Figure 12
(1) Propellers are designed to self-tighten during ight; therefore do not tighten them excessively. Do not use glue on the threads.
(2) Ensure propellers are attached in the correct position. The quadcopter cannot y properly if the propellers are installed incorrectly. Wear protective gloves while
installing as propellers are very thin and may cause accidental scratches�
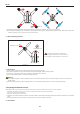
3.3 Disassembling Propellers
Auxiliary wrench
Figure 13
Unlock direction
3.4 Precautions
(1) Check whether propellers and motors are installed correctly and rmly before every ight.
(2) Ensure that all propellers are in good condition before each ight. Replace aged, chipped or broken propellers.
(3) To avoid injury, stand clear of and do not touch propellers or motors when they are spinning.
(4) Only use original AEE propellers for a better and safer ight experience.
Warning :
(1) When installing the propellers, rotate the propellers strictly in the lock direction specied by the mark, and DO NOT apply too much force in order to avoid
possible damage�
(2) When removing the propellers, rotate the propellers strictly in the unlock direction specied by the mark, in order to avoid possible damage.
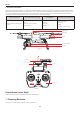
4 Preparing the Remote control
Quadcopter
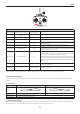
Remote control is paired with the Quadcopter receiver before delivery� The Remote control is set to U�S� mode by default�
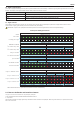
- Control Mode: The Remote control is set to U�S� mode or Japanese mode based on joystick channel mapping�
- U�S� mode: The left joystick controls throttle�
- Japan mode: The right joystick controls throttle�
● Repeater mount is already installed on the Remote control before delivery. Please install the Smartphone Holder before installing a mobile device on the Remote
control�
● Over sized mobile devices (such as iPad) are not recommended as they cannot be installed on the holder.
4.1 Introduction
As shown as in the Figure 13, prevent motor
rotation by using the auxiliary wrench or your hand, then
remove propeller by turning towards the unlock direction�