
User's Manual


- 3 -
download new map data, the user can rst enter Google Satellite Map. After it is conrmed that Google
Satellite can download new maps, enter Google Earth again to download new maps. If this problem
still exists, please contact our Customer Service Department.
* When the remote control is used to control the aircraft, please make sure that the option of “Send
joystick data” in the ground station software is NOT checked before take-off; when the ground station
joystick is used to control the aircraft, please make sure that the remote control is in the OFF state
before take-off.
* In order to avoid accidental damage of map files, please timely back up the map data after
downloading.
* Please disable the function of auto clearing Internet Explorer in different types of antivirus software to
prevent the map data from being deleted by mistake.
* For outdoor use, it is suggested to carry a 3G network card in case of absence of map in the existing
map data or backup data.
* For the sake of safety of your life and property, please use the product strictly in accordance with this
User’s Manual, and do not carry out improper operations.
Notice: Please strictly comply with the above safety precautions; any consequence resulted from
incompliance shall be on your own account.
Charging
This product is equipped with a professional intelligent balance charger with built-in high-performance
microprocessor and professional control software. This charger can realize simultaneous charging of four
different sets of batteries.
Use a Battery Indicator to Detect the Battery Level
Prior to take-off, please rst check the battery level of each device; in case of low battery level, charging
is required.
Use a battery indicator to detect the battery level. When the battery voltage of the aircraft is below 14.8V,
please charge the battery (the ight time will be shortened when the voltage is lower than 16.8V); when
the battery voltage of the remote control is below 11.1V, please charge the battery.
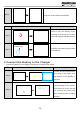
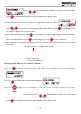
Connect the battery indicator to the battery in the direction shown below.
1
2
3
4
5
6
1
2
3
4
5
6
Black wire
to “–”
Notice: The black wire should be connected to “– ” during connection.