
User's Manual

- 42 -
1) During outdoor ight, please make sure that the GPS signal strength indicator is no less than 6.
2) Check if the indications of the heading indicator and the attitude indicator are consistent with the
current status of the aircraft; in case of any inconsistence, please contact us immediately.
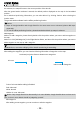
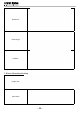
9 Display Track / Clear Track
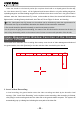
1) After starting the aircraft, click “Display Track” to display the real-time ight track of the aircraft during
its ying along the air route (Fig. 1); if “Display Track” is not clicked, the real-time ight track of the
aircraft will not be displayed (Fig. 2).
2) When “Clear Track” is clicked after track is displayed, the current real-time ight track of the aircraft will
be cleared (Fig. 2).
(Fig.1) (Fig.2)
10View Locking/Switching Function
After track display, the map interface will automatically enter the view locking state. If [Lock View] is
clicked, the view will be unlocked and you then can move the map. Click this button again to lock up
the view.
In the view locking mode, the map view will move as the aircraft position moves; in the view
unlocking mode, the map view has no change.
11 Auto Take-off
1) Before take-off, rst make sure the requirements on auto take-off are satised. See the instructions in
the section of “Safety Precautions” for details.
2) After using the ground station to manually start the aircraft, turn the manual/auto switch of the ground
station to the auto mode.
3) Click [Auto Take-off] on the toolbar; the aircraft will hover after ascending to an altitude of about 20m.
12 Auto Fly / Fly to the Designated Waypoint (Fly to)
1) Auto Fly
Click [Auto Fly], and the aircraft will automatically y along the preset air route; the aircraft will hover
after reaching the last waypoint.
2) Fly to the Designated Waypoint (Fly to)