
User Manual


aee.com
12
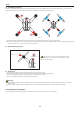
Vertical movements on the right joystick, controls the
quadcopter’s forward & backward pitch.
Push up to y forward and down to y backward.
The quadcopter will keep level and straight if the
joystick is centered.
Push the joystick further to increase pitch angle and
faster ight velocity.
Horizontal movements on the right joystick control left
and right pitch.
Push left to y left and right to y right.
The quadcopter will keep level and straight if the
joystick is centered
Push the joystick further to increase pitch angle and
faster ight velocity.
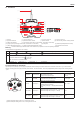
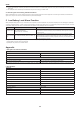
S2 S2S2
Position-1 Position-2 Position-3
S2 switch is used to calibrate joysticks position.
Toggle S2 to Position-3 , then power on the
Transmitter.
The photo capture status indicator (green) blinks. Then
move both joysticks clockwise and counterclockwise
twice, ensuring the joystick touches the maximum
positions.
After joystick calibration with the maximum stroke, the
status indicator in the middle will go out; nally, turn
S2 to position 1.
The Video Indicator lights up (green),
and calibration is completed.
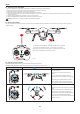
S4 S4S4
NULL
GPS
NRM
Position-1 Position-2 Position-3
S4 switch is the ight mode toggle switch.
Position 1 (GPS) is GPS mode, Position 2 (NRM) is
Normal mode, Position 3 (NULL) is Reserved function.
● In GPS mode, when all joysticks are in the neutral position, the quadcopter hovers at a xed-point.
● In Normal mode, when all joysticks are in the neutral position, the quadcopter remains level, but may drift in a horizontal direction.
● When S4 switch to GPS Mode, the motors can not be turned on until GPS is ready (Tail indicator remains on).
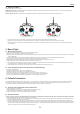
4.6 Frequency Pairing between Transmitter and Receiver
The Transmitter and receiver are paired before delivery. Normally, you can skip this procedure and directly use the quadcopter. However, if you change the
Transmitter or Receiver, frequency-pairing is required.
Frequency Pairing Procedures
(1) Important:Be sure to remove propellers before pairing to avoid accidental injury.
(2) First, power off the remote control, then power on the quadcopter. The front/rear indicators and tail indicator light up. When you hear a "beep" sound, power on
the remote control, the power indicator lights up. When photo shooting & video recording indicator(green) lights up, the link between the remote control and
quadcopter is successfully eatablished.
(3) If photo shooting & video recording indicator(green) doesn‘t light up, do the second step again.
Flight
After installation, please conduct ight training (for example: Flight simulator training or professional training). Ensure that all ights are carried out in a suitable
environment.
Flight Environment Requirements
(1) Do not use the quadcopter in severe weather conditions, such as strong winds (category 4 and above), snow, rain and fog.
(2) Fly in an open area without tall buildings. Presence of large number of steel buildings in the area will affect the onboard compass.
(3) Keep AP9 away from obstacles, people, power lines, trees, shelters, surface of the water, etc., during ight.
(4) Reduce the chance of electromagnetic interference by not ying in areas with high levels of electromagnetism (such as near mobile phone base stations or
towers).
(5) This product cannot be used in The Antarctic Circle and The Arctic Circle.
(6) Do not y the quadcopter within restricted or no-y zones, and abide by local laws or regulations.