Aerial Photography Equipment Professional·Advanced Unprecedented Technology User’s Manual Please read this Manual carefully before use, and keep it handy for future reference.
CONTENTS Statement ...................................................................................................................... 1 Product Introduction .................................................................................................... 1 Precautions for Use of Aerial Photography Equipment ........................................... 1 Precautions for Use of Airborne Camera ...................................................................
How to Use Wi-Fi ........................................................................................................ 18 Install App on Mobile Phone......................................................................................................... 18 Connect App ................................................................................................................................ 19 Instructions on How to Operate Wi-Fi Control Interface ....................................................
AEE Aerial Photography Equipment Professional·Advanced Statement The AEE aerial photography equipment is incorporated with multiple technologies to provide advanced functions. Improper use of this product will cause serious injuries. Therefore, we hereby make the following statements: 1. Never use this product for any and all illegal activities; or, Shenzhen AEE Aviation Technology Co., Ltd. shall assume no liability for any consequences resulting therefrom. 2.
AEE Aerial Photography Equipment Professional·Advanced * Do not use the aerial photography equipment in complex electromagnetic environments, because its communication will be affected in such environments, further resulting in abnormal Wi-Fi and remote control communications. * If a mobile phone is connected for image preview, do not answer any incoming calls whenever possible.
AEE Aerial Photography Equipment Professional·Advanced * Please stop using the device immediately when smoke or smelly gas comes out of the device. * When this device is used to shoot important scenes, please perform test shooting several times before actual shooting, to make sure the device is in normal working condition. Precautions for Use and Charging of Battery * Do not immerse the battery into water; store the battery in a dry and cool place if it will not be used for a long time.
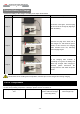
AEE Aerial Photography Equipment Professional·Advanced Connect Battery to Charger Connect the battery to the charger according to the steps shown below: Step Illustration Description Step 1: As shown in the figure, insert the plug at one end of the charger by aligning it with the battery. Step 2: Connect the plug at the other end of the charger to a 100~240V AC power outlet; at this moment, the charging state indicator turns red, indicating that charging begins.
AEE Aerial Photography Equipment Professional·Advanced Repeater adapter: 1pc Mobile phone stand: 1pc Repeater: 1pc Propeller guard: 4pcs Cross-head screwdriver: 1pc M3.0×10 screw: 16pcs Wrench: 1pc User’s Manual Battery of remote control: 4pcs (AA) Propeller blade (4pcs/set): 2 sets Long hexagonal screw: 1pc Notice: The accessories of actual products may vary slightly, and the above figures are for reference only.
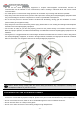
AEE Aerial Photography Equipment Professional·Advanced Propeller Motor Airborne camera Undercarriage Propeller guard Right front light (green) Left front light (green) TF card slot Right rear light (red) Left rear light (red) Tail light (red) Battery door Power switch Install Propellers There are two clockwise propellers and two counter-clockwise propellers. The propeller caps have two colors: black and silver.
AEE Aerial Photography Equipment Professional·Advanced Points for attention: (1) The propellers are designed with automatic tightening function; please do not over-tighten them during installation, and do not use screw adhesive. (2) Please make sure the propellers with black and silver caps are installed in right positions. (3) Since the propeller blades are thin, it is suggested that gloves should be worn during installation in order to avoid accidental injury.
AEE Aerial Photography Equipment Professional·Advanced Install Propeller Guards Please install the propeller guards according to the steps shown below: 1. Prepare AP10 aerial photography equipment (1 set), propeller guard (4pcs), M3.0×10 screw (8pcs), and cross-head screwdriver (1pc). 2. Use the screwdriver to remove the two screws (M3.0×6) on the motor, as shown in the ovals in the figure below. 3. Tighten the two screws (M3.
AEE Aerial Photography Equipment Professional·Advanced Turn on the power switch on the aerial photography equipment. At this moment, the 4 arm lights (two red lights, two green lights) are constantly on; the tail light (red) turns off 5~10s after turning on; meanwhile, the motors make “beep” sounds. Preparations before Take-off Before use of AP10, please first install the propellers. Check the entire equipment to see if it is complete and secure and if any screw is loosened.
AEE Aerial Photography Equipment Professional·Advanced Description of Buttons Name of button Description of function Slide switch S1 1. Up (OFF): non-lock normal flight; 2. Middle (CL): course lock; 3. Down (HL): home lock Slide switch S2 1. Up (OK): normal flight; 2. Middle (NULL): reserved; 3. Down (ADJ): enable joystick adjustment Slide switch S3 1.
AEE Aerial Photography Equipment Professional·Advanced Install the batteries in the remote control; slide the power switch rightwards to turn it ON; at this moment, the left power indicator (red) turns on, and the right recording indicator (blue) turns off 3s after turning on. Pairing of Aerial Photography Equipment The aerial photography equipment has undergone pairing before delivery, so it is unnecessary to carry out pairing again. If paring is indeed necessary, the steps below can be followed: 1.
AEE Aerial Photography Equipment Professional·Advanced The following figure shows the six planes that need to be calibrated: 2. Calibration of gyroscope: Place the aerial photography equipment on a horizontal plane, and keep it away from vibration sources; at this moment, the front lights (green) turn constantly on.
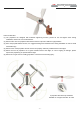
AEE Aerial Photography Equipment Professional·Advanced Turn the left joystick to the upper left corner Turn the right joystick to the upper right corner 3. Calibration of compass: Place the aerial photography equipment on a horizontal plane; at this moment, the rear lights (red) turn constantly on. Turn the joysticks to an upper toe-in shape (as shown in the figure) until the front lights (green) begin to flash, and then loosen the joysticks; the aerial photography equipment begins compass calibration.
AEE Aerial Photography Equipment Professional·Advanced “MC” position (manual fly control mode). 3. To switch the fly mode of the aerial photography equipment to GPS mode (if GPS satellite search is normal) when the flight in manual mode is normal, please first keep the equipment hovering, and then turn S4 to “AC” position for flight in GPS mode. Trial Flight 1.
AEE Aerial Photography Equipment Professional·Advanced moment, unlocking should be first carried out; turn the joysticks to a lower toe-out shape and loosen them after 3s.
AEE Aerial Photography Equipment Professional·Advanced 6. In the manual fly mode (MC), when the nose and tail of the aerial photography equipment cannot be discriminated because the equipment is beyond your sight, the slide switch S4 can be turned up to “AC”; then, the aerial photography equipment will stay in the auto hover state; if the remote control is turned off, the aerial photography equipment will automatically go back to the take-off position. 7.
AEE Aerial Photography Equipment Professional·Advanced Turn the left joystick forwards, and keep the right joystick in the original position. Turn the left joystick backwards, and keep the right joystick in the original position. Climb Upwards The motor speed and the propeller speed increase. The climbing speed increases with as the joystick turning angle increases. Rise Horizon Go downwards The motor speed and the propeller speed decrease.
AEE Aerial Photography Equipment Professional·Advanced position. Turn the right joystick backwards, and keep the left joystick in the original position. Turn the right joystick rightwards, and keep the left joystick in the original position. Turn the right joystick leftwards, and keep the left joystick in the original position. to realize horizontal flight of the aerial photography equipment.
AEE Aerial Photography Equipment Professional·Advanced 4. 5. 6. normal working status. Use a needle-like object to press the “RESET” button of the repeater until the WiFi signal indicator turns off; then loosen the “RESET” button. Wait for about 30s; then the WiFi signal indicator (blue) flashes (indicating the repeater has acquired the SSID and MAC address of the airborne DV), and the repeater enters the binding state; in case of unsuccessful pairing, repeat Step 3-5 until pairing is successful.
AEE Aerial Photography Equipment Professional·Advanced 4. Setting Click on the setting icon “ ” to change the parameters of recording setting, photographing setting and parameter setting. (1) Recording setting Click the “Resolution” option to set the desired video resolution: (PAL system) 1920×1080P 025f, 1280×0960P 048f/025f, 1280×0720P 050f/025f, 0848×0480P 100f/050f; (NTSC system) 1920×1080P 030f, 1280×0960P 048f/030f, 1280×0720P 060f/030f, 0848×0480P 120f/060f.
AEE Aerial Photography Equipment Professional·Advanced Usable duration: 3.4h Charging duration: <2h 1.4 Binding between the repeater and the airborne camera The repeater is a wireless communication device working at 2.4GHz frequency band, which is used to increase the effective communication distance between the mobile device and the aerial photography equipment. In an open field without interference, the effective communication distance can reach 300m or more.
AEE Aerial Photography Equipment Professional·Advanced photography equipment beep beep --- beep beep… continuous Level 1 alarm for low battery of the aerial photography equipment The arm lights flash slowly with beep sounds: beep --- beep --beep… continuous Alarm for low battery of the remote control Beep --- beep beep… continuous Remark: Upon Level 2 alarm for low battery of the aerial photography equipment, it will automatically land at the current position rather than go home.
AEE Aerial Photography Equipment Professional·Advanced started properly as required (2) Check the power battery of the aerial photography equipment to make sure the battery level is high enough. Protection Mechanism 1. During flying in the manual mode, when it is beyond the operating range, the aerial photography equipment will enter the protection mode, and automatically fly back to the take-off position and land. 2.
Patented Technologies National Hi-tech Enterprise Guangdong Famous Trademark Shenzhen Top Brand Popular in European, American and Asian Markets with Self-owned AEE Brand Please read this Manual carefully before use, and keep it handy for future reference.
AEE Aerial Photography Equipment Professional·Advanced Created in China Made in Shenzhen Add.: AEE Hi-Tech Park, Yangguang Industrial Area, Xili Town, Nanshan District, Shenzhen, P.R. China Tel.
FCC Information and Copyright This equipment has been tested and found to comply with the limits for a Class B digital device, pursuant to part 15 of the FCC Rules. These limits are designed to provide reasonable protection against harmful interference in a residential installation. This equipment generates, uses and can radiate radio frequency energy and, if not installed and used in accordance with the instructions, may cause harmful interference to radio communications.