
Installation Instructions
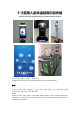

注意:此时不要连接网线、电源线等,避免安装麻烦。
Note: Do not connect the network cable, power cable, etc. At this time to avoid installation
trouble
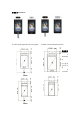
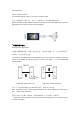
③在闸机下方,将线缆及线缆接口依次穿过垫片、螺母,将螺母对准螺纹拧紧,如图所示。
Under the gate, pass the cable and cable interface through the washer and nut in sequence, and
tighten the nut to the thread , as shown in the figure.
④连接电源、网线,屏幕画面启动。
Connect the power and network cable, and the screen will start
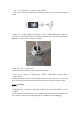
⑤双手扶住立柱,轻轻转动,可调节闸机角度,如图所示。根据识别界面,将闻机头调整至
合适的识别角度。
Hold the post with both hands and turn it gently to adjust the angle of the gate, as shown in the
figure. According to the recognition interface, adjust the gate to the proper recognition angle
桌面式
For Desktop
①需要将螺母取下,将尾线依次穿过不锈钢支架和螺母,用力拧紧调整好角度即可;适用于
方案调试。
The nut needs to be removed, the tail wire is passed through the stainless steel bracket and the
nut in sequence, and the angle is tightly tightened; it is suitable for program debugging.